VueCli源码分析
VueCli源码分析
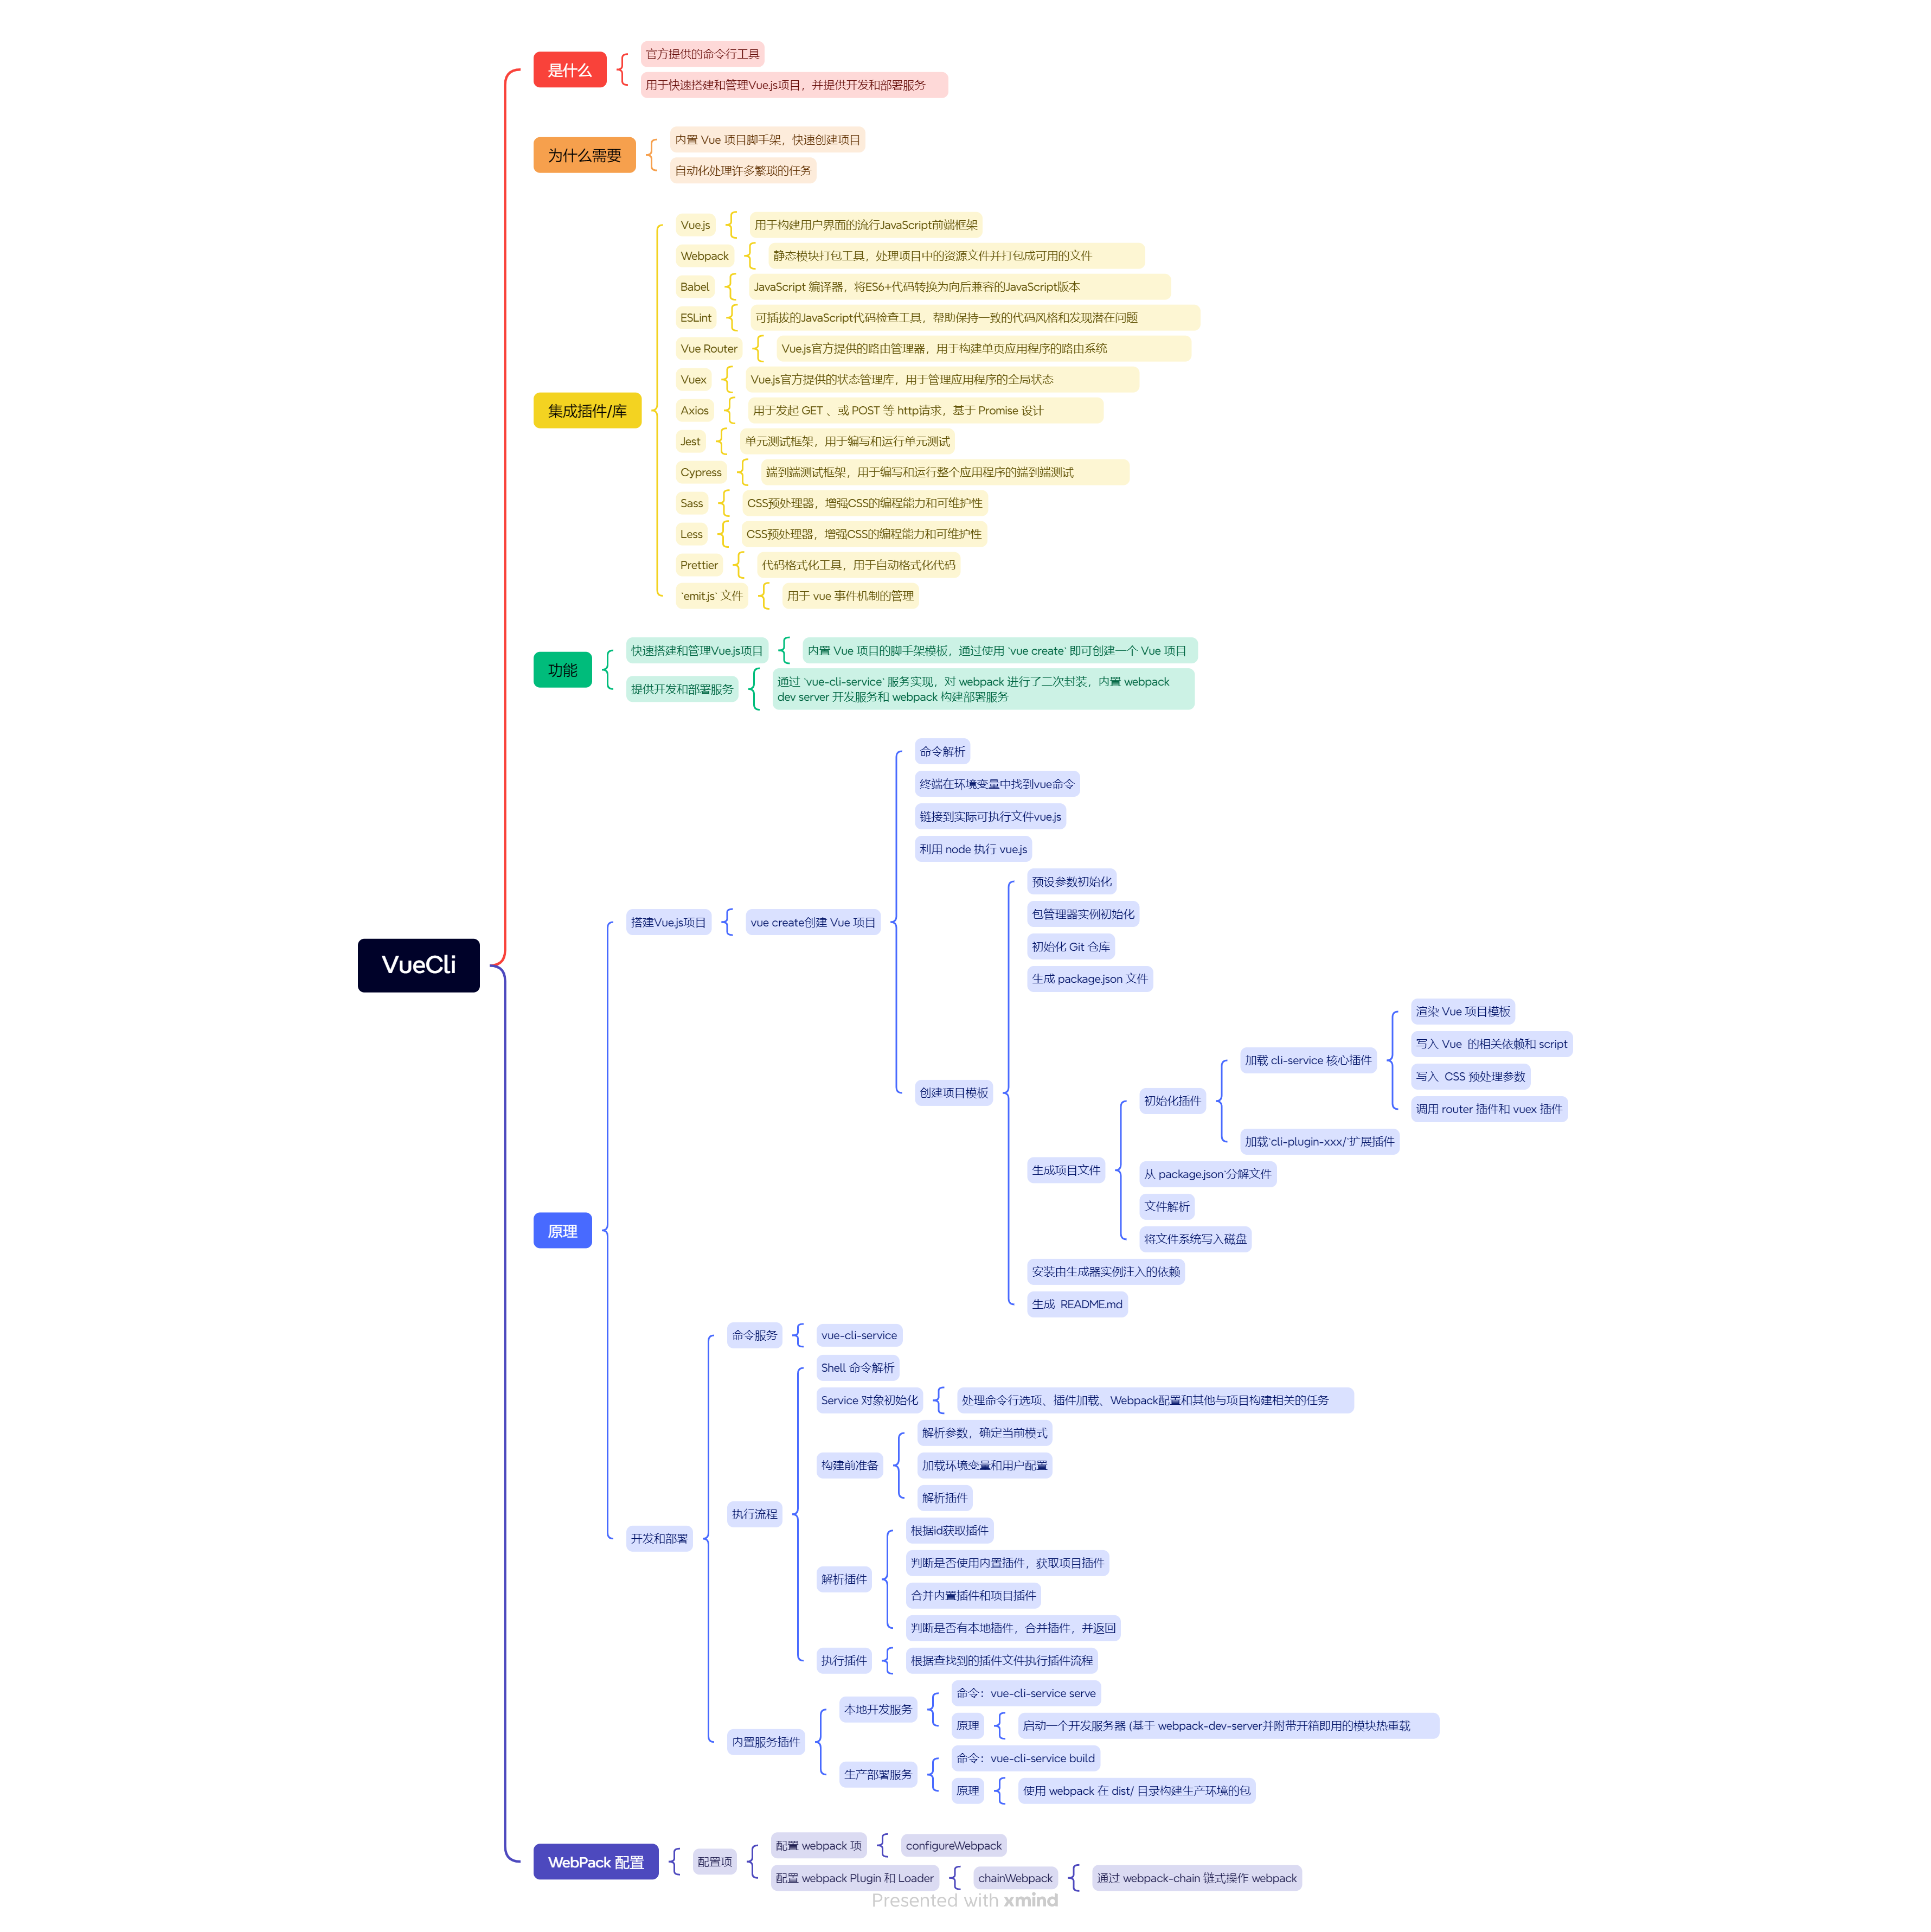
是什么
Vue CLI(Vue Command Line Interface)是一个官方提供的命令行工具,用于快速搭建和管理Vue.js项目。
它提供了一整套完整的开发解决方案,包括代码构建、热更新、代码分割、代码压缩、版本控制等功能,大大简化了Vue.js项目的开发过程。
为什么
在开发Vue.js项目时,如果没有一个统一的构建工具,开发人员需要手动配置各种工具和插件,这不仅浪费时间,还容易出错。
而Vue CLI作为官方的构建工具,提供了预先配置好的最佳实践,使得开发人员可以专注于编写业务逻辑,而不是花费大量时间在配置上。
Vue CLI还可以自动化处理许多繁琐的任务,如代码压缩、热更新等,从而提高开发效率。
Vue-cli 集成插件/库
| 技术 | 作用 |
|---|---|
| Vue.js | 用于构建用户界面的流行JavaScript前端框架 |
| Webpack | 静态模块打包工具,处理项目中的资源文件并打包成可用的文件 |
| Babel | JavaScript 编译器,将ES6+代码转换为向后兼容的JavaScript版本 |
| ESLint | 可插拔的JavaScript代码检查工具,帮助保持一致的代码风格和发现潜在问题 |
| Vue Router | Vue.js官方提供的路由管理器,用于构建单页应用程序的路由系统 |
| Vuex | Vue.js官方提供的状态管理库,用于管理应用程序的全局状态 |
| Axios | 用于发起 GET 、或 POST 等 http请求,基于 Promise 设计 |
| Jest | 单元测试框架,用于编写和运行单元测试 |
| Cypress | 端到端测试框架,用于编写和运行整个应用程序的端到端测试 |
| Sass | CSS预处理器,增强CSS的编程能力和可维护性 |
| Less | CSS预处理器,增强CSS的编程能力和可维护性 |
| Prettier | 代码格式化工具,用于自动格式化代码 |
| 代码分割 | 将代码拆分成多个小块,实现按需加载和提高应用程序性能 |
| 懒加载 | 延迟加载页面中的资源,提高应用程序的性能 |
emit.js 文件 | 用于 vue 事件机制的管理 |
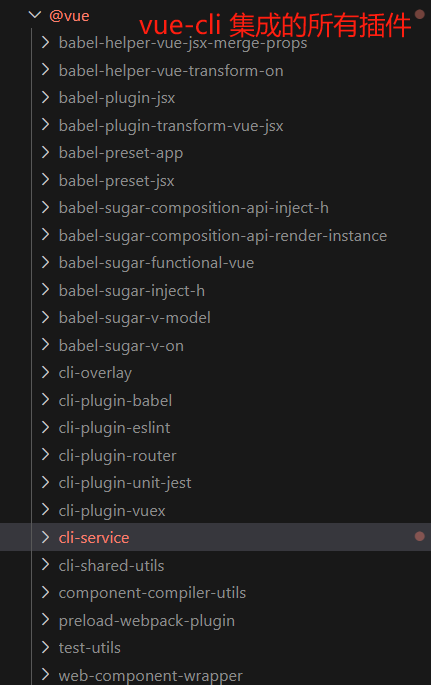
Vue-CLi 集成的所有内置插件位于 ./node_modules/@vue/目录下:
功能
Vue-Cli 主要有两个核心功能:
- 快速搭建和管理Vue.js项目:
vue-cli内置 Vue 项目的脚手架模板,通过使用vue create即可创建一个 Vue 项目; - 提供开发和部署服务:开发和部署解决方案通过
vue-cli-service服务实现,vue-cli-service服务对 webpack 进行了二次封装,内置 webpack dev server 开发服务和 webpack 构建部署服务。
下面将通过分析 创建 vue create 项目模板(项目脚手架)过程和 vue-cli-service 服务过程源码,来了解 vue-cli 的两大核心功能的实现。
创建项目过程分析
安装 Vue-Cli
可以使用下列任一命令安装这个新的包:
npm install -g @vue/cli
# OR
yarn global add @vue/cli
安装之后,你就可以在命令行中访问 vue 命令。
以上通过全局安装 vue-cli,默认情况下 windows 会安装到 C:\Users\{{YourUserName}}\AppData\Roaming\npm\node_modules\@vue\cli 目录中;
命令解析
运行以下命令来创建一个新项目:(详细参考官方文档:创建一个项目 | Vue CLI (vuejs.org))
vue create hello-world
vue create命令在 Windows 下的解析流程常在用户执行命令时自动进行:
- 命令行输入:当你在命令提示符(Command Prompt)或 PowerShell 中输入
vue create命令时,首先会检查系统环境变量中定义的全局安装包目录。- 环境变量查找:Windows 会检查系统的
PATH环境变量中列出的目录,寻找@vue/cli的可执行文件。在全局安装 npm 包时,通常会将包的 bin 目录添加到系统的 PATH 中。- 全局安装包目录:找到
@vue/cli的安装位置后,系统会在该目录下的bin子目录中查找名为vue的可执行文件。- 执行文件关联:一旦找到
vue可执行文件,系统会将其与vue create命令关联起来。这意味着当你输入vue create时,实际上是在执行这个可执行文件。- 命令执行:
vue可执行文件会接收到create命令及其后续参数(例如hello-world),并执行相应的操作。这通常涉及启动一个脚本来创建新的 Vue 项目。- 子进程调用:在某些情况下,
vue create命令可能会通过子进程调用其他工具或脚本,如yarn或npm,来安装项目的依赖项或执行其他初始化任务。- 输出与反馈:命令的执行结果(如成功创建项目或遇到错误)会显示在命令行界面上,为用户提供反馈。
当运行 vue create 命令时,默认会执行安装的 vue-cli 项目下的 /bin/vue.js 文件(以下是全局安装的 vue-cli 项目目录):
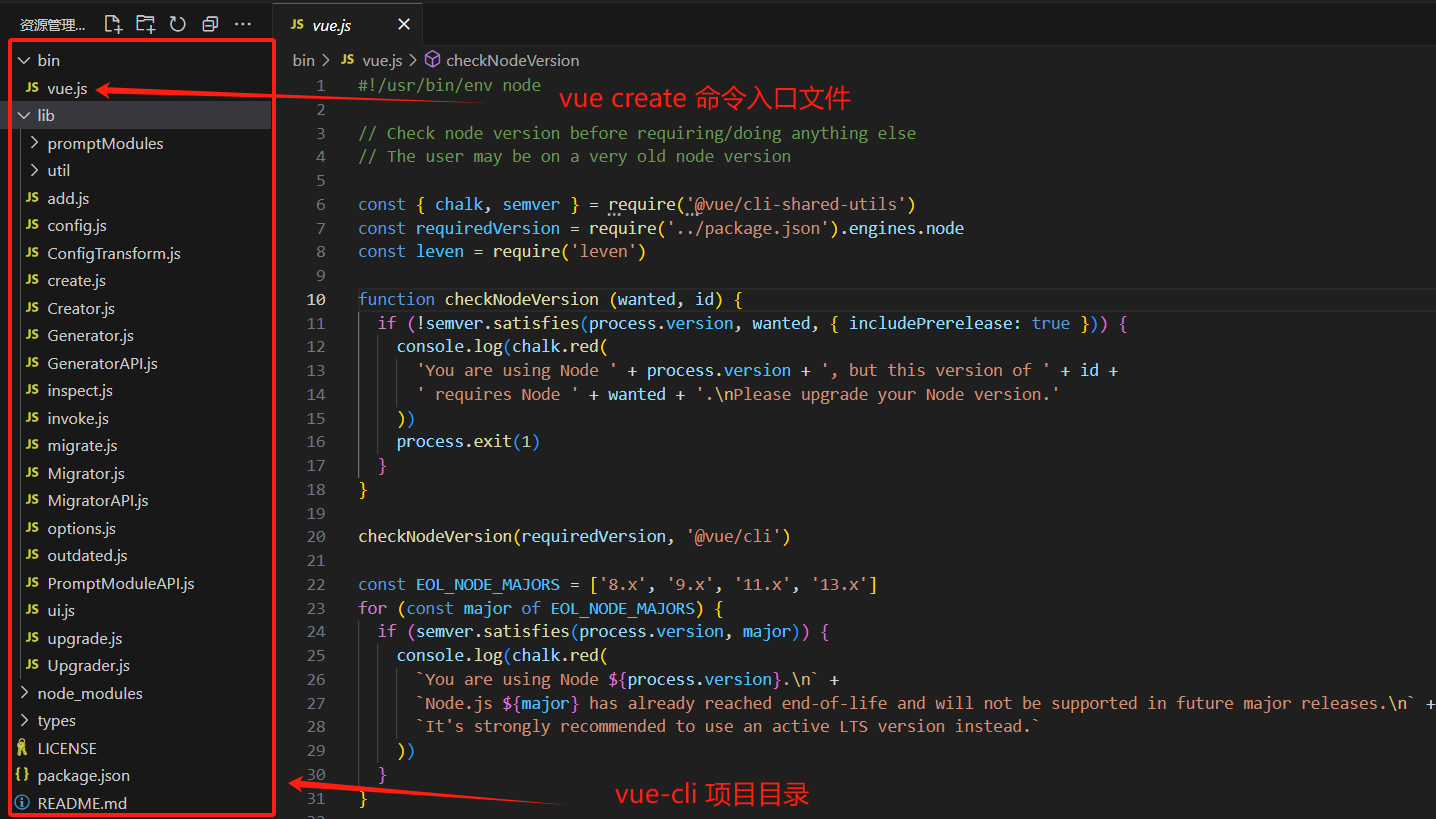
/bin/vue.js文件执行流程:
检查 Node.js 版本;
定义所有 vue 命令;
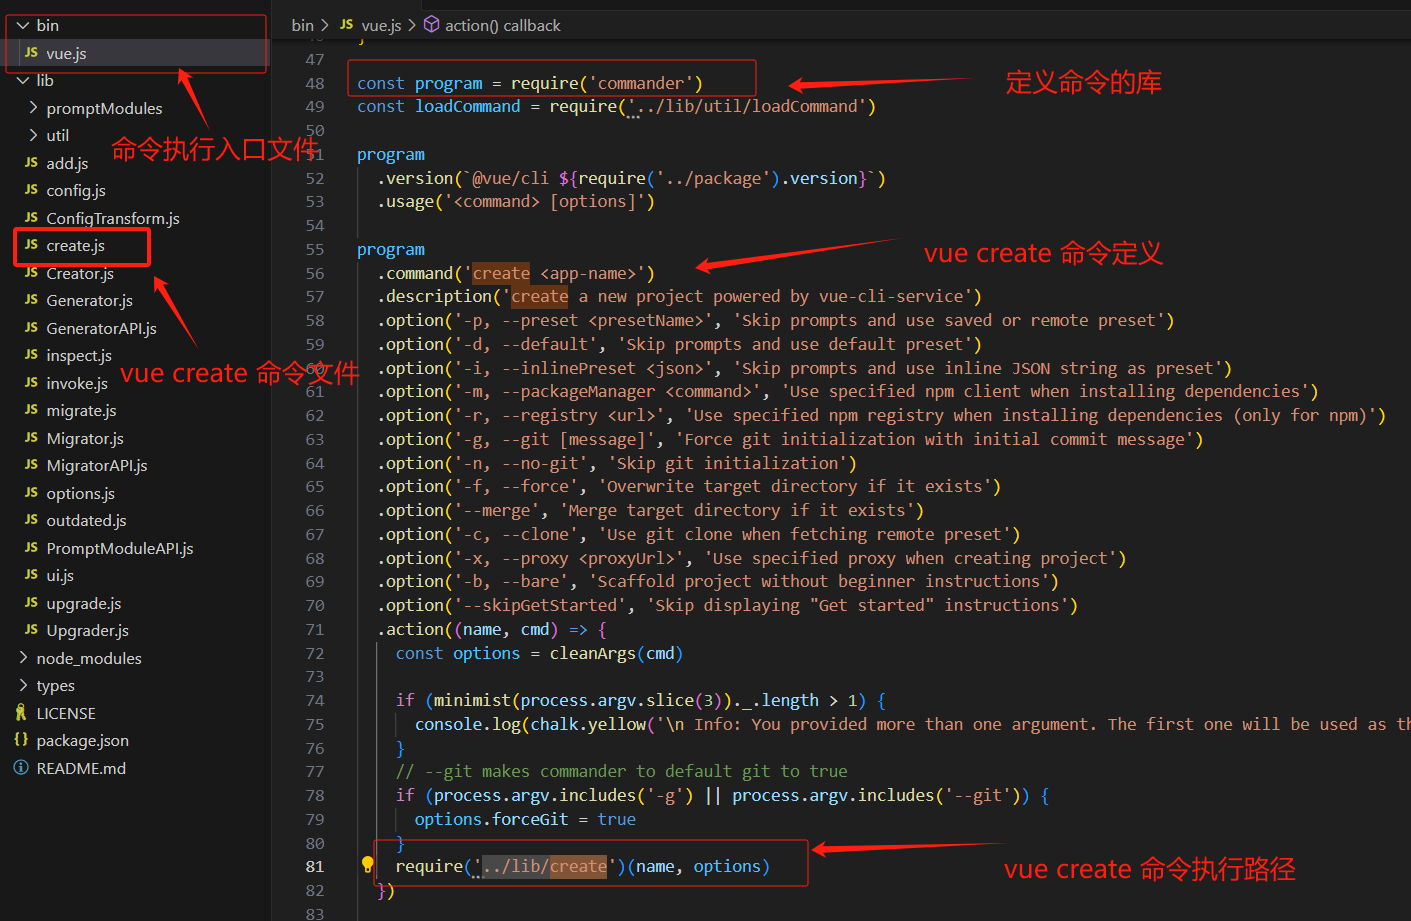
vue 使用 commander 库定义命令的配置项,并在配置中指明命令的执行文件;
vue create命令在文件中的定义和执行路径如下:
解析 shell 命令,并根据命令执行路径执行命令;
vue create 命令执行过程
- 终端输入
vue create vue-test-app; - 终端解析出
vue主命令; - 终端在环境变量中找到
vue命令; - 终端根据
vue命令链接到实际可执行文件vue.js; - 终端利用 node 执行 vue.js;
- vue.js 解析 command 和 option;
- vue.js 执行 command;
- 执行完毕,退出执行;
vue create 命令解析
执行 vue create 命令时,最终是解析 ./@vue/cli/lib/create.js 文件:
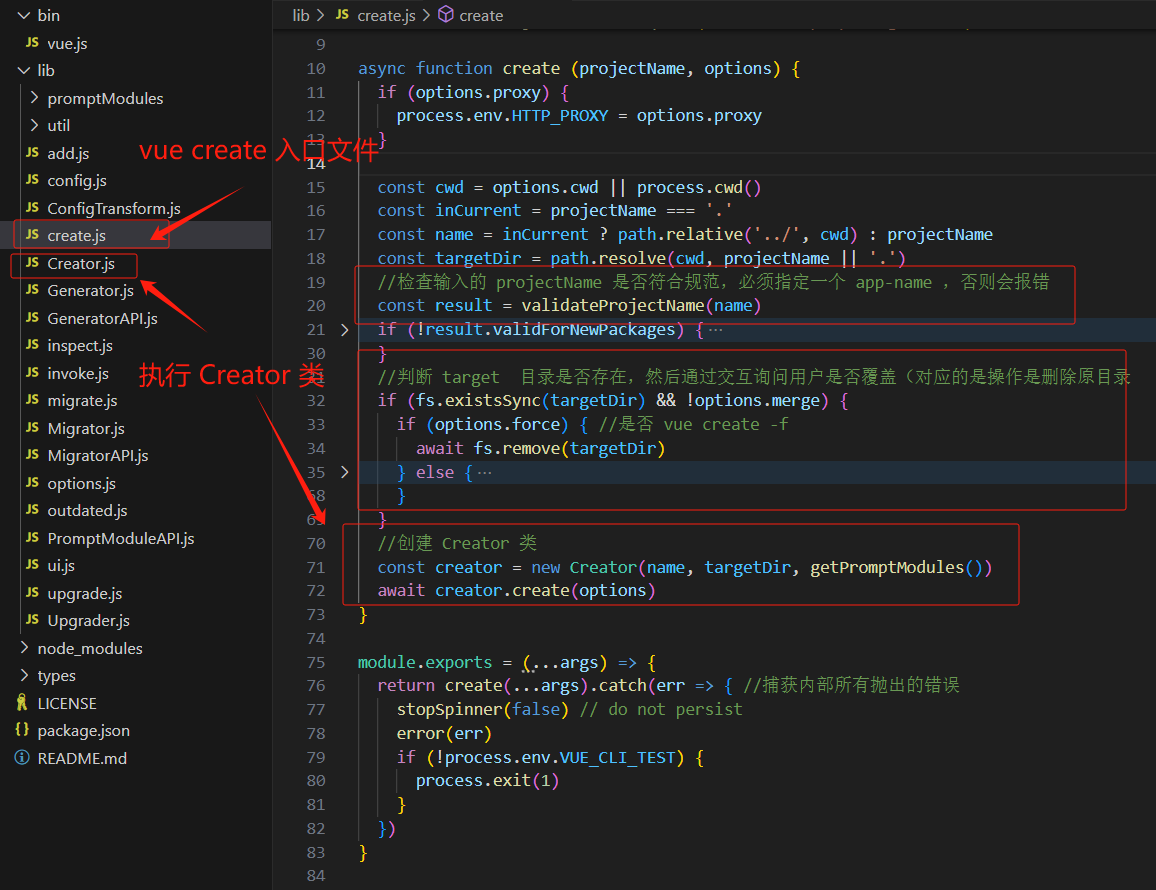
vue create命令主要执行以下逻辑:
- 检查输入的 projectName 是否符合规范;必须指定一个
app-name,否则会报错;- 判断 target 目录是否存在,然后通过交互询问用户是否覆盖(对应的是操作是删除原目录;
- 创建 Creator 类,并执行
creator.create(options);
Creator 创建项目
Creator 类是主要创建脚手架的类,该类定义如下:
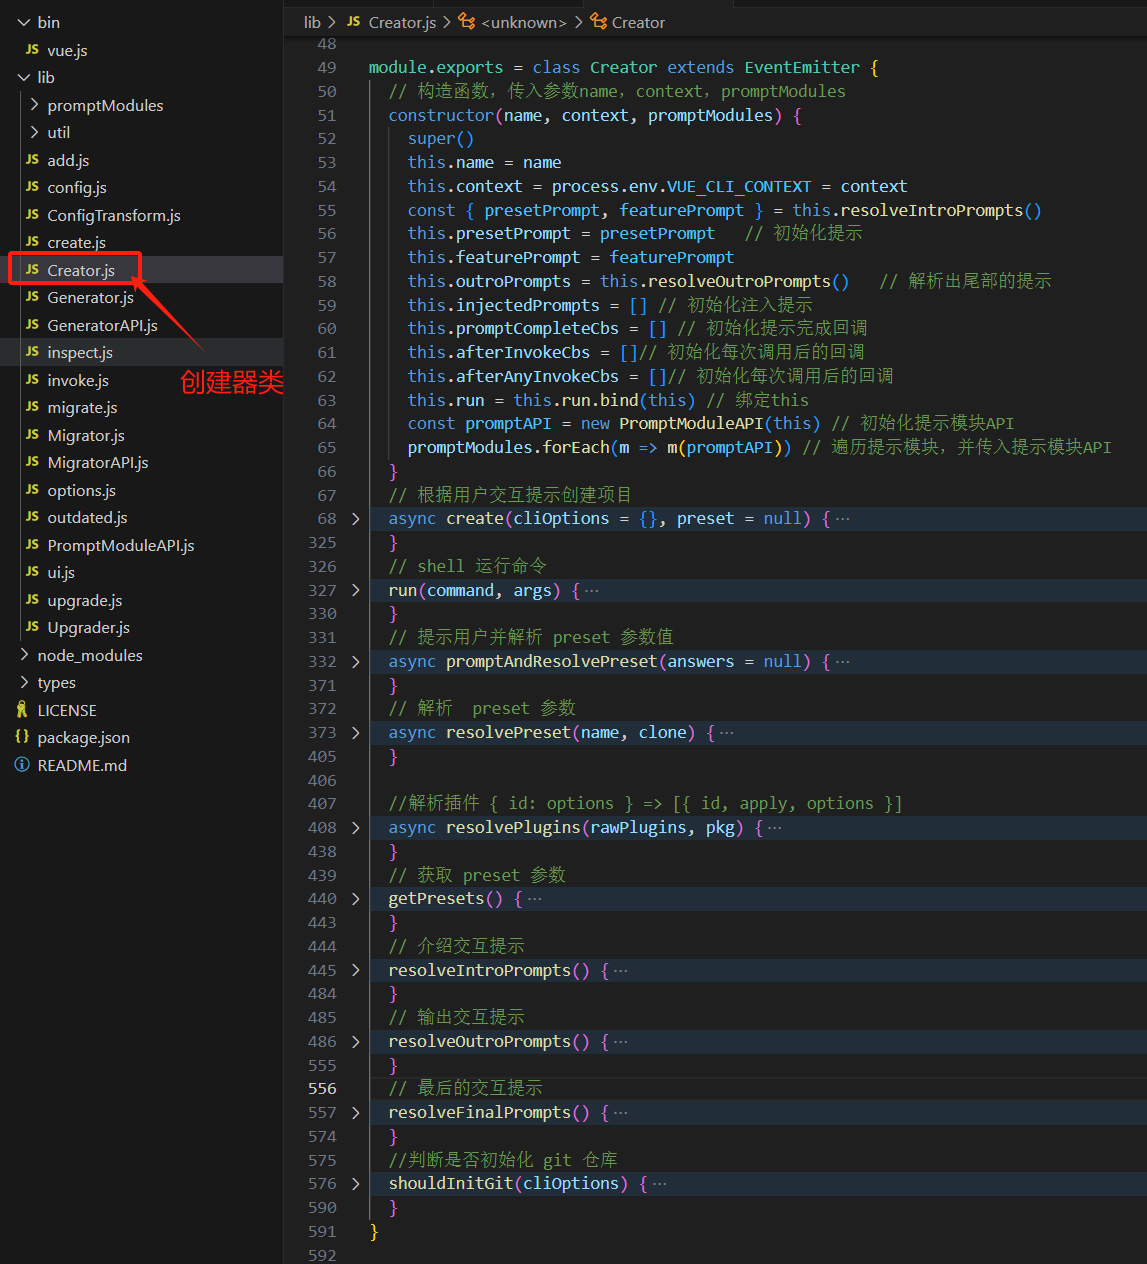
由以上 Creator 类的定义,创建项目的核心方法在 Creator.create() 中:
  // 根据用户交互提示创建项目
  async create(cliOptions = {}, preset = null) {
    // 判断是否是测试或调试环境
    const isTestOrDebug = process.env.VUE_CLI_TEST || process.env.VUE_CLI_DEBUG
    // 获取 run、name、context、afterInvokeCbs、afterAnyInvokeCbs 五个属性
    const { run, name, context, afterInvokeCbs, afterAnyInvokeCbs } = this

    // 如果没有提供preset,则根据cliOptions的参数来决定使用哪个preset
    if (!preset) {
      if (cliOptions.preset) {
        // vue create foo --preset bar
        preset = await this.resolvePreset(cliOptions.preset, cliOptions.clone)
      } else if (cliOptions.default) {
        // vue create foo --default
        preset = defaults.presets.default
      } else if (cliOptions.inlinePreset) {
        // vue create foo --inlinePreset {...}
        try {
          preset = JSON.parse(cliOptions.inlinePreset)
        } catch (e) {
          error(`CLI inline preset is not valid JSON: ${cliOptions.inlinePreset}`)
          exit(1)
        }
      } else {
        // 用户没有提供任何preset,因此弹出一个提示,让用户选择
        preset = await this.promptAndResolvePreset()
      }
    }

    // clone before mutating
    // 克隆一份preset,因为后面会修改它
    preset = cloneDeep(preset)
    // inject core service
    // 注入核心服务
    preset.plugins['@vue/cli-service'] = Object.assign({
      projectName: name
    }, preset)

    // 判断cliOptions.bare是否存在,存在则将preset.plugins['@vue/cli-service'].bare设置为true
    if (cliOptions.bare) {
      preset.plugins['@vue/cli-service'].bare = true
    }

    // legacy support for router
    // 判断preset.router是否存在,存在则将preset.plugins['@vue/cli-plugin-router']设置为空对象
    if (preset.router) {
      preset.plugins['@vue/cli-plugin-router'] = {}

      // 判断preset.routerHistoryMode是否存在,存在则将preset.plugins['@vue/cli-plugin-router'].historyMode设置为true
      if (preset.routerHistoryMode) {
        preset.plugins['@vue/cli-plugin-router'].historyMode = true
      }
    }

    // Introducing this hack because typescript plugin must be invoked after router.
    // Currently we rely on the `plugins` object enumeration order,
    // which depends on the order of the field initialization.
    // FIXME: Remove this ugly hack after the plugin ordering API settled down
    // 如果preset.plugins中包含@vue/cli-plugin-router和@vue/cli-plugin-typescript,则删除@vue/cli-plugin-typescript,并将@vue/cli-plugin-typescript设置为preset.plugins['@vue/cli-plugin-typescript']
    if (preset.plugins['@vue/cli-plugin-router'] && preset.plugins['@vue/cli-plugin-typescript']) {
      const tmp = preset.plugins['@vue/cli-plugin-typescript']
      delete preset.plugins['@vue/cli-plugin-typescript']
      preset.plugins['@vue/cli-plugin-typescript'] = tmp
    }

    // legacy support for vuex
    // 如果preset.vuex存在,则将preset.plugins['@vue/cli-plugin-vuex']设置为空对象
    if (preset.vuex) {
      preset.plugins['@vue/cli-plugin-vuex'] = {}
    }

    // 加载cliOptions中的packageManager属性,如果没有则加载options中的packageManager属性,
    // 如果没有则根据是否有yarn,pnpm3或更高版本,返回对应的packageManager
    const packageManager = (
      cliOptions.packageManager ||
      loadOptions().packageManager ||
      (hasYarn() ? 'yarn' : null) ||
      (hasPnpm3OrLater() ? 'pnpm' : 'npm')
    )

    await clearConsole()
    const pm = new PackageManager({ context, forcePackageManager: packageManager })

    log(`✨  Creating project in ${chalk.yellow(context)}.`)
    this.emit('creation', { event: 'creating' })

    // get latest CLI plugin version
    const { latestMinor } = await getVersions()

    // generate package.json with plugin dependencies
    const pkg = {
      name,
      version: '0.1.0',
      private: true,
      devDependencies: {},
      ...resolvePkg(context)
    }
    const deps = Object.keys(preset.plugins)
    deps.forEach(dep => {
      // 过滤掉 preset 插件
      if (preset.plugins[dep]._isPreset) {
        return
      }

      let { version } = preset.plugins[dep]

      // 如果没有指定版本,则根据不同的插件类型,使用不同的默认版本
      if (!version) {
        if (isOfficialPlugin(dep) || dep === '@vue/cli-service' || dep === '@vue/babel-preset-env') {
          version = isTestOrDebug ? `file:${path.resolve(__dirname, '../../../', dep)}` : `~${latestMinor}`
        } else {
          version = 'latest'
        }
      }

      // 添加到依赖中
      pkg.devDependencies[dep] = version
    })

    // write package.json
    // 写入文件树,context为上下文,pkg为包信息
    await writeFileTree(context, {
      'package.json': JSON.stringify(pkg, null, 2)
    })

    // generate a .npmrc file for pnpm, to persist the `shamefully-flatten` flag
    if (packageManager === 'pnpm') {
      const pnpmConfig = hasPnpmVersionOrLater('4.0.0')
        ? 'shamefully-hoist=true\n'
        : 'shamefully-flatten=true\n'

      await writeFileTree(context, {
        '.npmrc': pnpmConfig
      })
    }

    if (packageManager === 'yarn' && semver.satisfies(process.version, '8.x')) {
      // Vue CLI 4.x should support Node 8.x,
      // but some dependenices already bumped `engines` field to Node 10
      // and Yarn treats `engines` field too strictly
      await writeFileTree(context, {
        '.yarnrc': '# Hotfix for Node 8.x\n--install.ignore-engines true\n'
      })
    }

    // intilaize git repository before installing deps
    // so that vue-cli-service can setup git hooks.
    // 判断是否初始化git仓库
    const shouldInitGit = this.shouldInitGit(cliOptions)
    if (shouldInitGit) {
      log(`🗃  Initializing git repository...`)
      this.emit('creation', { event: 'git-init' })
      await run('git init')//初始化git仓库
    }

    // install plugins
    log(`⚙\u{fe0f}  Installing CLI plugins. This might take a while...`)
    log()
    this.emit('creation', { event: 'plugins-install' })

    // 如果isTestOrDebug为true,且process.env.VUE_CLI_TEST_DO_INSTALL_PLUGIN为false,则执行setupDevProject函数,否则执行install函数
    if (isTestOrDebug && !process.env.VUE_CLI_TEST_DO_INSTALL_PLUGIN) {
      // in development, avoid installation process
      await require('./util/setupDevProject')(context)
    } else {
      await pm.install()
    }

    // run generator
    this.emit('creation', { event: 'invoking-generators' })
    // 解析插件
    const plugins = await this.resolvePlugins(preset.plugins, pkg)
    // 创建生成器
    const generator = new Generator(context, {
      pkg,
      plugins,
      afterInvokeCbs,
      afterAnyInvokeCbs
    })
    // 生成文件
    await generator.generate({
      extractConfigFiles: preset.useConfigFiles
    })

    // install additional deps (injected by generators)
    log(`📦  Installing additional dependencies...`)
    this.emit('creation', { event: 'deps-install' })
    log()
    // 判断是否是测试或者调试环境,或者VUE_CLI_TEST_DO_INSTALL_PLUGIN环境变量是否为true
    if (!isTestOrDebug || process.env.VUE_CLI_TEST_DO_INSTALL_PLUGIN) {
      // 安装插件
      await pm.install()
    }

    // run complete cbs if any (injected by generators)
    log(`⚓  Running completion hooks...`)
    // 触发创建事件
    this.emit('creation', { event: 'completion-hooks' })
    // 执行afterInvokeCbs中的回调函数
    for (const cb of afterInvokeCbs) {
      await cb()
    }
    // 执行afterAnyInvokeCbs中的回调函数
    for (const cb of afterAnyInvokeCbs) {
      await cb()
    }
    // 生成  README.md
    if (!generator.files['README.md']) {
      // generate README.md
      log()
      log('📄  Generating README.md...')
      await writeFileTree(context, {
        'README.md': generateReadme(generator.pkg, packageManager)
      })
    }

    // commit initial state
    let gitCommitFailed = false
    if (shouldInitGit) {
      // 添加所有文件到 git
      await run('git add -A')
      if (isTestOrDebug) {
        // 设置测试配置
        await run('git', ['config', 'user.name', 'test'])
        await run('git', ['config', 'user.email', 'test@test.com'])
        await run('git', ['config', 'commit.gpgSign', 'false'])
      }
      const msg = typeof cliOptions.git === 'string' ? cliOptions.git : 'init'
      try {
        // 提交
        await run('git', ['commit', '-m', msg, '--no-verify'])
      } catch (e) {
        // 如果提交失败,则设置gitCommitFailed为true
        gitCommitFailed = true
      }
    }

    // log instructions
    log()
    log(`🎉  Successfully created project ${chalk.yellow(name)}.`)
    if (!cliOptions.skipGetStarted) {
      log(
        `👉  Get started with the following commands:\n\n` +
        (this.context === process.cwd() ? `` : chalk.cyan(` ${chalk.gray('$')} cd ${name}\n`)) +
        chalk.cyan(` ${chalk.gray('$')} ${packageManager === 'yarn' ? 'yarn serve' : packageManager === 'pnpm' ? 'pnpm run serve' : 'npm run serve'}`)
      )
    }
    log()
    this.emit('creation', { event: 'done' })

    if (gitCommitFailed) {
      warn(
        `Skipped git commit due to missing username and email in git config, or failed to sign commit.\n` +
        `You will need to perform the initial commit yourself.\n`
      )
    }

    generator.printExitLogs()
  }
Creator.create()方法主要逻辑:
preset 预设参数初始化;
- Preset 是一个包含创建新项目所需预定义选项和插件的 JSON 对象,让用户无需在命令提示中选择它们。
包管理器实例初始化;
根据插件依赖生成 package.json 文件;
- Vue CLI 在创建目录下写入一个基础的
package.json根据包管理器自动判断 NPM 源,生成对应管理器的 xxxrc 文件;
判断是否初始化 Git 仓库,并初始化 Git 仓库环境;
判断是否为是测试或调试环境:
- 是,则调用
setupDevProject启动开发服务;在开发过程中,避免安装过程;- 否,根据 package.json 文件安装项目依赖;
生成项目文件: 解析插件对象,并创建生成器实例生成项目文件;
    // 解析插件
    const plugins = await this.resolvePlugins(preset.plugins, pkg)
    // 创建生成器
    const generator = new Generator(context, {
      pkg,
      plugins,
      afterInvokeCbs,
      afterAnyInvokeCbs
    })
    // 生成文件
    await generator.generate({
      extractConfigFiles: preset.useConfigFiles
    })
安装由生成器实例注入的依赖;
运行初始化后的回调;
生成 README.md;
暂存 git ,拉取远程 preset;
打印创建结果;
Creator类是继承于 Node.js 的EventEmitter类,events是 Node.js 中最重要的一个模块,而EventEmitter类就是其基础,是 Node.js 中事件触发与事件监听等功能的封装。在
create过程中emit一些事件:this.emit('creation', { event: 'creating' }); // 创建项目时 this.emit('creation', { event: 'git-init' }); // 初始化 git 时 this.emit('creation', { event: 'plugins-install' }); // 安装插件 this.emit('creation', { event: 'invoking-generators' }); // 调用 generator this.emit('creation', { event: 'deps-install' }); // 安装额外的依赖 this.emit('creation', { event: 'completion-hooks' }); // 完成之后的回调 this.emit('creation', { event: 'done' }); // create 流程结束 this.emit('creation', { event: 'fetch-remote-preset' }); // 拉取远程 preset
Creator.create() 方法主要执行项目的参数初始化、包管理初始化、npm 初始化、仓库初始化,通过Generator生成项目文件,并安装项目依赖;
Generator 生成项目文件
通过以上分析可知,Creator.create() 方法用于创建项目,Generator 对象创建生成项目文件:
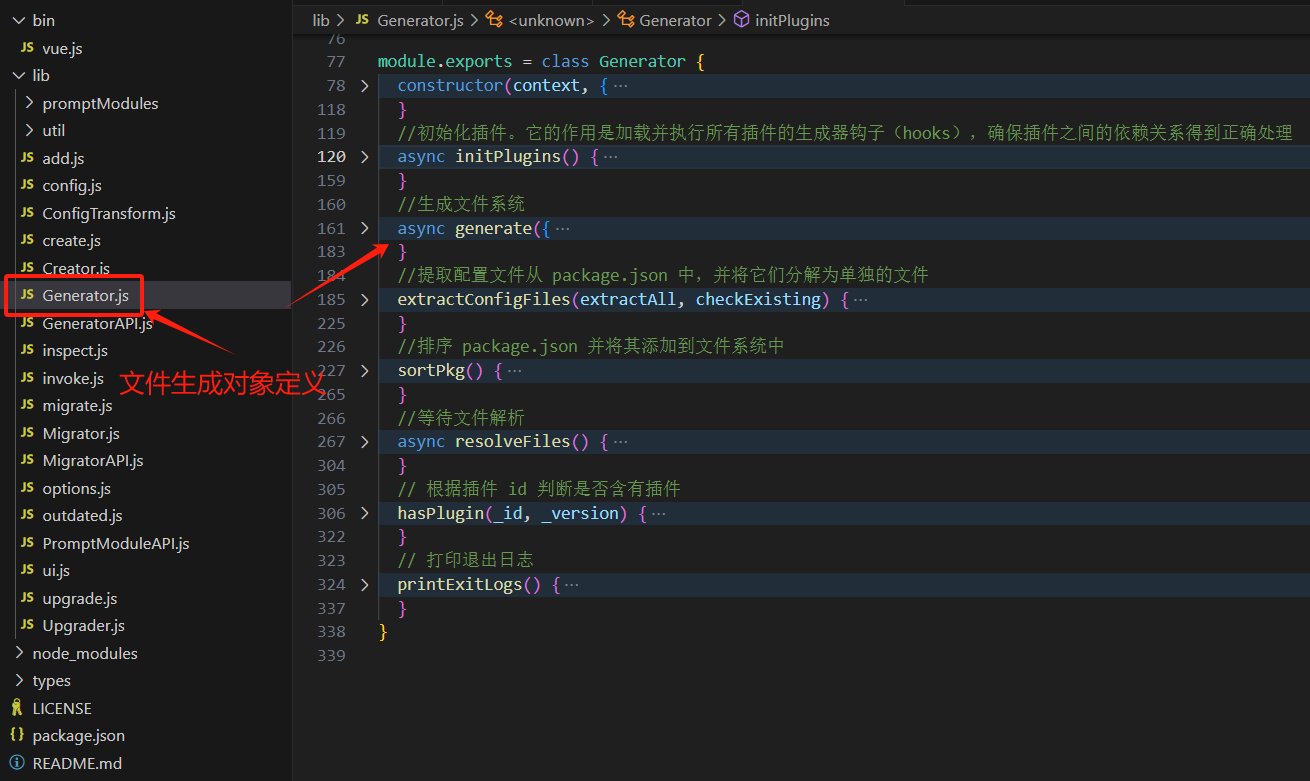
Generator 对象通过 Generator.generate 方法生成 Vue 项目文件:
  //生成文件系统
  async generate({
    extractConfigFiles = false,
    checkExisting = false
  } = {}) {
    //初始化插件
    await this.initPlugins()

    // save the file system before applying plugin for comparison
    const initialFiles = Object.assign({}, this.files)
    // extract configs from package.json into dedicated files.
    //提取配置文件从 package.json 中,并将它们分解为单独的文件
    this.extractConfigFiles(extractConfigFiles, checkExisting)
    // wait for file resolve
    //等待文件解析
    await this.resolveFiles()
    // set package.json
    //排序 package.json 并将其添加到文件系统中
    this.sortPkg()
    this.files['package.json'] = JSON.stringify(this.pkg, null, 2) + '\n'
    // write/update file tree to disk
    //将文件系统写入磁盘
    await writeFileTree(this.context, this.files, initialFiles)
  }
generate 方法用于生成文件系统。它接受一个对象作为参数,可以设置两个选项:
extractConfigFiles和checkExisting。函数的实现原理如下:
- 首先,初始化插件。
- 从
package.json中提取配置文件,并将它们分解为单独的文件。- 等待文件解析。
- 排序
package.json并将其添加到文件系统中。- 将文件系统写入磁盘。
注意事项:
- 确保在调用此函数之前已正确初始化上下文和文件系统。
- 设置
extractConfigFiles为true以从package.json中提取配置文件。- 设置
checkExisting为true以在提取配置文件之前检查现有文件。- 此函数为异步函数,应在适当的事件循环或回调函数中使用。
- 如果需要,可以在函数结束后检查错误并处理它们。
初始化插件
Generator.generate 方法生成 Vue 项目文件第一步中,先执行的是一个 initPlugins 方法,代码如下:
async initPlugins () {
  for (const id of this.allPluginIds) {
    const api = new GeneratorAPI(id, this, {}, rootOptions)
    const pluginGenerator = loadModule(`${id}/generator`, this.context)

    if (pluginGenerator && pluginGenerator.hooks) {
      await pluginGenerator.hooks(api, {}, rootOptions, pluginIds)
    }
  }
}
在这里会给每一个 package.json 里的插件初始化一个 GeneratorAPI 实例,将实例传入对应插件的 generator 方法并执行:
loadModule(`${id}/generator`, this.context)
通过以上代码执行时,会加载两类插件:
cli-service插件: Vue CLI 的核心插件;cli-plugin-xxx/扩展插件:预选项插件,根据用户选择加载;
加载cli-service 核心插件:
加载cli-service 核心插件,会执行 @vue/cli-service/generator/index.js 目录:
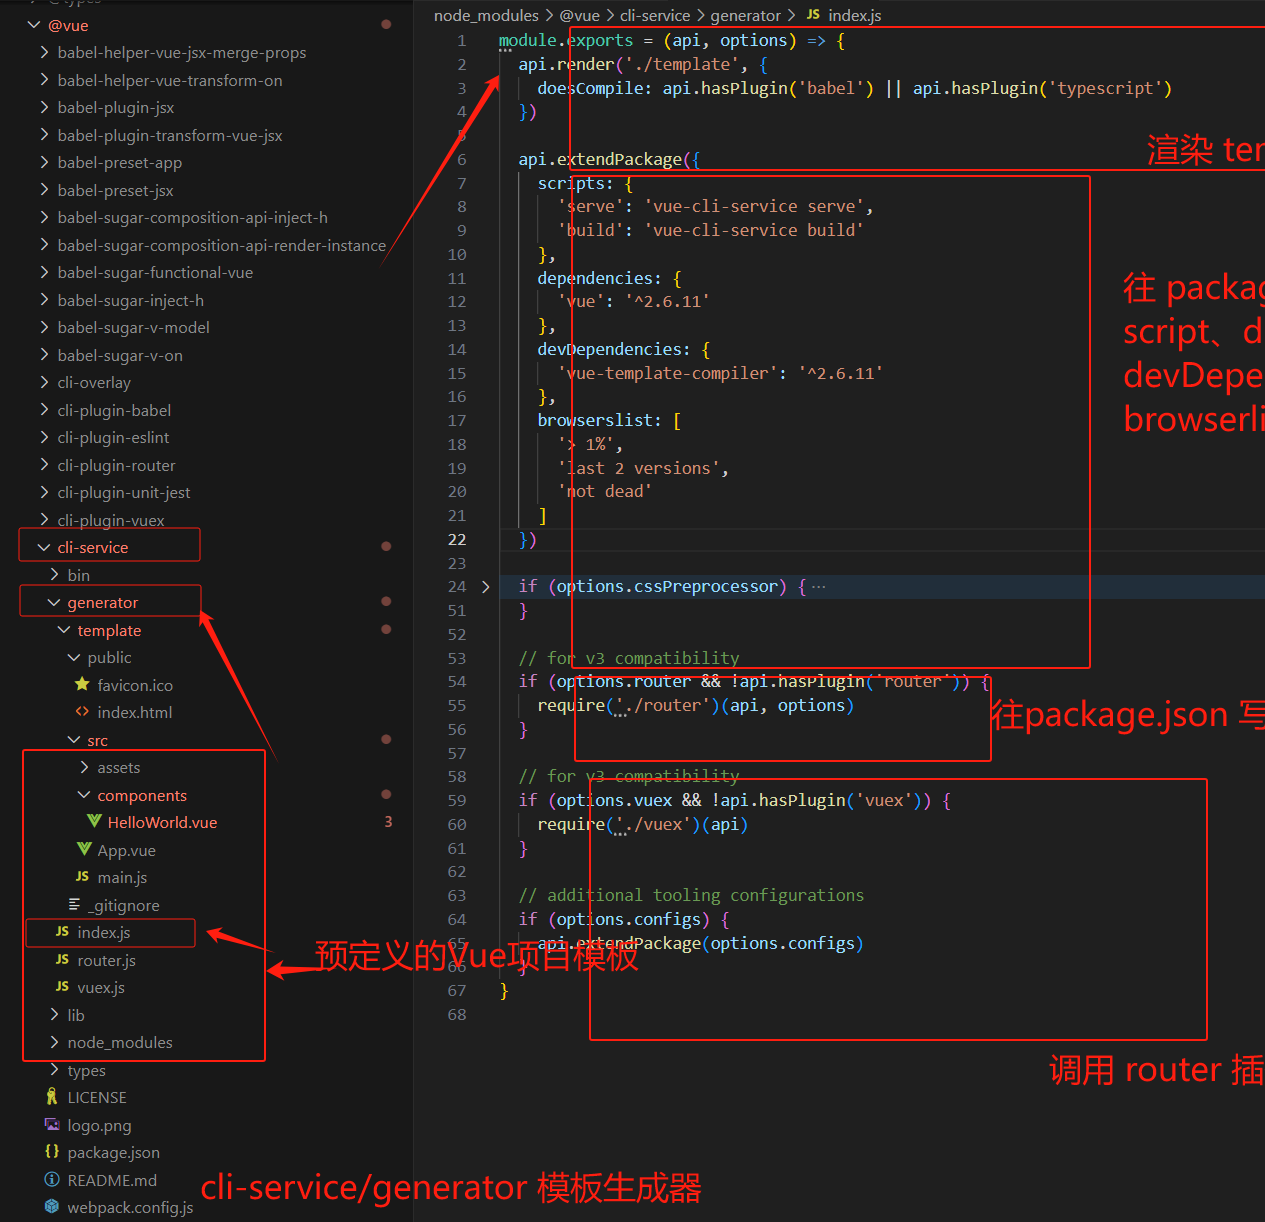
cli-service核心插件的 generator 方法主要逻辑:
渲染 Vue 项目模板;
Vue 项目模板位于
@vue/cli-service/tempalte/目录,可以看到该目录下文件即为一个使用 vue-cli 创建的 vue 基础项目目录文件;
api.render会通过 EJS 将模板文件渲染成字符串放在内存中。通过
extendPackage往pacakge.json中写入Vue的相关依赖和 script;通过
extendPackage往pacakge.json中写入CSS预处理参数;调用 router 插件和 vuex 插件。
执行了
generate的所有逻辑之后,内存中已经有了需要输出的各种文件,放在this.files里。generate的最后一步就是调用writeFileTree将内存中的所有文件写入到硬盘
加载cli-plugin-xxx/扩展插件:
加载cli-plugin-xxx/扩展插件,会去 @vue/ 目录下加载对应 cli-plugin-xxx/generator.js 插件的 generator 方法。
以加载 @vue/cli-plugin-babel 插件的 @vue/cli-plugin-babel/generator.js 为例:
执行以上代码时候,会在当前项目的 ./node_modules/@vue/cli-plugin-babel/ 目录下加载 generator.js 文件:
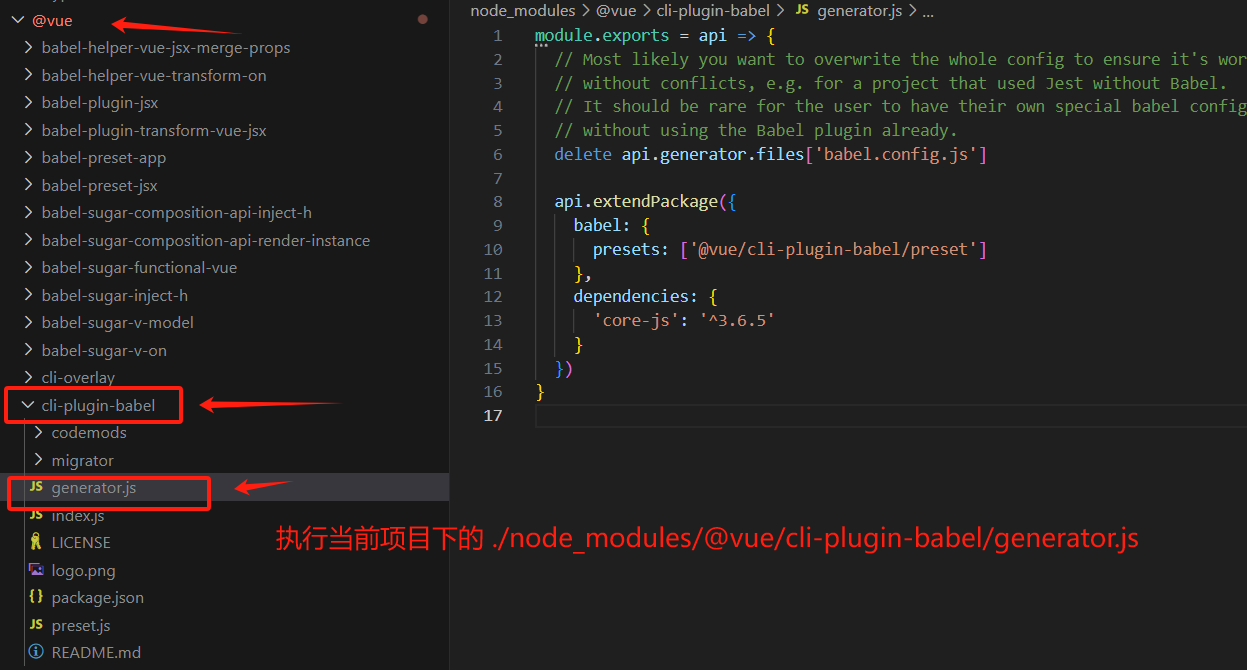
这里
api就是一个GeneratorAPI实例,这里用到了一个extendPackage方法:// GeneratorAPI.js // 删减部分代码,只针对 @vue/cli-plugin-babel 分析 extendPackage (fields, options = {}) { const pkg = this.generator.pkg const toMerge = isFunction(fields) ? fields(pkg) : fields // 遍历传入的参数,这里是 babel 和 dependencies 两个对象 for (const key in toMerge) { const value = toMerge[key] const existing = pkg[key] // 如果 key 的名称是 dependencies 和 devDependencies // 就通过 mergeDeps 方法往 package.json 合并依赖 if (isObject(value) && (key === 'dependencies' || key === 'devDependencies')) { pkg[key] = mergeDeps( this.id, existing || {}, value, this.generator.depSources, extendOptions ) } else if (!extendOptions.merge || !(key in pkg)) { pkg[key] = value } } }
通过extendPackage 方法加载 cli-plugin-babel 后,默认的 package.json 就变成:
{
  "babel": {
    "presets": ["@vue/cli-plugin-babel/preset"]
  },
  "dependencies": {
    "core-js": "^3.6.5"
  },
  "devDependencies": {},
  "name": "test",
  "private": true,
  "version": "0.1.0"
}
CLI 服务分析
使用
在一个 Vue CLI 项目中,@vue/cli-service 安装了一个名为 vue-cli-service 的命令。
可以在 npm scripts 中以 vue-cli-service、或者从终端中以 ./node_modules/.bin/vue-cli-service 访问这个命令。
这是你使用默认 preset 的项目的 package.json:
{
  "scripts": {
    "serve": "vue-cli-service serve",
    "build": "vue-cli-service build"
  }
}
你可以通过 npm 或 Yarn 调用这些 script:
npm run serve
# OR
yarn serve
如果你可以使用 npx (最新版的 npm 应该已经自带),也可以直接这样调用命令:
npx vue-cli-service serve
Shell 命令解析
- 在 shell 命令行中输入
npm run serve时候,会执行vue-cli-service serve - 当遇到
vue-cli-service命令时,会在./node_modules/.bin目录下根据 windows 或 mac 平台查找 shell 或 cmd 脚本执行,在 windows 平台下会执行./node_modules/.bin/vue-cli-service.cmd:

- 该批处理脚本的主要作用是找到并设置Vue CLI服务的执行路径,然后使用Node.js来运行Vue CLI服务,Vue CLI服务的执行路径执行路径为
..\@vue\cli-service\bin\vue-cli-service.js
vue-cli-service.js 文件主要作用是检查运行环境、解析命令行参数,并运行 Vue CLI 服务:
// 设定脚本的解释器为 node,这样这个脚本就是一个 node 脚本,可以在命令行中运行。
#!/usr/bin/env node

// 从 '@vue/cli-shared-utils' 模块中引入 'semver' 和 'error' 函数。'semver' 用于处理语义版本,'error' 用于输出错误信息。
const { semver, error } = require('@vue/cli-shared-utils')

// 从 '../package.json' 文件中获取 'engines.node' 的值,这个值是运行这个脚本所需要的 Node.js 的版本。
const requiredVersion = require('../package.json').engines.node

// 检查当前运行的 Node.js 版本是否满足 'requiredVersion',如果不满足,则输出错误信息并退出进程。
if (!semver.satisfies(process.version, requiredVersion)) {
  error(
    `You are using Node ${process.version}, but vue-cli-service ` +
    `requires Node ${requiredVersion}.\nPlease upgrade your Node version.`
  )
  process.exit(1)
}

// 从 '../lib/Service' 文件中引入 'Service' 类,并创建一个新的 'Service' 实例。
const Service = require('../lib/Service')
const service = new Service(process.env.VUE_CLI_CONTEXT || process.cwd())

// 获取命令行参数(除了脚本名和路径参数),并存储到 'rawArgv' 中。
const rawArgv = process.argv.slice(2)

// 使用 'minimist' 库解析 'rawArgv' 中的参数。这里定义了一些布尔类型的参数。
const args = require('minimist')(rawArgv, {
  boolean: [
    // build
    'modern',
    'report',
    'report-json',
    'inline-vue',
    'watch',
    // serve
    'open',
    'copy',
    'https',
    // inspect
    'verbose'
  ]
})

// 获取 'args._[0]',即第一个命令行参数(不包括参数名),这个参数通常表示命令。
const command = args._[0]

// 运行 'service' 的 'run' 方法,传入命令、参数和原始的命令行参数。如果运行过程中出现错误,则捕获并输出错误信息,然后退出进程。
service.run(command, args, rawArgv).catch(err => {
  error(err)
  process.exit(1)
})
以上代码主要执行以下操作:
- 检查运行环境:首先,脚本检查当前运行的 Node.js 版本是否满足所需的版本要求。如果不满足,它会输出错误信息并退出进程。
- 解析命令行参数:然后,脚本使用 'minimist' 库解析命令行参数。它定义了一些布尔类型的参数,并根据这些参数的值设置相应的数据结构。
- 运行 Vue CLI 服务:最后,脚本运行 'service' 的 'run' 方法,传入命令、参数和原始的命令行参数。如果运行过程中出现错误,它会捕获并输出错误信息,然后退出进程。
vue-cli-service 常用命令:
vue-cli-service serve命令: 启动一个开发服务器 (基于 webpack-dev-server) 并附带开箱即用的模块热重载 (Hot-Module-Replacement)。用法:vue-cli-service serve [options] [entry]vue-cli-service build命令: 会在dist/目录产生一个可用于生产环境的包,带有 JS/CSS/HTML 的压缩,和为更好的缓存而做的自动的 vendor chunk splitting。它的 chunk manifest 会内联在 HTML 里。用法:vue-cli-service build [options] [entry|pattern]
通过以上代码可知,vue-cli-service 命令执行前,先创建了一个 Service 类,并通过 service.run() 方法执行执行命令。
Service 对象初始化
Service 对象定义位于 ./node_modules/@vue/cli-service/lib/Service.js 中;
Service的类包含了Vue CLI中的服务对象。
服务对象负责处理命令行选项、插件加载、Webpack配置和其他与项目构建相关的任务:
module.exports = class Service {
  constructor (context, { plugins, pkg, inlineOptions, useBuiltIn } = {}) {
    process.VUE_CLI_SERVICE = this
    this.initialized = false
    this.context = context
    this.inlineOptions = inlineOptions
    this.webpackChainFns = []
    this.webpackRawConfigFns = []
    this.devServerConfigFns = []
    this.commands = {}
    // Folder containing the target package.json for plugins
    this.pkgContext = context//context参数,它是一个包含项目路径和其他配置的环境对象
    // package.json containing the plugins
    this.pkg = this.resolvePkg(pkg)//解析pkg参数,如果pkg是相对路径,它会相对于context目录来解析。
    // If there are inline plugins, they will be used instead of those
    // found in package.json.
    // When useBuiltIn === false, built-in plugins are disabled. This is mostly
    // for testing.
    //根据plugins参数和useBuiltIn标志来加载插件。如果useBuiltIn为false,则禁用内置插件。
    this.plugins = this.resolvePlugins(plugins, useBuiltIn)//
    // pluginsToSkip will be populated during run()
    this.pluginsToSkip = new Set() //用于记录要跳过的插件的集合
    // resolve the default mode to use for each command
    // this is provided by plugins as module.exports.defaultModes
    // so we can get the information without actually applying the plugin.
    //默认模式对象,用于定义每个命令的默认模式。这个对象是通过插件的apply对象中的defaultModes来构建的。
    this.modes = this.plugins.reduce((modes, { apply: { defaultModes }}) => {
      return Object.assign(modes, defaultModes)
    }, {})
  }
  //解析pkg参数,如果pkg是相对路径,它会相对于context目录来解析
 //如果inlinePkg存在,则直接返回。
  //否则,使用resolvePkg方法来解析context目录下的包。
  //如果解析后的包包含vuePlugins属性,则设置pkgContext属性为context与vuePlugins.resolveFrom的路径分辨率。
  //递归调用resolvePkg方法,直到pkgContext被设置为止。
  resolvePkg (inlinePkg, context = this.context) {
    // ...
    return pkg
  }
  //初始化
  init (mode = process.env.VUE_CLI_MODE) {
  // ...
  }
  //根据环境变量VUE_CLI_MODE来加载相应的配置文件
  loadEnv (mode) {
   // ...
  }
  //用于记录要跳过的插件的集合
  setPluginsToSkip (args) {
  // ...
  }
  //根据plugins参数和useBuiltIn标志来加载插件。如果useBuiltIn为false,则禁用内置插件。
  resolvePlugins (inlinePlugins, useBuiltIn) {
    // ...
    return plugins
  }

// async函数,用于运行name,args,rawArgv
 async run (name, args = {}, rawArgv = []) {
    // ...
    return fn(args, rawArgv)
  }
 //加载用户提供的chainable配置文件。链入Webpack配置处理函数,以便在构建过程中使用。
 resolveChainableWebpackConfig () {
   	// ...
    return chainableConfig
  }

  	//链入Webpack配置处理函数,以便在构建过程中使用。
  	//解析用户提供的chainable配置文件。
    //执行配置文件处理函数,以便在构建过程中使用。
    //检查配置项entry的类型,并将其转换为数组。
    //将entry文件解析为具体的路径,并设置环境变量VUE_CLI_ENTRY_FILES。
  resolveWebpackConfig (chainableConfig = this.resolveChainableWebpackConfig()) {
    // ...
    return config
  }
  //加载用户提供的选项,并使用默认值来填充缺失的选项。
  loadUserOptions () {
    // ...
    return resolved
  }
}
以上代码为
Service类的定义,在该类中定义了Service类的属性和方法:
- 初始化
Service类时:
- 会设置一些基本的状态:如
initialized、context、inlineOptions、webpackChainFns、webpackRawConfigFns、devServerConfigFns、commands和pkgContext。- 构造函数: 会接收一个
context参数,它是一个包含项目路径和其他配置的环境对象。resolvePkg方法:用于解析pkg参数,如果pkg是相对路径,它会相对于context目录来解析。resolvePlugins方法:会根据plugins参数和useBuiltIn标志来加载插件。如果useBuiltIn为false,则禁用内置插件。pluginsToSkip:是一个用于记录要跳过的插件的集合。modes:是一个默认模式对象,用于定义每个命令的默认模式。这个对象是通过插件的apply对象中的defaultModes来构建的。init方法:
- 初始化
Service类,设置一些基本的状态。- 根据环境变量
VUE_CLI_MODE来加载相应的配置文件(vue-cli-service serve [options] [entry]命令通过--mode参数指定环境模式 ,默认值为 development,该参数会加载当前目录下指定环境的下配置文件)。- 加载用户提供的选项,并使用默认值来填充缺失的选项。
- 遍历插件列表,并执行它们的方法。
- 链入Webpack配置处理函数,以便在构建过程中使用。
- 创建一个新的Webpack配置处理函数,以便在构建过程中使用。
run方法:用于启动项目构建过程,它会遍历插件列表,并执行它们的方法。这些方法、属性和状态的定义允许服务对象在项目构建过程中执行各种任务,如加载插件、配置Webpack和处理开发服务器配置等。
通过以上 Service 对象定义可知:
- 在 shell 执行命令时候,首先解析参数,并将参数传递给 Service 类:
new Service(process.env.VUE_CLI_CONTEXT || process.cwd()); - Service 类初始化时,调用
resolvePkg(pkg)解析解析参数指定目录下的包; - 初始化完成后调用
run方法,用于启动项目构建过程,它会遍历插件列表,并执行它们的方法。
Service.run 启动构建
Service.run 方法详细代码:
// async函数,用于运行name,args,rawArgv
 async run (name, args = {}, rawArgv = []) {
    // resolve mode
    // prioritize inline --mode
    // fallback to resolved default modes from plugins or development if --watch is defined
    //解析`args.mode`和`args.watch`参数,确定当前模式
    const mode = args.mode || (name === 'build' && args.watch ? 'development' : this.modes[name])

    // --skip-plugins arg may have plugins that should be skipped during init()
    // set plugins to skip
    //设置要跳过的插件
    this.setPluginsToSkip(args)

    // load env variables, load user config, apply plugins
    // 加载环境变量,加载用户配置,应用插件
    this.init(mode)

    // resolve args
    // 解析参数
    args._ = args._ || []
    let command = this.commands[name]
    if (!command && name) {
      error(`command "${name}" does not exist.`)
      process.exit(1)
    }
    if (!command || args.help || args.h) {
      command = this.commands.help
    } else {
      args._.shift() // remove command itself
      rawArgv.shift()
    }
    const { fn } = command
    return fn(args, rawArgv)
  }
该方法执行以下操作:
- 解析
args.mode和args.watch参数,确定当前模式。- 设置要跳过的插件。
- 加载环境变量和用户配置。
- 应用插件。
- 解析参数。
- 调用
command方法,并返回结果。
根据以上 "Shell 命令解析" 部分代码中,vue-cli-service.js 文件中调用了 service.run:
service.run(command, args, rawArgv).catch(err => {
  error(err)
  process.exit(1)
})
而vue-cli-service 命令用法为:(以 serve参数为例) vue-cli-service serve [options] [entry],则 service.run 方法的 command 参数为该命令的 serve 方法;
在 service.run 方法中最后执行 :
const { fn } = command
return fn(args, rawArgv)
说明在 vue-cli-service serve [options] [entry] 命令中最后执行 serve 方法并传入 [options] [entry] 参数。
解析插件
以 serve 方法为例,vue-cli-service 构建命令为: vue-cli-service serve[options] [entry|pattern]
通过以上代码分析可知,命令行参数方法 serve 通过 command 参数执行, command 参数在 Service 构造函数中定义,并通过 Service.resolvePlugins 方法初始化,该方法定义如下:
 // 解析插件
  resolvePlugins (inlinePlugins, useBuiltIn) {
    // 根据id获取插件
    const idToPlugin = id => ({
      id: id.replace(/^.\//, 'built-in:'),
      apply: require(id)
    })

    let plugins

    // 内置插件
    const builtInPlugins = [
      './commands/serve',
      './commands/build',
      './commands/inspect',
      './commands/help',
      // config plugins are order sensitive
      './config/base',
      './config/css',
      './config/prod',
      './config/app'
    ].map(idToPlugin)

    // 判断是否使用内置插件
    if (inlinePlugins) {
      // 判断是否使用内置插件
      plugins = useBuiltIn !== false
        ? builtInPlugins.concat(inlinePlugins)
        : inlinePlugins
    } else {
      // 获取项目插件
      const projectPlugins = Object.keys(this.pkg.devDependencies || {})
        .concat(Object.keys(this.pkg.dependencies || {}))
        .filter(isPlugin)
        .map(id => {
          // 判断是否可选依赖
          if (
            this.pkg.optionalDependencies &&
            id in this.pkg.optionalDependencies
          ) {
            let apply = () => {}
            try {
              // 尝试加载插件
              apply = require(id)
            } catch (e) {
              // 加载失败,输出警告
              warn(`Optional dependency ${id} is not installed.`)
            }

            return { id, apply }
          } else {
            // 根据id获取插件
            return idToPlugin(id)
          }
        })
      // 合并内置插件和项目插件
      plugins = builtInPlugins.concat(projectPlugins)
    }

    // Local plugins
    // 判断是否有本地插件
    if (this.pkg.vuePlugins && this.pkg.vuePlugins.service) {
      // 获取文件
      const files = this.pkg.vuePlugins.service
      // 判断文件类型是否为数组
      if (!Array.isArray(files)) {
        // 不是数组,抛出错误
        throw new Error(`Invalid type for option 'vuePlugins.service', expected 'array' but got ${typeof files}.`)
      }
      // 合并插件
      plugins = plugins.concat(files.map(file => ({
        id: `local:${file}`,
        apply: loadModule(`./${file}`, this.pkgContext)
      })))
    }

    return plugins
  }
该方法主要解析插件:
- 根据id获取插件;
- 判断是否使用内置插件,获取项目插件
- 合并内置插件和项目插件;
- 判断是否有本地插件,合并插件
- 返回合并后的插件。
根据以上resolvePlugins 方法可知, serve 方法 插件定义在./commands/serve,所有内置插件定义如下:
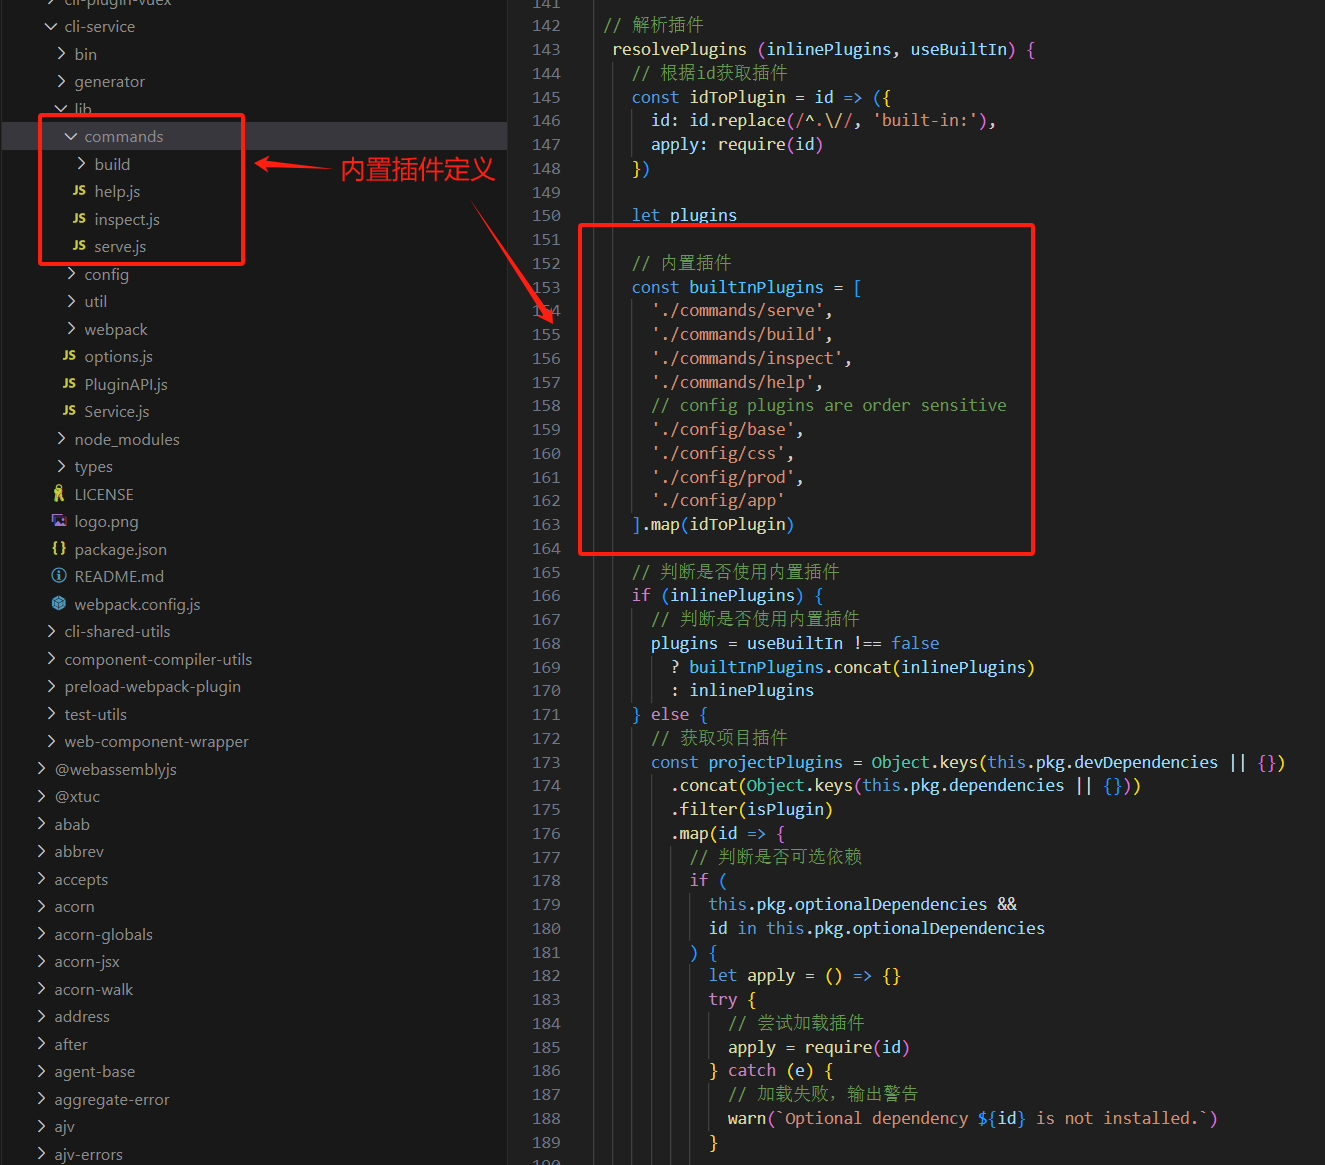
自定义开发插件可以参考官方文档: 插件开发指南 | Vue CLI (vuejs.org)
serve 命令解析
vue-cli-service serve 命令用于开发环境,在本地启动一个 HTTP 服务:
使用
用法:vue-cli-service serve [options] [entry]

选项:

  --open    在服务器启动时打开浏览器
  --copy    在服务器启动时将 URL 复制到剪切版
  --mode    指定环境模式 (默认值:development)
  --host    指定 host (默认值:0.0.0.0)
  --port    指定 port (默认值:8080)
  --https   使用 https (默认值:false)
通过 npm script 执行该命令:
  "scripts": {
    "dev": "vue-cli-service serve",
    "prod": "cross-env NODE_ENV=production && vue-cli-service serve",
  },
原理
vue-cli-service serve 命令会启动一个开发服务器 (基于 webpack-dev-server) 并附带开箱即用的模块热重载 (Hot-Module-Replacement)。
源码分析
在通过以上“解析插件” 步骤时,执行vue-cli-service serve命令时,最终是通过调用 serve 插件方法,serve 命令脚本在 cli-service/lib/commands/serve.js 中:
module.exports = (api, options) => {
  //调用 registerCommand 注册一个 serve 命令
  api.registerCommand('serve', {
    description: 'start development server',
    usage: 'vue-cli-service serve [options] [entry]',
    options: {
      '--open': `open browser on server start`,
      '--copy': `copy url to clipboard on server start`,
      '--stdin': `close when stdin ends`,
      '--mode': `specify env mode (default: development)`,
      '--host': `specify host (default: ${defaults.host})`,
      '--port': `specify port (default: ${defaults.port})`,
      '--https': `use https (default: ${defaults.https})`,
      '--public': `specify the public network URL for the HMR client`,
      '--skip-plugins': `comma-separated list of plugin names to skip for this run`
    }
  }, async function serve (args) {
    info('Starting development server...')
 	// 启动一个开发服务器,以下代码省略...
    })
  })
}
在
serve.js中主要调用了api.registerCommand进行注册命令,并传入三个参数:
- 第一个参数:serve 命令名称;
- 第二个参数:命令选项;
- 第三个参数:命令回调函数,在该回调函数中使用 webpack 启动一个本地开发服务;
api.registerCommand方式实际上在cli-service/lib/PluginAPI.js中定义:主要作用是在 Service 类中注册一个命令registerCommand (name, opts, fn) { if (typeof opts === 'function') { fn = opts opts = null } this.service.commands[name] = { fn, opts: opts || {}} }
该命令的主要执行逻辑为 api.registerCommand 的第三个参数回调方法,下面分析该回调 serve 方法 :
serve 回调
serve 回调中主要使用 webpack 启动一个启动一个本地开发服务,内部主要逻辑:
- 配置初始化: webpack 和 webpack 开发服务配置项初始化;
- 创建 webpack 实例 和 开发服务实例;
- 返回 HTTP 服务实例,并启动本地 HTTP 服务;
代码简化逻辑为:
async function serve (args) {
    info('Starting development server...')

    // although this is primarily a dev server, it is possible that we
    // are running it in a mode with a production env, e.g. in E2E tests.
    const isInContainer = checkInContainer()
    const isProduction = process.env.NODE_ENV === 'production'

    const url = require('url')
    const { chalk } = require('@vue/cli-shared-utils')
    const webpack = require('webpack')
    const WebpackDevServer = require('webpack-dev-server')
    const portfinder = require('portfinder')
    const prepareURLs = require('../util/prepareURLs')
    const prepareProxy = require('../util/prepareProxy')
    const launchEditorMiddleware = require('launch-editor-middleware')
    const validateWebpackConfig = require('../util/validateWebpackConfig')
    const isAbsoluteUrl = require('../util/isAbsoluteUrl')
   // ==================webpack 和 webpack 开发服务配置项 初始化====================
    // 往 service.webpackChainFns 队列中添加回调...
    // 1.设置开发环境下 webpack 开发工具...
    // 2.解析 webpack 配置
    // 3.检查常见的 webpack 配置错误
    // 4.暴露高级统计信息...
    //5.解析 webpack 入口参数...
    // 6.解析服务器选项...
    // 7.非生产环境下,注入开发和热重载中间件...

    //========== webpack 配置项初始化完成 ====================
    //========== 创建 webpack 实例 和 开发服务实例============
    // create compiler
    // 核心:创建 webpack 实例,返回一个编译器对象
    const compiler = webpack(webpackConfig)

    // create server
    // 核心:创建一个 webpack 开发服务, 传入一个编译器实例 和 参数选项
    const server = new WebpackDevServer(compiler, {
     //配置项省略...
    })
	// 返回一个 HTTP 服务实例
    return new Promise((resolve, reject) => {
      // log instructions & open browser on first compilation complete
      let isFirstCompile = true
      // 监听 webpack 插件 done 事件
      compiler.hooks.done.tap('vue-cli-service serve', stats => {
  	  // 配置操作....
      // 启动服务,并监听
      server.listen(port, host, err => {
        if (err) {
          reject(err)
        }
      })
    })
  }
完整代码和注释为:
async function serve (args) {
    info('Starting development server...')
    // ==================webpack 和 webpack 开发服务配置项 初始化====================
    // although this is primarily a dev server, it is possible that we
    // are running it in a mode with a production env, e.g. in E2E tests.
    const isInContainer = checkInContainer()
    const isProduction = process.env.NODE_ENV === 'production'

    const url = require('url')
    const { chalk } = require('@vue/cli-shared-utils')
    const webpack = require('webpack')
    const WebpackDevServer = require('webpack-dev-server')
    const portfinder = require('portfinder')
    const prepareURLs = require('../util/prepareURLs')
    const prepareProxy = require('../util/prepareProxy')
    const launchEditorMiddleware = require('launch-editor-middleware')
    const validateWebpackConfig = require('../util/validateWebpackConfig')
    const isAbsoluteUrl = require('../util/isAbsoluteUrl')

    // configs that only matters for dev server
    // 往 service.webpackChainFns 队列中添加回调
    api.chainWebpack(webpackConfig => {
      // 设置开发环境下 webpack 开发工具
      if (process.env.NODE_ENV !== 'production' && process.env.NODE_ENV !== 'test') {
        webpackConfig
          .devtool('cheap-module-eval-source-map')

        // 添加 webpack 热更新插件
        webpackConfig
          .plugin('hmr')
            .use(require('webpack/lib/HotModuleReplacementPlugin'))

        // https://github.com/webpack/webpack/issues/6642
        // https://github.com/vuejs/vue-cli/issues/3539
        // https://v3.vuejs.org/api/global-api.html#definecomponnet
        // 设置 webpack 全局对象 一些插件需要它来正确工作
        webpackConfig
          .output
            .globalObject(`(typeof self !== 'undefined' ? self : this)`)

        // 添加 webpack 进度条
        if (!process.env.VUE_CLI_TEST && options.devServer.progress !== false) {
          webpackConfig
            .plugin('progress')
            .use(require('webpack/lib/ProgressPlugin'))
        }
      }
    })

    // resolve webpack config 解析 webpack 配置
    const webpackConfig = api.resolveWebpackConfig()

    // check for common config errors
    // 检查常见的 webpack 配置错误
    validateWebpackConfig(webpackConfig, api, options)

    // load user devServer options with higher priority than devServer
    // in webpack config
    // 加载用户 devServer 选项,具有比 webpack 配置中的 devServer 更高的优先级
    const projectDevServerOptions = Object.assign(
      webpackConfig.devServer || {},
      options.devServer
    )

    // expose advanced stats
    // 暴露高级统计信息
    if (args.dashboard) {
      // https://github.com/FormidableLabs/webpack-dashboard
      const DashboardPlugin = require('../webpack/DashboardPlugin')
      ;(webpackConfig.plugins = webpackConfig.plugins || []).push(new DashboardPlugin({
        type: 'serve'
      }))
    }

    // entry arg
    //解析 webpack 入口参数
    const entry = args._[0]
    if (entry) {
      webpackConfig.entry = {
        app: api.resolve(entry)
      }
    }

    // resolve server options
    // 解析服务器选项
    const useHttps = args.https || projectDevServerOptions.https || defaults.https
    const protocol = useHttps ? 'https' : 'http'
    const host = args.host || process.env.HOST || projectDevServerOptions.host || defaults.host
    portfinder.basePort = args.port || process.env.PORT || projectDevServerOptions.port || defaults.port
    const port = await portfinder.getPortPromise()
    const rawPublicUrl = args.public || projectDevServerOptions.public
    const publicUrl = rawPublicUrl
      ? /^[a-zA-Z]+:\/\//.test(rawPublicUrl)
        ? rawPublicUrl
        : `${protocol}://${rawPublicUrl}`
      : null

    const urls = prepareURLs(
      protocol,
      host,
      port,
      isAbsoluteUrl(options.publicPath) ? '/' : options.publicPath
    )
    const localUrlForBrowser = publicUrl || urls.localUrlForBrowser
    // proxy config
    const proxySettings = prepareProxy(
      projectDevServerOptions.proxy,
      api.resolve('public')
    )

    // inject dev & hot-reload middleware entries
    // 非生产环境下,注入开发和热重载中间件
    if (!isProduction) {
      // socket 连接路径
      const sockPath = projectDevServerOptions.sockPath || '/sockjs-node'
      const sockjsUrl = publicUrl
        // explicitly configured via devServer.public
        ? `?${publicUrl}&sockPath=${sockPath}`
        : isInContainer
          // can't infer public network url if inside a container...
          // use client-side inference (note this would break with non-root publicPath)
          ? ``
          // otherwise infer the url
          : `?` + url.format({
            protocol,
            port,
            hostname: urls.lanUrlForConfig || 'localhost'
          }) + `&sockPath=${sockPath}`
      const devClients = [
        // dev server client
        require.resolve(`webpack-dev-server/client`) + sockjsUrl,
        // hmr client
        require.resolve(projectDevServerOptions.hotOnly
          ? 'webpack/hot/only-dev-server'
          : 'webpack/hot/dev-server')
        // TODO custom overlay client
        // `@vue/cli-overlay/dist/client`
      ]
      if (process.env.APPVEYOR) {
        devClients.push(`webpack/hot/poll?500`)
      }
      // inject dev/hot client
      // 添加开发和热重载客户端到 entry
      addDevClientToEntry(webpackConfig, devClients)
    }
    //========== webpack 配置项初始化完成 ====================
    //========== 创建 webpack 实例 和 开发服务实例============
    // create compiler
    // 核心:创建 webpack 实例,返回一个编译器对象
    const compiler = webpack(webpackConfig)

    // handle compiler error
    // webpack 处理编译错误,监听错误,发生错误时退出程序
    compiler.hooks.failed.tap('vue-cli-service serve', msg => {
      error(msg)
      process.exit(1)
    })

    // create server
    // 核心:创建一个 webpack 开发服务, 传入一个编译器实例 和 参数选项
   const server = new WebpackDevServer(compiler, Object.assign({
      // 关闭 webpack 的日志
      logLevel: 'silent',
      // 关闭 webpack-dev-server 的日志
      clientLogLevel: 'silent',
      // 支持页面跳转
      historyApiFallback: {
        // 禁用点式规则
        disableDotRule: true,
        // 生成历史api回退重写
        rewrites: genHistoryApiFallbackRewrites(options.publicPath, options.pages)
      },
      // 指定内容基础
      contentBase: api.resolve('public'),
      // 非生产环境时,监听内容基础
      watchContentBase: !isProduction,
      // 非生产环境时,启用热更新
      hot: !isProduction,
      // 禁用注入客户端
      injectClient: false,
      // 压缩
      compress: isProduction,
      // 指定publicPath
      publicPath: options.publicPath,
      // 非生产环境时,启用覆盖
      overlay: isProduction // TODO disable this
        ? false
        : { warnings: false, errors: true }
    }, projectDevServerOptions, {
      // 使用https
      https: useHttps,
      // 代理设置
      proxy: proxySettings,
      // 注册中间件
      // eslint-disable-next-line no-shadow
      before (app, server) {
        // launch editor support.
        // this works with vue-devtools & @vue/cli-overlay
        // 启动编辑器支持
        // 此功能与vue-devtools和@vue/cli-overlay一起工作
        app.use('/__open-in-editor', launchEditorMiddleware(() => console.log(
          `To specify an editor, specify the EDITOR env variable or ` +
          `add "editor" field to your Vue project config.\n`
        )))
        // allow other plugins to register middlewares, e.g. PWA
        // 允许其他插件注册中间件,例如PWA
        api.service.devServerConfigFns.forEach(fn => fn(app, server))
        // apply in project middlewares
        // 应用项目中间件
        projectDevServerOptions.before && projectDevServerOptions.before(app, server)
      },
      // avoid opening browser
      // 避免打开浏览器
      open: false
    }))

   // 注册 node 信号
   ;['SIGINT', 'SIGTERM'].forEach(signal => {
      // 当收到SIGINT或SIGTERM信号时,关闭服务器
      process.on(signal, () => {
        server.close(() => {
          // 退出进程
          process.exit(0)
        })
      })
    })

   // 判断args.stdin是否存在
   if (args.stdin) {
      // 当标准输入流结束时
      process.stdin.on('end', () => {
        // 关闭服务器
        server.close(() => {
          // 退出进程
          process.exit(0)
        })
      })

      // 恢复标准输入流
      process.stdin.resume()
    }

   // on appveyor, killing the process with SIGTERM causes execa to
    // throw error
    if (process.env.VUE_CLI_TEST) {
      process.stdin.on('data', data => {
        if (data.toString() === 'close') {
          console.log('got close signal!')
          server.close(() => {
            process.exit(0)
          })
        }
      })
    }

    return new Promise((resolve, reject) => {
      // log instructions & open browser on first compilation complete
      let isFirstCompile = true
      // 监听 webpack 插件 done 事件
      compiler.hooks.done.tap('vue-cli-service serve', stats => {
        if (stats.hasErrors()) {
          return
        }

        let copied = ''
        // 首次编译将服务地址添加到粘贴板
        if (isFirstCompile && args.copy) {
          try {
            require('clipboardy').writeSync(localUrlForBrowser)
            copied = chalk.dim('(copied to clipboard)')
          } catch (_) {
            /* catch exception if copy to clipboard isn't supported (e.g. WSL), see issue #3476 */
          }
        }

        const networkUrl = publicUrl
          ? publicUrl.replace(/([^/])$/, '$1/')
          : urls.lanUrlForTerminal

        console.log()
        console.log(`  App running at:`)
        console.log(`  - Local:   ${chalk.cyan(urls.localUrlForTerminal)} ${copied}`)
        if (!isInContainer) {
          console.log(`  - Network: ${chalk.cyan(networkUrl)}`)
        } else {
          console.log()
          console.log(chalk.yellow(`  It seems you are running Vue CLI inside a container.`))
          if (!publicUrl && options.publicPath && options.publicPath !== '/') {
            console.log()
            console.log(chalk.yellow(`  Since you are using a non-root publicPath, the hot-reload socket`))
            console.log(chalk.yellow(`  will not be able to infer the correct URL to connect. You should`))
            console.log(chalk.yellow(`  explicitly specify the URL via ${chalk.blue(`devServer.public`)}.`))
            console.log()
          }
          console.log(chalk.yellow(`  Access the dev server via ${chalk.cyan(
            `${protocol}://localhost:<your container's external mapped port>${options.publicPath}`
          )}`))
        }
        console.log()

        if (isFirstCompile) {
          isFirstCompile = false

          if (!isProduction) {
            const buildCommand = hasProjectYarn(api.getCwd()) ? `yarn build` : hasProjectPnpm(api.getCwd()) ? `pnpm run build` : `npm run build`
            console.log(`  Note that the development build is not optimized.`)
            console.log(`  To create a production build, run ${chalk.cyan(buildCommand)}.`)
          } else {
            console.log(`  App is served in production mode.`)
            console.log(`  Note this is for preview or E2E testing only.`)
          }
          console.log()
          // 打开浏览器
          if (args.open || projectDevServerOptions.open) {
            const pageUri = (projectDevServerOptions.openPage && typeof projectDevServerOptions.openPage === 'string')
              ? projectDevServerOptions.openPage
              : ''
            openBrowser(localUrlForBrowser + pageUri)
          }

          // Send final app URL
          // 发送 url 到粘贴板
          if (args.dashboard) {
            const ipc = new IpcMessenger()
            ipc.send({
              vueServe: {
                url: localUrlForBrowser
              }
            })
          }

          // resolve returned Promise
          // so other commands can do api.service.run('serve').then(...)
          resolve({
            server,
            url: localUrlForBrowser
          })
        } else if (process.env.VUE_CLI_TEST) {
          // signal for test to check HMR
          console.log('App updated')
        }
      })
      // 启动服务,并监听
      server.listen(port, host, err => {
        if (err) {
          reject(err)
        }
      })
    })
  }
build 命令解析
vue-cli-service build 命令用于生产环境,使用 webpack 对项目进行构建:
使用
用法:vue-cli-service build [options] [entry|pattern]

选项:

  --mode        指定环境模式 (默认值:production)
  --dest        指定输出目录 (默认值:dist)
  --modern      面向现代浏览器带自动回退地构建应用
  --target      app | lib | wc | wc-async (默认值:app)
  --name        库或 Web Components 模式下的名字 (默认值:package.json 中的 "name" 字段或入口文件名)
  --no-clean    在构建项目之前不清除目标目录的内容
  --report      生成 report.html 以帮助分析包内容
  --report-json 生成 report.json 以帮助分析包内容
  --watch       监听文件变化
vue-cli-service build 会在 dist/ 目录产生一个可用于生产环境的包,带有 JS/CSS/HTML 的压缩,和为更好的缓存而做的自动的 vendor chunk splitting。它的 chunk manifest 会内联在 HTML 里。
这里还有一些有用的命令参数:
--modern使用现代模式构建应用,为现代浏览器交付原生支持的 ES2015 代码,并生成一个兼容老浏览器的包用来自动回退。--target允许你将项目中的任何组件以一个库或 Web Components 组件的方式进行构建。更多细节请查阅构建目标。--report和--report-json会根据构建统计生成报告,它会帮助你分析包中包含的模块们的大小。
通过 npm script 执行该命令:
  "scripts": {
    "build:prod": "git pull && vue-cli-service build && npm run upload prod",
    "build:test": "git pull && vue-cli-service build --mode staging && npm run upload test",
  },
源码分析
build 命令插件位于 cli-service/lib/commands/build/index.js: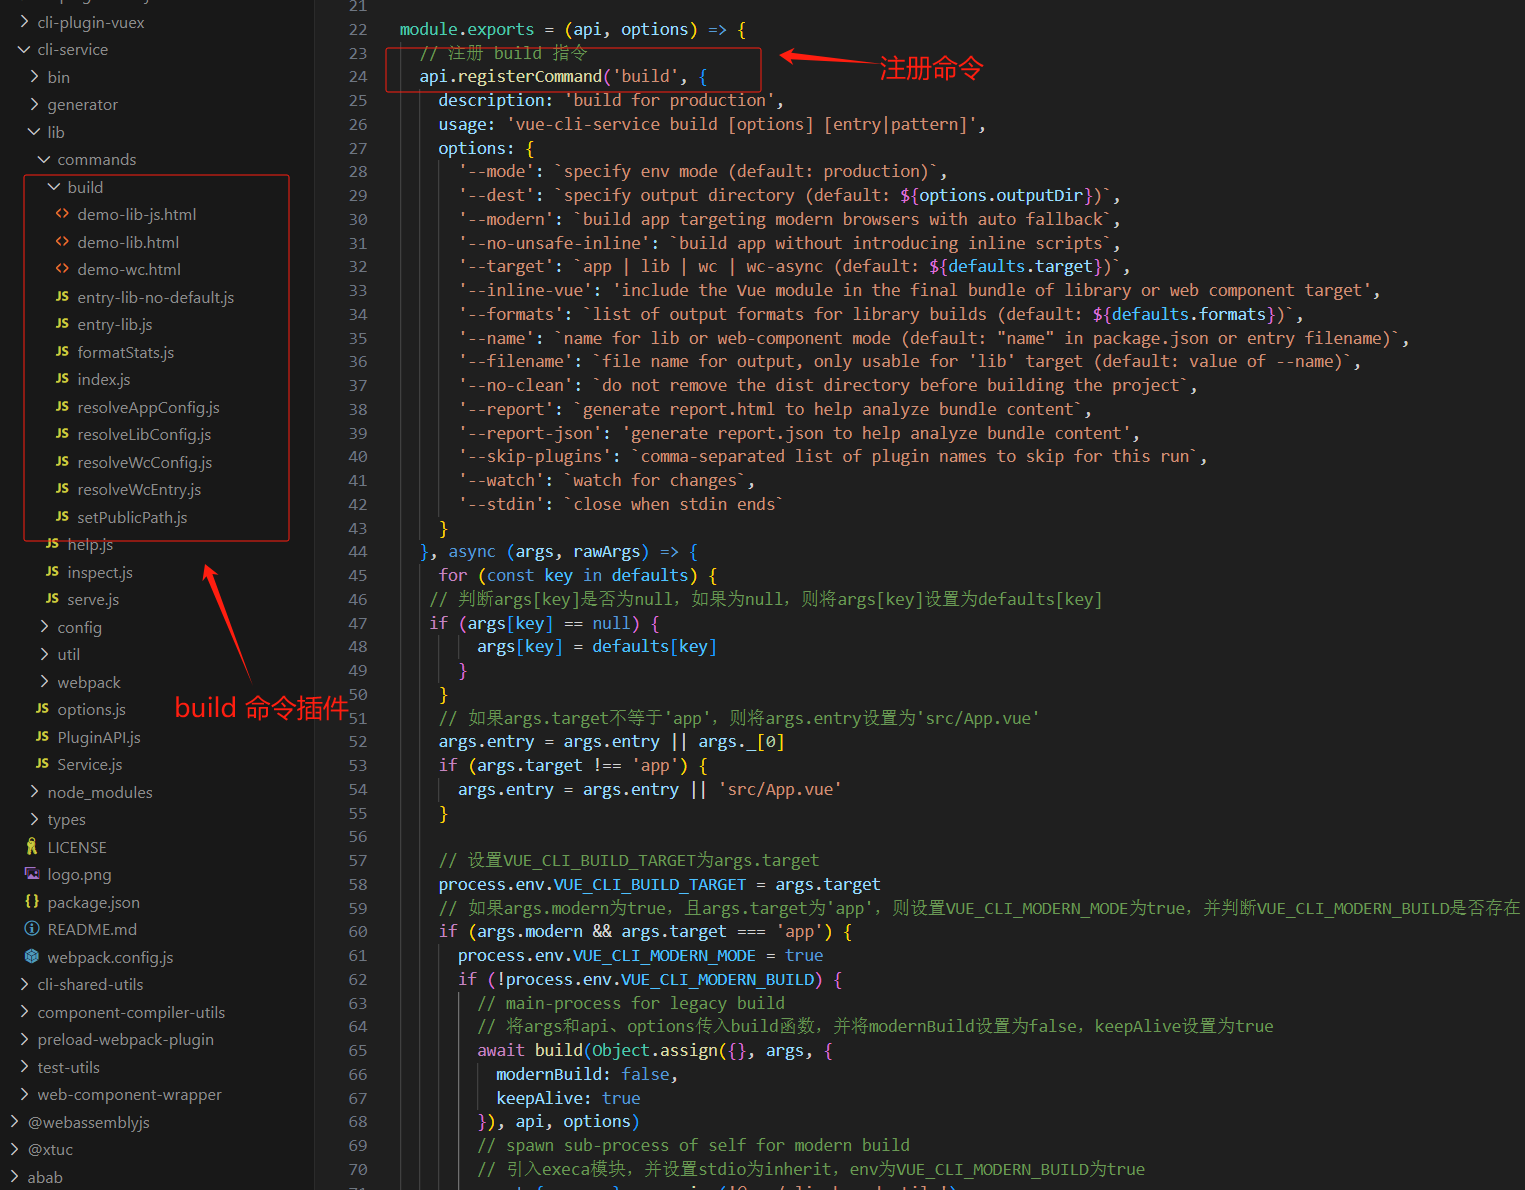
该命令入口文件使用
api.registerCommand('build',options, callback)注册一个 build 命令:
- 注册并处理一个名为
build的命令。- 根据命令的参数和选项来设置默认值。
- 根据
args.modern的值来执行不同的构建操作。- 在 Modern 模式下,通过子进程来执行构建操作。
- 删除构建操作中产生的临时文件。
在注册完成 build 命令后,解析命令参数,最后传入一个 build 方法解析命令行参数、配置 Webpack 配置、执行 Webpack 构建执行 webpack 构建:
//负责解析命令行参数、配置 Webpack 配置、执行 Webpack 构建
async function build(args, api, options) {
  const fs = require('fs-extra')
  const path = require('path')
  const webpack = require('webpack')
  const { chalk } = require('@vue/cli-shared-utils')
  const formatStats = require('./formatStats')
  const validateWebpackConfig = require('../../util/validateWebpackConfig')
  const {
    log,
    done,
    info,
    logWithSpinner,
    stopSpinner
  } = require('@vue/cli-shared-utils')

  log()
  const mode = api.service.mode
  //检查命令行参数,并根据参数内容修改了构建模式(如 --modern 和 --no-modern)
  if (args.target === 'app') {
    const bundleTag = args.modern
      ? args.modernBuild
        ? `modern bundle `
        : `legacy bundle `
      : ``
    logWithSpinner(`Building ${bundleTag}for ${mode}...`)
  } else {
    const buildMode = buildModes[args.target]
    if (buildMode) {
      const additionalParams = buildMode === 'library' ? ` (${args.formats})` : ``
      logWithSpinner(`Building for ${mode} as ${buildMode}${additionalParams}...`)
    } else {
      throw new Error(`Unknown build target: ${args.target}`)
    }
  }

  if (args.dest) {
    // Override outputDir before resolving webpack config as config relies on it (#2327)
    options.outputDir = args.dest
  }

  const targetDir = api.resolve(options.outputDir)
  const isLegacyBuild = args.target === 'app' && args.modern && !args.modernBuild

  // resolve raw webpack config
  //加载了相应的webpack配置文件
  let webpackConfig
  if (args.target === 'lib') {
    webpackConfig = require('./resolveLibConfig')(api, args, options)
  } else if (
    args.target === 'wc' ||
    args.target === 'wc-async'
  ) {
    webpackConfig = require('./resolveWcConfig')(api, args, options)
  } else {
    webpackConfig = require('./resolveAppConfig')(api, args, options)
  }

  // check for common config errors
  //检查了 Webpack 配置是否包含错误,并进行了修正
  validateWebpackConfig(webpackConfig, api, options, args.target)
  //启动一个监听器来监听文件变化并自动重新构建
  if (args.watch) {
    modifyConfig(webpackConfig, config => {
      config.watch = true
    })
  }

  // 判断是否有标准输入
  if (args.stdin) {
    // 当标准输入结束时,退出程序
    process.stdin.on('end', () => {
      process.exit(0)
    })
    // 恢复标准输入
    process.stdin.resume()
  }

  // Expose advanced stats
  // 判断参数dashboard是否存在
  if (args.dashboard) {
    // 引入DashboardPlugin插件
    const DashboardPlugin = require('../../webpack/DashboardPlugin')
    // 修改webpack配置
    modifyConfig(webpackConfig, config => {
      // 将DashboardPlugin插件添加到配置中
      config.plugins.push(new DashboardPlugin({
        type: 'build',
        modernBuild: args.modernBuild,
        keepAlive: args.keepAlive
      }))
    })
  }
  // 如果args.report或者args['report-json']存在,则引入webpack-bundle-analyzer插件
  if (args.report || args['report-json']) {
    const { BundleAnalyzerPlugin } = require('webpack-bundle-analyzer')
    // 修改webpackConfig配置
    modifyConfig(webpackConfig, config => {
      // 根据target参数,设置bundleName
      const bundleName = args.target !== 'app'
        ? config.output.filename.replace(/\.js$/, '-')
        : isLegacyBuild ? 'legacy-' : ''
      // 添加BundleAnalyzerPlugin插件
      config.plugins.push(new BundleAnalyzerPlugin({
        // 设置日志等级
        logLevel: 'warn',
        // 关闭浏览器
        openAnalyzer: false,
        // 根据args.report参数,设置analyzerMode
        analyzerMode: args.report ? 'static' : 'disabled',
        // 设置报告文件名
        reportFilename: `${bundleName}report.html`,
        // 设置报告文件名
        statsFilename: `${bundleName}report.json`,
        // 根据args['report-json']参数,设置generateStatsFile
        generateStatsFile: !!args['report-json']
      }))
    })
  }

  if (args.clean) {
    // 如果args.clean为true,则执行fs.remove函数,删除targetDir目录
    await fs.remove(targetDir)
  }

 return new Promise((resolve, reject) => {
    // 执行webpack构建
    webpack(webpackConfig, (err, stats) => {
      // 停止spinner
      stopSpinner(false)
      // 如果出现错误,则返回错误
      if (err) {
        return reject(err)
      }

      // 如果构建有错误,则返回错误
      if (stats.hasErrors()) {
        return reject(`Build failed with errors.`)
      }

      // 如果不是静默模式,则输出构建信息
      if (!args.silent) {
        const targetDirShort = path.relative(
          api.service.context,
          targetDir
        )
        log(formatStats(stats, targetDirShort, api))
        // 如果是app目标,且不是legacy构建,则输出部署信息
        if (args.target === 'app' && !isLegacyBuild) {
          // 如果不是watch模式,则输出构建完成信息
          if (!args.watch) {
            done(`Build complete. The ${chalk.cyan(targetDirShort)} directory is ready to be deployed.`)
            info(`Check out deployment instructions at ${chalk.cyan(`https://cli.vuejs.org/guide/deployment.html`)}\n`)
          } else {
            done(`Build complete. Watching for changes...`)
          }
        }
      }

      // test-only signal
      // 测试only信号
      if (process.env.VUE_CLI_TEST) {
        console.log('Build complete.')
      }

      // 构建成功,返回成功
      resolve()
    })
  })
}
该方法主要逻辑为:
- 代码检查了命令行参数,并根据参数内容修改了构建模式(如
--modern和--no-modern)。- 然后,代码加载了相应的配置文件(如
resolveAppConfig、resolveLibConfig等),并根据命令行参数进行了相应的配置修改。- 接着,代码检查了 Webpack 配置是否包含错误,并进行了修正。
- 最后,代码根据命令行参数(如
--silent和--report)决定是否输出构建结果。- 如果需要,代码还会启动一个监听器来监听文件变化并自动重新构建。
- 执行 webpack 构建;
- 为了方便测试,代码还允许在测试环境中输出一些信号。
WebPack 配置原理
配置方式
在 vue.config.js 中的 选项提供一个对象:
// vue.config.js
module.exports = {
  configureWebpack: {
    plugins: [
      new MyAwesomeWebpackPlugin()
    ]
  }
}
该对象将会被 webpack-merge 合并入最终的 webpack 配置。
使用 Vue-Cli 创建的项目 vue.config.js 配置为:
'use strict'
const path = require('path')
const defaultSettings = require('./src/settings/projectSettings.js')
const LodashModuleReplacementPlugin = require('lodash-webpack-plugin')
const UpdatePopup = require('@femessage/update-popup') // 版本更新提醒插件
function resolve(dir) {
  return path.join(__dirname, dir)
}

const name = defaultSettings.title page title

// If your port is set to 80,
// use administrator privileges to execute the command line.
// For example, Mac: sudo npm run
// You can change the port by the following methods:
// port = 8080 npm run dev OR npm run dev --port = 8080
const port = process.env.port || process.env.npm_config_port || 8080 // dev port

// All configuration item explanations can be find in https://cli.vuejs.org/config/
module.exports = {
  /**
   * You will need to set publicPath if you plan to deploy your site under a sub path,
   * for example GitHub Pages. If you plan to deploy your site to https://foo.github.io/bar/,
   * then publicPath should be set to "/bar/".
   * In most cases please use '/' !!!
   * Detail: https://cli.vuejs.org/config/#publicpath
   */
  publicPath: './',
  outputDir: 'dist',
  assetsDir: 'static',
  lintOnSave: process.env.NODE_ENV === 'development',
  productionSourceMap: false,
  devServer: {
    port: port,
    open: true,
    overlay: {
      warnings: false,
      errors: true
    },
    hot: true,
    // websocket 配置代理
    proxy: {
      '/socket.io': {
        target: 'http://localhost:3000', // target host
        changeOrigin: true, // needed for virtual hosted sites
        logLevel: 'debug'
      }
    }
  },
  configureWebpack: {
    // provide the app's title in webpack's name field, so that
    // it can be accessed in index.html to inject the correct title.
    name: name,
    resolve: {
      alias: {
        '@': resolve('src')
      }
    }
  },
  chainWebpack(config) {
    // it can improve the speed of the first screen, it is recommended to turn on preload
    config.plugin('preload').tap(() => [
      {
        rel: 'preload',
        // to ignore runtime.js
        // https://github.com/vuejs/vue-cli/blob/dev/packages/@vue/cli-service/lib/config/views/App.js#L171
        fileBlacklist: [/\.map$/, /hot-update\.js$/, /runtime\..*\.js$/],
        include: 'initial'
      }
    ])
    // 版本更新提醒插件
    config.plugin('femessage-update-popup').use(UpdatePopup, [{
      auto: true
    }])
    // when there are many pages, it will cause too many meaningless requests
    config.plugins.delete('prefetch')

    // set svg-sprite-loader
    config.module
      .rule('svg')
      .exclude.add(resolve('src/icons'))
      .end()
    config.module
      .rule('icons')
      .test(/\.svg$/)
      .include.add(resolve('src/icons'))
      .end()
      .use('svg-sprite-loader')
      .loader('svg-sprite-loader')
      .options({
        symbolId: 'icon-[name]'
      })
      .end()

    config
      .when(process.env.NODE_ENV !== 'development',
        config => {
          config
            .plugin('ScriptExtHtmlWebpackPlugin')
            .after('html')
            .use('script-ext-html-webpack-plugin', [{
            // `runtime` must same as runtimeChunk name. default is `runtime`
              inline: /runtime\..*\.js$/
            }])
            .end()
          config
            .optimization.splitChunks({
              chunks: 'all',
              cacheGroups: {
                libs: {
                  name: 'chunk-libs',
                  test: /[\\/]node_modules[\\/]/,
                  priority: 10,
                  chunks: 'initial' // only package third parties that are initially dependent
                },
                elementUI: {
                  name: 'chunk-elementUI', // split elementUI into a single package
                  priority: 20, // the weight needs to be larger than libs and app or it will be packaged into libs or app
                  test: /[\\/]node_modules[\\/]_?element-ui(.*)/ // in order to adapt to cnpm
                },
                commons: {
                  name: 'chunk-commons',
                  test: resolve('src/components'), // can customize your rules
                  minChunks: 3, //  minimum common number
                  priority: 5,
                  reuseExistingChunk: true
                }
              }
            })
          // https:// webpack.js.org/configuration/optimization/#optimizationruntimechunk
          config.optimization.runtimeChunk('single')
        }
      )

    config.plugin('loadshReplace').use(new LodashModuleReplacementPlugin())
  },
  css: {
    loaderOptions: {
      sass: {
        prependData: `@import "~@/styles/variables.scss";`
      }
    }
  }
}
configureWebpack 属性
Type:
Object | Functionwebpack 配置属性:
如果这个值是一个对象,则会通过 webpack-merge 合并到最终的配置中。
如果这个值是一个函数,则会接收被解析的配置作为参数。该函数既可以修改配置并不返回任何东西,也可以返回一个被克隆或合并过的配置版本。
原理
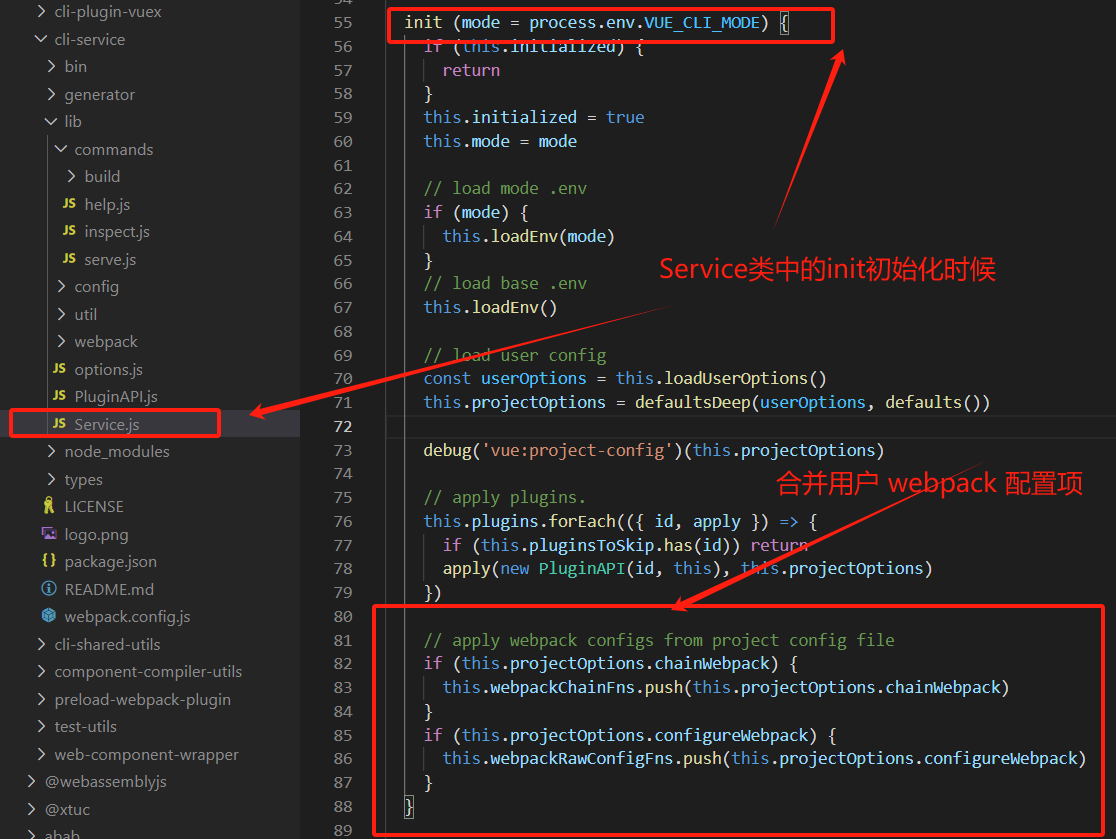
configureWebpack 属性在 CLI 服务对象 Service 类初始化 init 方法中,通过将用户配置的 webpack 项存储到 webpackRawConfigFns,最后通过 webpack-merge 合并到最终的配置中:
链式操作 (高级)
Vue CLI 内部的 webpack 配置是通过 webpack-chain 维护的。
这个库提供了一个 webpack 原始配置的上层抽象,使其可以定义具名的 loader 规则和具名插件,并有机会在后期进入这些规则并对它们的选项进行修改。 链式操作通过 vue.config.js 中的 chainWebpack 属性配置:
chainWebpack 属性
Type:
Function是一个函数,会接收一个基于 webpack-chain 的
ChainableConfig实例。允许对内部的 webpack 配置进行更细粒度的修改。
chainWebpack 属性使用方式参考 webpack-chain 官方文档使用方式。
webpack-chain
webpack-chain 是什么?
webpack-chain是一个工具,它通过链式 API 生成和简化 webpack 2-4 版本的配置的修改
为什么要使用 webpack-chain ?
Webpack-chain 的出现是为了解决 webpack 配置的问题。
Webpack 的配置过程极其复杂,需要输入大量的信息来保证打包结果符合预期。
Webpack-chain 通过提供一个链式 API 来解决这个问题:
- 它允许用户以链式方式创建和修改 webpack 配置,这使得配置过程更加直观和易于管理。
- API 的 Key 部分可以由用户指定的名称引用,这有助于标准化跨项目的配置修改方式。
模式和环境变量
模式
模式是 Vue CLI 项目中一个重要的概念。默认情况下,一个 Vue CLI 项目有三个模式:
- 开发模式:
development字段表示,使用vue-cli-service serve命令启动; - 测试模式:
test字段表示,使用vue-cli-service test:unit命令启动; - 生产模式:
production字段表示,使用vue-cli-service build命令启动;
你可以通过传递 --mode 选项参数为命令行覆写默认的模式。例如,如果你想要在构建命令中使用开发环境变量:
vue-cli-service build --mode development
当运行 vue-cli-service 命令时,所有的环境变量都从对应的环境文件中载入。
通过以上 "serve 命令解析" 部分可知:vue-cli-service 中 serve 和 build 命令最终实际执行 server.js 和 build 插件,插件目录如下: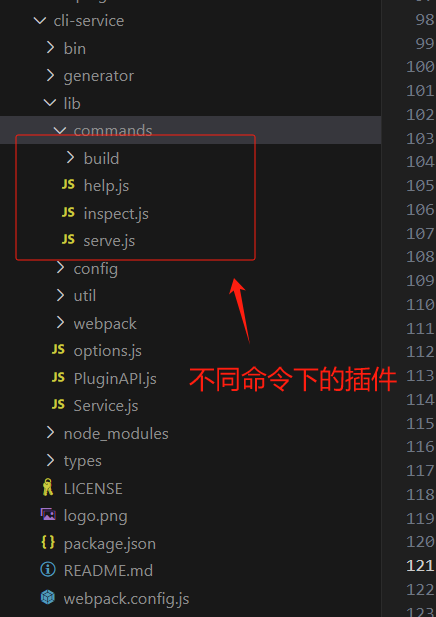
环境变量
项目根目录中放置下列文件来指定环境变量:
.env                # 在所有的环境中被载入
.env.local          # 在所有的环境中被载入,但会被 git 忽略
.env.[mode]         # 只在指定的模式中被载入
.env.[mode].local   # 只在指定的模式中被载入,但会被 git 忽略
一个环境文件只包含环境变量的“键=值”对:
FOO=bar
VUE_APP_NOT_SECRET_CODE=some_value
源码分析
模式和环境变量初始化在 Service 类初始化时 init 方法中,通过 loadEnv 方法初始化:
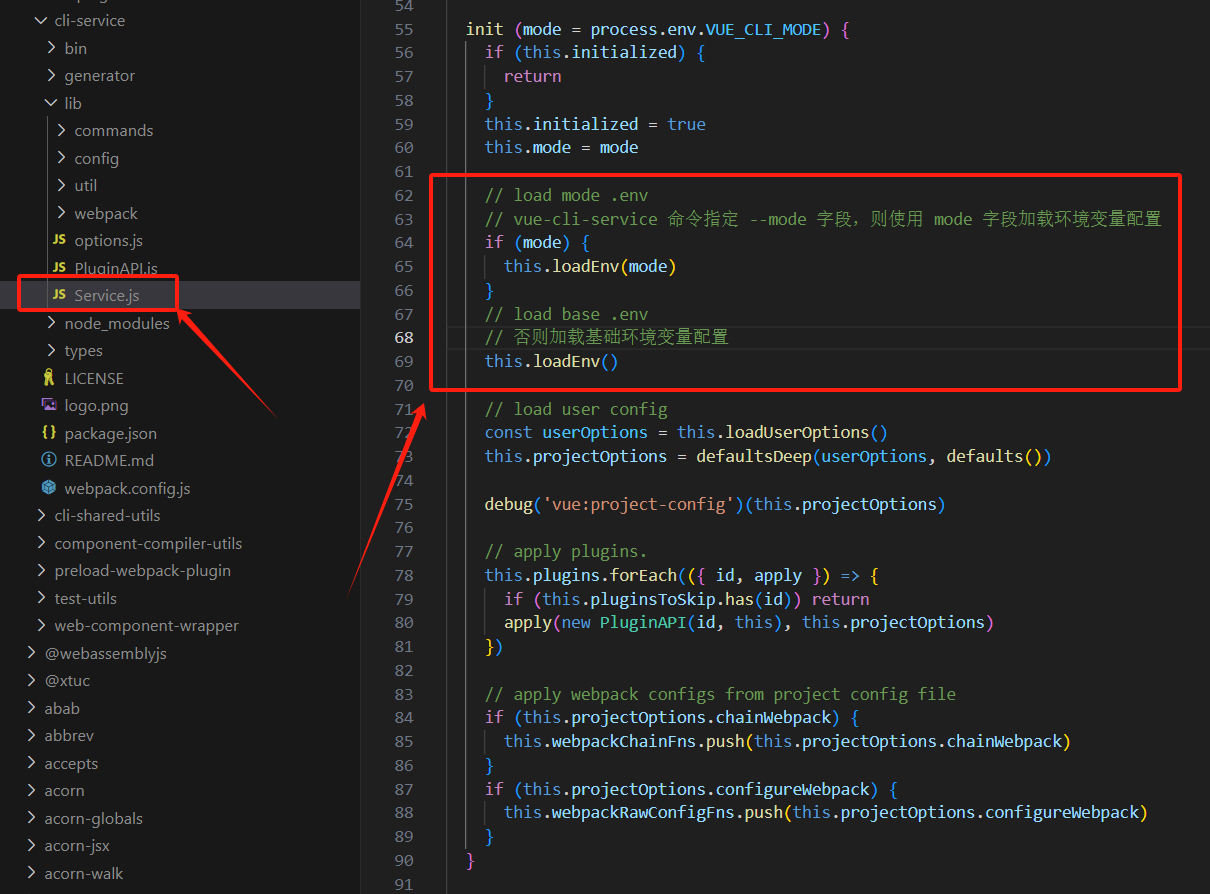
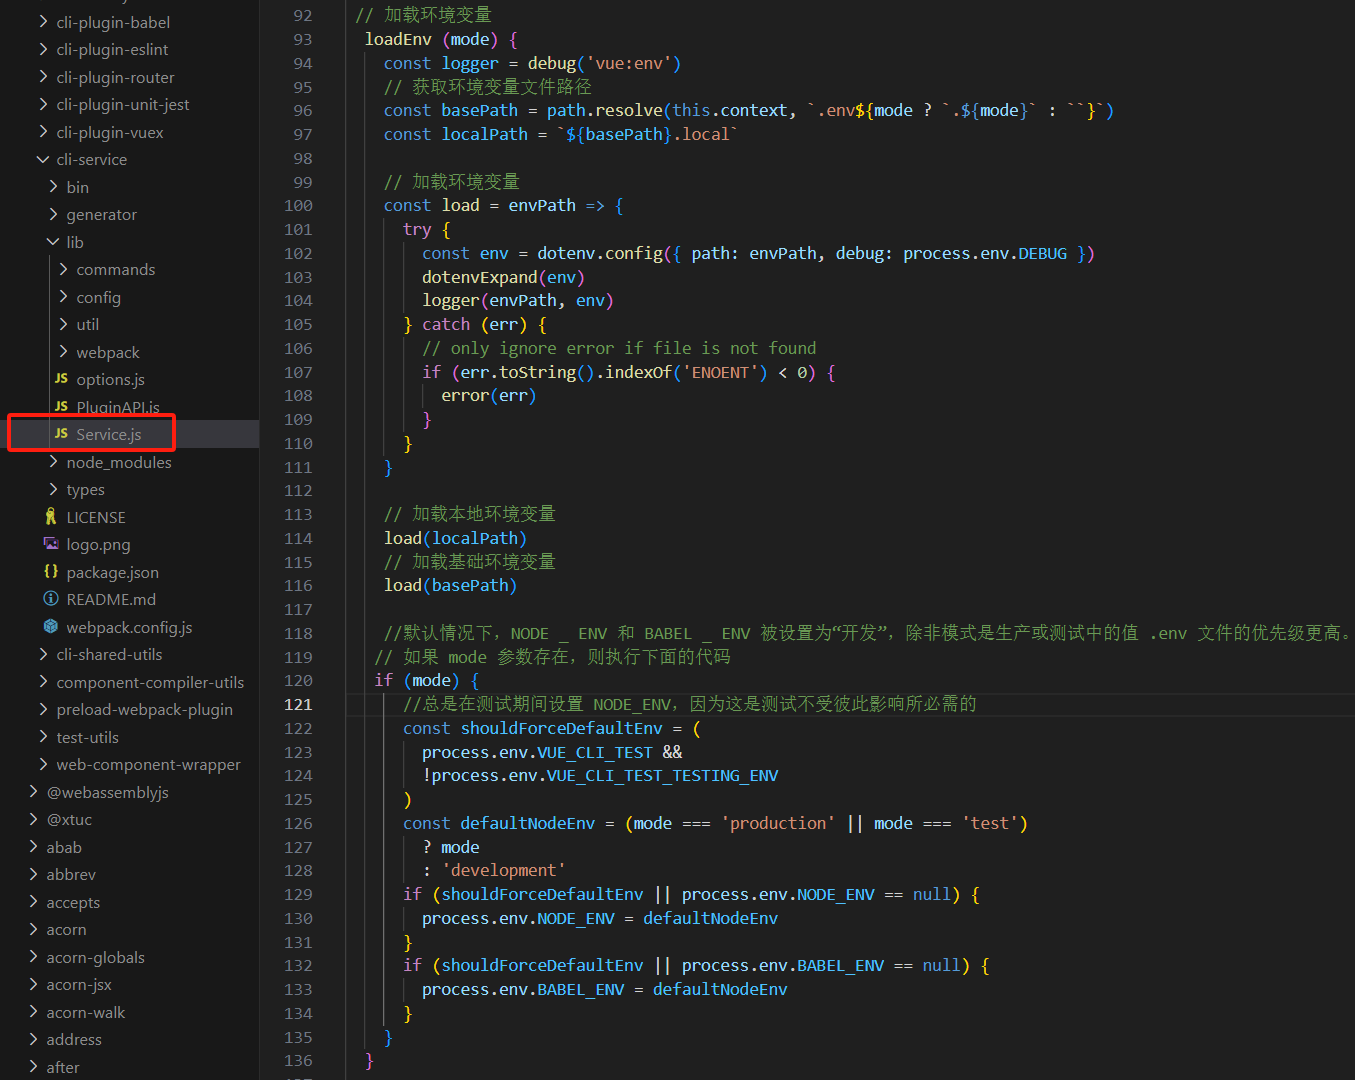
loadEnv 方法定义:
