组件和组件封装
组件和组件封装
组件设计
关于 Vue2 组件基础知识总结,可以参考我的博客文章 Vue2.x 组件,文章中包含以下关于组件的知识总结:
当前文章是对组件知识点扩展
Web Components
概念:
Web Components是一种用于构建可重用、独立的Web元素的技术,它由一组Web平台标准组成,包括自定义元素(Custom Elements)、影子DOM(Shadow DOM)和HTML模板(HTML Templates)。它旨在改善Web应用程序的可维护性、可复用性和封装性。
为什么需要 Web Components ?
Web Components解决了HTML不支持组件导致的代码冗余问题。在没有组件的情况下,相同的HTML结构需要在代码中多次出现,这不仅不美观,而且严重影响维护,从而影响项目的开发进度。而Web Components允许开发者创建自定义HTML标签,具有其自己的样式、行为和功能,然后将它们在不同页面和项目中重复使用。
核心组成:
具体来说,自定义元素(Custom Elements)是Web组件的核心部分,允许开发人员定义自己的HTML元素,并定义元素的行为和样式。通过自定义元素,开发人员可以创建具有语义性和功能性的自定义标签。例如,可以创建一个名为<my-button>或<my-carousel>的自定义元素,然后在整个Web应用程序中重复使用这些元素,而无需重复编写相同的HTML结构和样式。
影子DOM(Shadow DOM):为自定义元素提供了一个封装的DOM树,使得元素内部的样式和行为与外界隔离,从而避免了全局样式冲突的问题。
HTML模板(HTML Templates):则允许开发者定义可重用的HTML结构,这些结构可以在需要时被动态地插入到DOM中。
- Custom Elements 定义组件展示形式
- HTML Imports 提出新的引入方式
参考资料
组件分类
按组件定义分类
- 内置的组件:
keep-alive、component、transition、transition-group等; - 用户自定义组件:在使用前必须注册。
按逻辑分类
- 异步组件
- 动态组件:
<component /> - 递归组件
按功能分类
- 视图组件
- 逻辑组件
异步组件
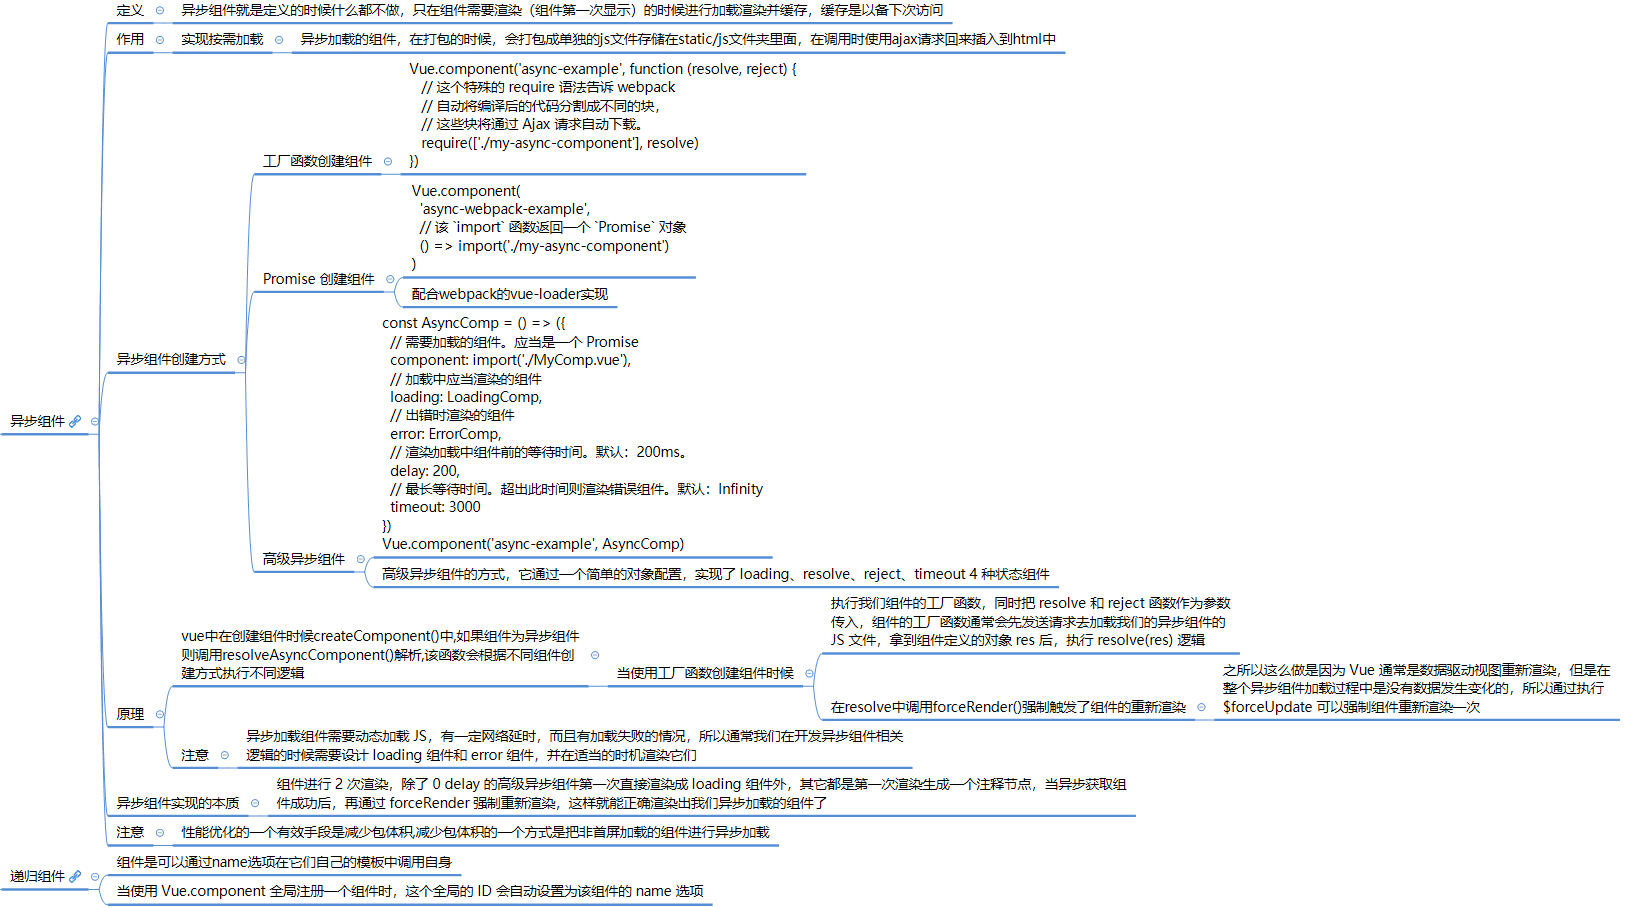
注册方式
全局注册
使用工厂函数组件创建
Vue.component('async-webpack-example', function (resolve) {
  // 这个特殊的 `require` 语法将会告诉 webpack
  // 自动将你的构建代码切割成多个包,这些包
  // 会通过 Ajax 请求加载
  require(['./my-async-component'], resolve)
})
使用 Promise 创建
Vue.component(
  'async-webpack-example',
  // 这个动态导入会返回一个 `Promise` 对象。
  () => import('./my-async-component')
)
高级异步组件
const AsyncComponent = () => ({
  // 需要加载的组件 (应该是一个 `Promise` 对象)
  component: import('./MyComponent.vue'),
  // 异步组件加载时使用的组件
  loading: LoadingComponent,
  // 加载失败时使用的组件
  error: ErrorComponent,
  // 展示加载时组件的延时时间。默认值是 200 (毫秒)
  delay: 200,
  // 如果提供了超时时间且组件加载也超时了,
  // 则使用加载失败时使用的组件。默认值是:`Infinity`
  timeout: 3000
})
局部注册
使用
Promise创建new Vue({ // ... components: { 'my-component': () => import('./my-async-component') } })
源码分析
原理:异步组件实现的本质是 2 次渲染
- 第一次渲染生成一个注释节点;
- 当异步获取组件成功后,再通过
forceRender强制重新渲染,这样就能正确渲染出我们异步加载的组件了;
0 delay 的高级异步组件第一次直接渲染成 loading 组件,只有一次渲染。
异步组件创建时机:
在组件创建一节中提到,组件创建时两个过程:
- 第一次:render 方法调用的 _createElement() 方法中的 createComponent() 的实现,此处主要创建组件的占位符节点;
- 第二次:path 方法调用 createElem() 方法中: 调用 createComponent() 的实现,此处递归创建组件组件实例,通过 new Vue() 创建组件;
异步组件创建时机是在第一次 render 方法中调用 createComponents() 中
resolveAsyncComponent时创建:export function createComponent ( Ctor: Class<Component> | Function | Object | void, data: ?VNodeData, context: Component, children: ?Array<VNode>, tag?: string ): VNode | Array<VNode> | void { if (isUndef(Ctor)) { return } const baseCtor = context.$options._base // plain options object: turn it into a constructor if (isObject(Ctor)) { // 异步组件中传入的 Ctor 为函数,因此此处逻辑跳过 Ctor = baseCtor.extend(Ctor) } // ... // async component let asyncFactory if (isUndef(Ctor.cid)) { //异步组件未定义 cid asyncFactory = Ctor Ctor = resolveAsyncComponent(asyncFactory, baseCtor, context) //解析异步组件 if (Ctor === undefined) { // return a placeholder node for async component, which is rendered // as a comment node but preserves all the raw information for the node. // the information will be used for async server-rendering and hydration. // 创建异步组件的占位符 VNode return createAsyncPlaceholder( asyncFactory, data, context, children, tag ) } } }- 通过
resolveAsyncComponent函数解析后返回 VNode 占位符节点。
- 通过
resolveAsyncComponent函数:- 加载异步组件,处理三种类型的异步组件,当组件加载完成后根据加载状态进行处理。
- 加载成功时调用
forceRender强制重新渲染组件。函数定义在 src/core/vdom/helpers/resolve-async-component.js
/**
 * resolveAsyncComponent处理 3 种异步组件的创建方式:
 * 1.工厂函数方式;
 * 2.Promise 创建组件;
 * 3.高级异步组件
 * @param {*} factory
 * @param {*} baseCtor
 * @param {*} context
 */
export function resolveAsyncComponent(
  factory: Function,
  baseCtor: Class<Component>,
  context: Component
): Class<Component> | void {
  /*配置错误选项工厂返回出错组件*/
  if (isTrue(factory.error) && isDef(factory.errorComp)) {
    return factory.errorComp
  }

  /*resoved时候返回resolved组件*/
  if (isDef(factory.resolved)) {
    return factory.resolved
  }

  /*如果异步组件加载中并未返回,这时候会走到这个逻辑,执行 loading 组件*/
  if (isTrue(factory.loading) && isDef(factory.loadingComp)) {
    return factory.loadingComp //返回 factory.loadingComp,渲染 loading 组件
  }
  /**多个地方同时初始化一个异步组件,那么它的实际加载应该只有一次 */
  if (isDef(factory.contexts)) {
    // already pending
    factory.contexts.push(context)
  } else {
    const contexts = factory.contexts = [context]
    let sync = true
	// forceRender 函数定义
    const forceRender = () => {
      //遍历调用每一异步组件的forceUpadate方法
      for (let i = 0, l = contexts.length; i < l; i++) {
        /**
         * 强制触发组件渲染,之所以这么做是因为 Vue 通常是数据驱动视图重新渲染,
         * 但是在整个异步组件加载过程中是没有数据发生变化的,所以通过执行 $forceUpdate 可以强制组件重新渲染一次
         */
        contexts[i].$forceUpdate() //定义在 src/core/instance/lifecycle.js 中
      }
    }
    //resolve函数定义: 异步组件加载成功时候执行,利用闭包和一个标志位保证了它包装的函数只会执行一次
    const resolve = once((res: Object | Class<Component>) => {
      // cache resolved
      //把加载结果缓存到 factory.resolved
      factory.resolved = ensureCtor(res, baseCtor)
      // invoke callbacks only if this is not a synchronous resolve
      // (async resolves are shimmed as synchronous during SSR)
      if (!sync) { //异步加载组件成功后sync设置为false
        forceRender()
      }
    })
    //reject 方法方法定义:once 包装 reject 方法,异步组件加载失败时执行,加载失败和加载超时时执行
    const reject = once(reason => {
      process.env.NODE_ENV !== 'production' && warn(
        `Failed to resolve async component: ${String(factory)}` +
        (reason ? `\nReason: ${reason}` : '')
      )
      if (isDef(factory.errorComp)) {//定义了加载错误组件,则强制渲染
        factory.error = true //设置错误标记为true,显示加载错误组件
        forceRender()
      }
    })
    /*
    开始加载组件: 执行传入组件的工厂函数,同时把 resolve 和 reject 函数作为参数传入,组件的工厂函数通常会先发送请求去加载我们的异步组件的 JS 文件,拿到组件定义的对象 res 后,执行 resolve(res) 逻辑
     */
    const res = factory(resolve, reject)

    if (isObject(res)) {
      /*使用Promise 异步组件,执行完 res = factory(resolve, reject),返回的值就是 import('./my-async-component') 的返回值,它是一个 Promise 对象
      */
      if (typeof res.then === 'function') {
        // () => Promise
        if (isUndef(factory.resolved)) {
          res.then(resolve, reject)
        }////高级异步组件执行逻辑
      } else if (isDef(res.component) && typeof res.component.then === 'function') {
        res.component.then(resolve, reject)
        /**判断 res.error 是否定义了 error 组件,如果有的话则赋值给 factory.errorComp */
        if (isDef(res.error)) {
          factory.errorComp = ensureCtor(res.error, baseCtor)
        }

        if (isDef(res.loading)) { //判断组件中是否定义Loading组件
          factory.loadingComp = ensureCtor(res.loading, baseCtor)
          if (res.delay === 0) { //没有定义延时
            factory.loading = true
          } else {
            setTimeout(() => { //延时执行
              if (isUndef(factory.resolved) && isUndef(factory.error)) {
                factory.loading = true
                forceRender()
              }
            }, res.delay || 200)
          }
        }

        if (isDef(res.timeout)) { //如果定义了timeout,并在指定时间内没有加载成功,执行reject
          setTimeout(() => {
            reject(
              process.env.NODE_ENV !== 'production'
                ? `timeout (${res.timeout}ms)`
                : null
            )
          }, res.timeout)
        }
      }
    }

    sync = false
    // return in case resolved synchronously
    return factory.loading
      ? factory.loadingComp
      : factory.resolved
  }
}

/**
 * 函数目的是为了保证能找到异步组件 JS 定义的组件对象,并且如果它是一个普通对象,
 * 则调用 Vue.extend 把它转换成一个组件的构造函数
 * @param {*} comp
 * @param {*} base
 */
function ensureCtor(comp, base) {
  return isObject(comp)
    ? base.extend(comp)
    : comp
}
递归组件
概念
- 递归组件是指在组件定义中使用组件自身的情况。
- 换句话说,一个组件的模板中包含对自身的使用。
- 递归组件通常通过使用组件的名称来实现递归,这使得组件能够在自身内部进行嵌套。
原理
- 通过在组件定义中使用组件的名称来实现递归。
- 当组件渲染时,它会检测到自身的引用,并继续递归地渲染嵌套的组件,直到达到终止条件。
- 这个过程会一直进行下去,直到渲染完整个组件树。
- 为了避免无限递归导致的堆栈溢出错误,通常需要在递归组件中设置终止条件。终止条件是一个条件判断,当满足条件时,停止递归并返回一个基本的组件或占位符。
用途
树形结构:递归组件非常适合用于展示树形结构的数据,例如评论列表、目录结构等。使用递归组件可以方便地处理不同层级的数据,并以递归的方式构建嵌套的组件结构。
动态组件:递归组件可以根据数据的层级动态地渲染组件。这使得在不同层级上使用不同的组件成为可能,从而使应用程序更加灵活和可扩展。
可伸缩性:递归组件的使用可以有效地处理未知层级的数据。无论数据有多少层级,递归组件都可以自我调用并渲染嵌套的组件,因此具有很强的可伸缩性。
示例
<template>
  <div>
    <span>{{ node.name }}</span>
    <ul>
      <li v-for="childNode in node.children" :key="childNode.id">
        <!-- 递归调用自身 -->
        <recursive-component :node="childNode" />
      </li>
    </ul>
  </div>
</template>

<script>
export default {
  name: 'RecursiveComponent',
  props: {
    node: {
      type: Object,
      required: true
    }
  }
}
</script>
RecursiveComponent是一个递归组件。它接受一个名为node的 prop,该 prop 包含了节点的数据。在模板中,它通过递归地渲染
RecursiveComponent组件来处理每个子节点,并以树形结构展示节点数据。请注意,在递归组件中,需要确保递归调用处的组件名称与当前组件的名称一致,以实现递归的效果。
实现一个动态递归组件
思路
- 动态组件是通过 Vue2 内置组件
<component />实现,通过该标签可以实现渲染任意自定义组件; - 递归组件是通过引用组件名称,递归组件自身实现:
- 通过传入参数,判断是否有子节点,有子节点,递归调用自身渲染。
以下通过内置组件 <component /> 和递归组件实现一个 BasicComponent 组件:
<template>
  <div v-if="options.comp">
    <component
      :is="typeof options.comp === 'string' ? options.comp : `${options.comp}`"
      :ref="options.ref"
      v-model="options.data"
      v-bind="options.attr"
      v-on="options.listeners || {}"
    >
      <div v-if="options.children && options.children.length !== 0">
        <BasicComponent
          v-for="(chilOpt, index) of options.children"
          :key="index"
          :options="chilOpt"
        />
      </div>
      <template v-if="options.content">
        {{ options.content }}
      </template>
    </component>
  </div>
</template>

<script>
import BasicComponent from '@/components/BasicComponent/index.vue'
export default {
  name: 'BasicComponent',
  component: {
    BasicComponent
  },
  props: {
    options: {
      type: [Object, String],
      default: function() {
        return {
          comp: null, // 组件标签
          ref: null, // 组件引用对象
          data: null, // 组件数据
          attr: null, // 组件属性
          listeners: null, // 组件监听事件
          content: null, // 组件内容
          children: [
            {
              comp: null, // 组件标签
              ref: null, // 组件引用对象
              data: null, // 组件数据
              attr: null, // 组件属性
              listeners: null, // 组件监听事件
              children: []
            }
          ]
        }
      }
    }
  },
  data() {
    return {}
  },
  created() {},
  mounted() {},
  methods: {}
}
</script>
- 该组件接收一个
options选项:
- 该选项为组件配置对象,通过该配置对象渲染递归组件。
高阶组件
概念
高阶组件(Higher-Order Component,HOC)是一种在React中用于组件复用和逻辑共享的模式。
它本质上是一个函数,接收一个组件作为参数,并返回一个新的组件。
在 Vue 的世界里,组件是一个对象,所以高阶组件就是一个函数接受一个对象,返回一个新的包装好的对象。Vue 中,高阶组件就是 f(object) -> 新的object。
特点
HOC具有以下作用和特点:
- 组件复用: HOC可以将通用的功能逻辑封装在一个函数中,并应用于多个组件。通过将公共逻辑提取到HOC中,可以避免在多个组件中重复编写相同的代码,提高了代码的复用性。
- 逻辑共享: HOC允许你在组件之间共享逻辑,例如状态管理、数据获取、认证等。你可以通过HOC将这些逻辑从组件中分离出来,并在需要的地方应用它们,以实现逻辑的共享和解耦。
- 属性代理和增强: HOC可以通过属性代理的方式,将额外的属性和功能注入到被包裹的组件中。这使得你可以修改、增强或覆盖被包裹组件的行为,以满足特定的需求。例如,你可以通过HOC向组件注入路由信息、国际化功能或其他上下文信息。
- 抽象和组合: HOC可以将组件的实现细节进行抽象,提供一个更高层次的接口。通过将不相关的实现细节封装到HOC中,你可以更专注于组件的业务逻辑,并实现组件的组合。这样,你可以构建出更复杂和可扩展的组件树。
需要注意的是,HOC本身并不是React的特性或API,而是一种基于React组合特性的设计模式。它可以用来解决一些常见的代码共享和复用问题,但在使用HOC时需要谨慎,避免滥用。滥用HOC可能导致组件关系复杂化、调试困难等问题。在使用HOC时,建议遵循一些最佳实践,如清晰的命名、避免命名冲突、遵循传递不变性等规则。
规则
- 高阶组件(
HOC)应该是无副作用的纯函数,且不应该修改原组件;- 高阶组件纯函数,它接收一个组件作为参数并返回了一个新的组件,在新组件的
render函数中仅仅渲染了被包装的组件,并没有侵入式的修改它。
- 高阶组件纯函数,它接收一个组件作为参数并返回了一个新的组件,在新组件的
- 高阶组件(
HOC)不关心你传递的数据(props)是什么,并且被包装组件不关心数据来源; - 高阶组件(
HOC)接收到的props应该透传给被包装组件:高阶组件完全可以添加、删除、修改props,但是除此之外,要将其余props透传,否则在层级较深的嵌套关系中(这是高阶组件的常见问题)将造成props阻塞。
实现
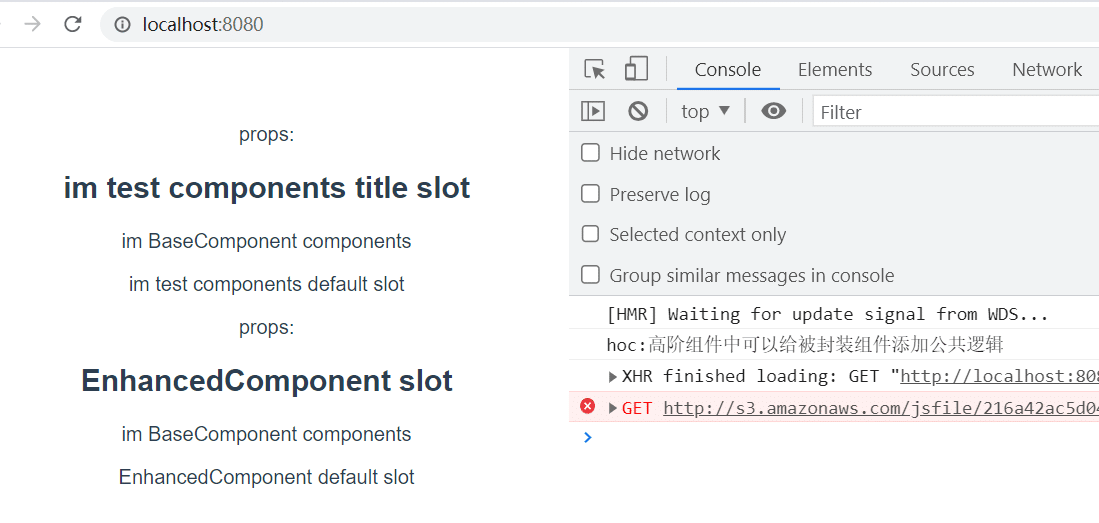
高阶组件:用于封装组件的公共逻辑组件,给所有被封装的组件添加初始化 console 打印方法。
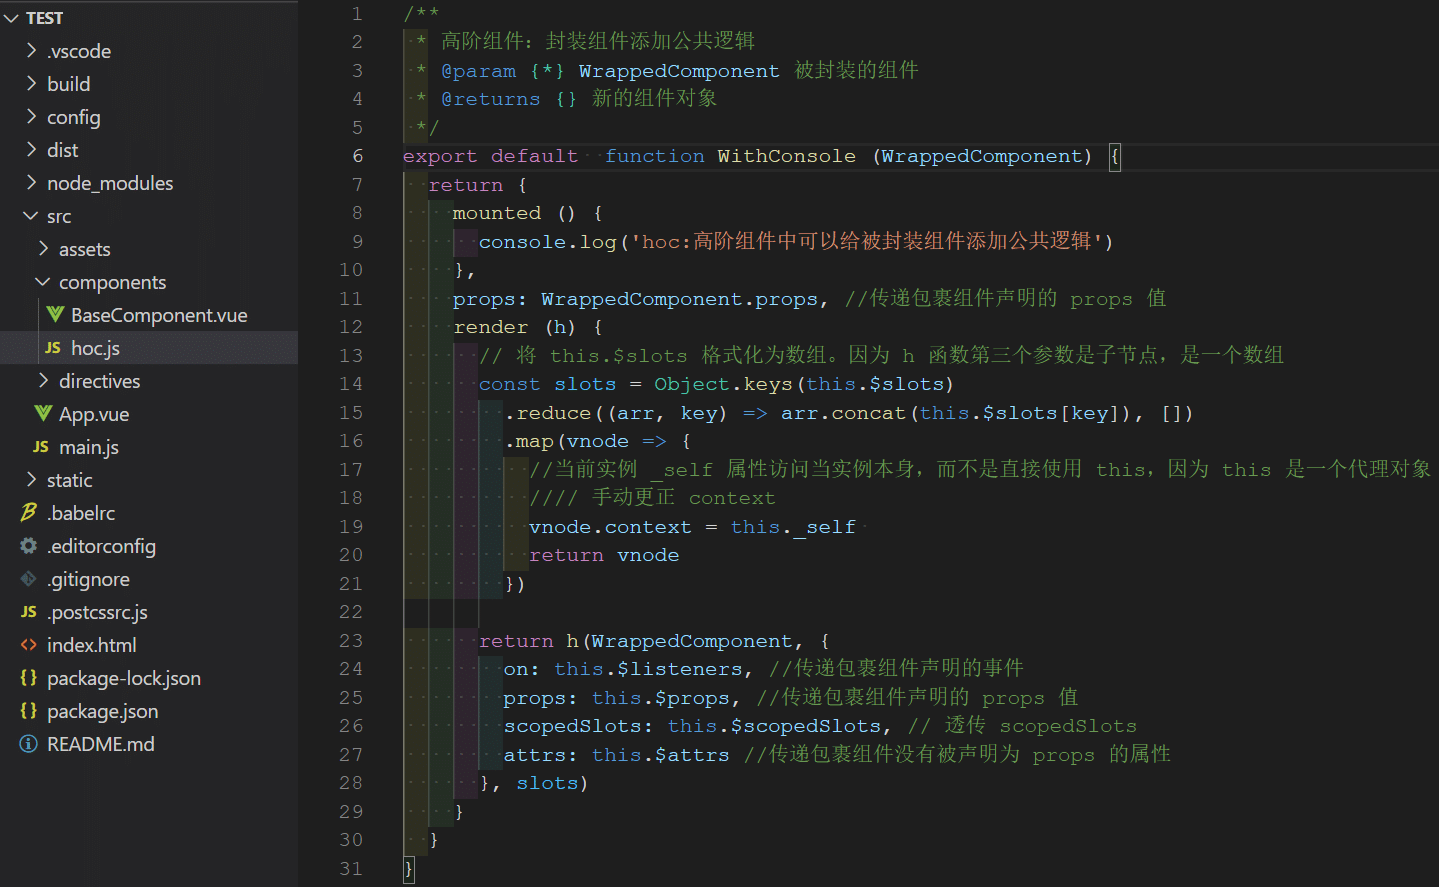
测试:
编写被包裹的组件:被封装的组件
BaseCompoent。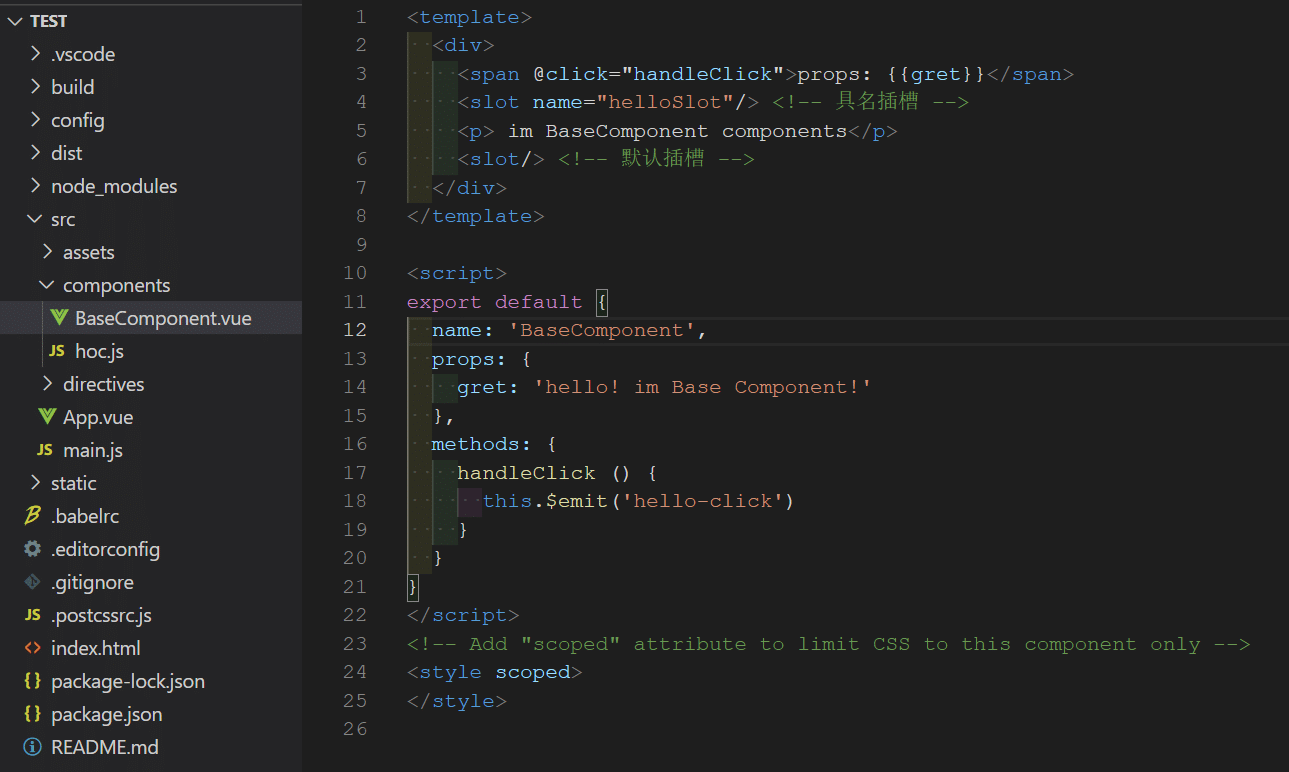
使用方式: 使用高阶组件包裹基础组件
BaseComponent生成一个新的组。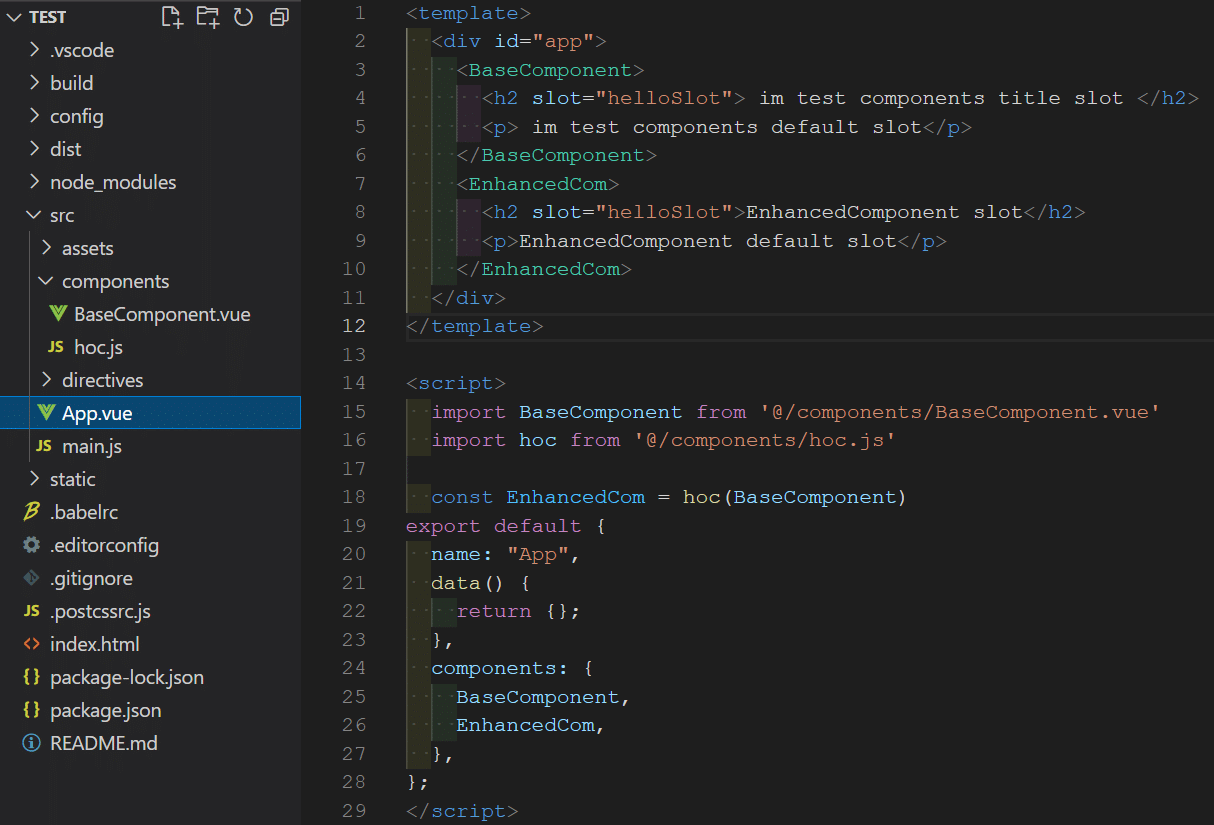
测试结果:
参考资料
高阶组件 - React Guidebook (tsejx.github.io)
命令式组件
概念
命令式组件封装是一种将功能封装在组件内部,并通过命令式的方式进行调用和控制的封装方法。
在命令式组件封装中,组件负责封装一定的功能逻辑,并提供一组接口或方法,供外部代码调用来触发和控制组件的行为。
在
element-uiMessageBox 弹框,提供了命令式调用组件方法:<template> <el-button type="text" @click="open">点击打开 Message Box</el-button> </template> <script> export default { methods: { open() { // 命令式调用弹窗组件 this.$alert('这是一段内容', '标题名称', { confirmButtonText: '确定', callback: action => { this.$message({ type: 'info', message: `action: ${ action }` }); } }); } } } </script>
为什么要用命令式组件?
- 简化组件使用方式:例如使用 在
element-uiMessageBox 弹框 组件,可以直接通过this.$alert方法调用该组件,使用简单; - 使用模板组件方式需引入组件、传入属性、监听组件事件等操作,导致简单组件使用成本高;使用命令组件可以在项目的任何页面快速使用组件。
Vue2 封装命令式组件
思路
使用
vue2插件机制,在创建 vue 实例之前,给 vue 实例对象挂载命令式组件对象,使在组件内可以使用this.$yourComponents(options)直接通过命令式调用组件;在插件中,传入
install方法,在install方法中执行实例化你的组件操作:使用
Vue.extend()实例化组件;挂载组件并将组件挂载到
dom;
下面以封装一个通用弹窗组件为基础示例
1.编写通用弹窗组件
<template>
<div class="dialog-wrapper">
<!--stop的iframe阻止submit后跳转-->
<iframe name="stop" class="none" style="display: none" />
<!--stop的iframe阻止submit后跳转 end-->
<el-dialog
ref="dialogWrapper"
v-el-drag-dialog
class="dialog-component"
:title="title"
:visible="visible"
:width="width"
:close-on-click-modal="false"
v-bind="$attrs"
v-on="$listeners"
@close="close"
>
<slot name="pre-content" />
<template slot="title">
<slot name="dialogTitle" />
</template>
<slot name="content" />
<div v-if="items.length > 0">
<el-form
:ref="formRef"
:model="data"
:label-width="labelWidth"
label-position="left"
target="stop"
:rules="rules"
>
<el-row
v-for="(row, rowIndex) in items"
:key="rowIndex"
:gutter="24"
:class="`form-row-${rowIndex}`"
>
<el-col
v-for="(item, index) in isArray(row)"
:key="index"
:span="item.span || 24 / row.length"
:class="item.colClassName"
>
<el-form-item
:key="item.label || index"
:style="item.styles"
:class="[
isRequire(item) ? 'form-item-required' : '',
!item.label ? 'hidden-form-item-label' : '',
item.className,
item.attrs && item.attrs.disabled ? 'hidden-tips' : '',
]"
:label="item.label"
:prop="item.prop"
:rules="item.rules"
:label-width="item.labelWidth || '120px'"
:name="item.prop"
>
<!--自定义插槽-->
<slot
v-if="item.type == $const.DialogCompType.slot"
:item="item"
:name="item.slotName"
/>
<!--单行输入框-->
<el-input
v-if="item.type == $const.DialogCompType.input"
v-model="data[item.prop]"
:name="item.prop"
auto-complete="on"
class="item-inputs"
:style="{ width: `${item.width}` }"
:placeholder="placeholderFormate(item)"
v-bind="item.attrs"
v-on="item.listeners"
>
<template v-if="item.slot" :slot="item.slotName">{{
item.slotContent
}}</template>
</el-input>
<!--远程搜索选择器-->
<remote-search-selector
v-if="item.type == $const.DialogCompType.remoteSearchSelector"
:init-value="data[item.prop]"
class="item-inputs"
:placeholder="placeholderFormate(item)"
v-bind="item.attrs"
:options="item.optionList"
:show-value="item.showValue"
:remote-methods="item.remoteMethod"
:style="{ width: `${item.width}` }"
v-on="item.listeners"
@valueChange="remoteSearchValueChage($event, data, item)"
/>
<!--数字输入-->
<el-input-number
v-if="item.type == $const.DialogCompType.number"
v-model="data[item.prop]"
class="item-inputs"
:style="{ width: `${item.width}` }"
:placeholder="placeholderFormate(item)"
v-bind="item.attrs"
v-on="item.listeners"
/>
<!--多行输入-->
<el-input
v-if="item.type == $const.DialogCompType.textarea"
v-model="data[item.prop]"
:name="item.prop"
auto-complete="on"
class="item-inputs"
:style="{ width: `${item.width}` }"
type="textarea"
:placeholder="placeholderFormate(item)"
v-bind="item.attrs"
autosize
v-on="item.listeners"
/>
<!--日期选择器-->
<el-date-picker
v-if="item.type == $const.DialogCompType.datePicker"
v-model="data[item.prop]"
class="item-inputs"
:type="(item.attrs && item.attrs.type) || 'date'"
:placeholder="placeholderFormate(item)"
:style="{ width: `${item.width}` }"
v-bind="item.attrs"
v-on="item.listeners"
/>
<!--日期时间选择器-->
<el-date-picker
v-if="item.type == $const.DialogCompType.dateTime"
v-model="data[item.prop]"
class="item-inputs"
type="datetime"
:placeholder="placeholderFormate(item)"
:style="{ width: `${item.width}` }"
v-bind="item.attrs"
v-on="item.listeners"
/>
<!--日期时间选择器-带标记封装组件-->
<date-picker-wrap
v-if="item.type == $const.DialogCompType.datePickerColor"
:date="data[item.prop]"
class="item-inputs"
:placeholder="placeholderFormate(item)"
:style="{ width: `${item.width}` }"
v-bind="item.attrs"
v-on="item.listeners"
/>
<!--开关-->
<el-switch
v-if="item.type == $const.DialogCompType.switch"
v-model="data[item.prop]"
v-bind="item.attrs"
v-on="item.listeners"
/>
<!--下拉菜单-->
<el-dropdown
v-if="item.type == $const.DialogCompType.dropdown"
v-bind="item.attrs"
v-on="item.listeners"
>
<el-button v-bind="item.dropdownButtonsAttrs">
{{ item.dropdownLabel }}
<i class="el-icon-arrow-down el-icon--right" />
</el-button>
<el-dropdown-menu slot="dropdown">
<el-dropdown-item
v-for="dItem in item.dropdownItem"
:key="dItem.label"
v-bind="dItem.attrs"
v-on="dItem.listeners"
>
{{ dItem.label }}
</el-dropdown-item>
</el-dropdown-menu>
</el-dropdown>
<!--普通下拉选择器-->
<SelectorWrap
v-if="item.type == $const.DialogCompType.select"
:key="item.prop"
:item="item"
:data="data"
v-bind="item.attrs"
v-on="item.listeners"
/>
<!--单选框-->
<el-radio-group
v-if="item.type == $const.DialogCompType.radio"
v-model="data[item.prop]"
class="item-inputs"
:style="{ width: `${item.width}` }"
v-bind="item.attrs"
v-on="item.listeners"
>
<el-radio
v-for="option in item.optionList"
:key="option.id || option.value"
:label="option.value"
>
{{ option.label }}
</el-radio>
</el-radio-group>
<!--滑动条-->
<el-slider
v-if="item.type == $const.DialogCompType.slider"
v-model="data[item.prop]"
class="item-inputs"
v-bind="item.attrs"
v-on="item.listeners"
/>
<!--警告-->
<el-alert
v-if="item.type == $const.DialogCompType.alert"
v-bind="item.attrs"
/>
<el-divider
v-if="item.type == $const.DialogCompType.divider"
v-bind="item.attrs"
>
<span v-if="item.tips">{{ item.tips }}</span>
</el-divider>
<!--文件上传-->
<file-upload
v-if="item.type == $const.DialogCompType.files"
class="item-inputs"
v-bind="item.attrs"
v-on="item.listeners"
/>
<!--按钮组-->
<div
v-if="item.type == $const.DialogCompType.buttons"
class="dialog-buttons"
:style="{
display: 'flex',
'justify-content': buttonsAlign[item.align] || 'flex-end',
}"
>
<el-button
v-for="but in item.buttons"
:key="but.label"
:type="but.type"
v-bind="but.attrs"
size="small"
@click="submitValidate(but.validate, but.reset, but.event)"
>
{{ but.label }}
</el-button>
</div>
<!--富文本编辑器-->
<tinymce
v-if="item.type == $const.DialogCompType.editor"
v-model="data[item.prop]"
:height="item.height"
/>
</el-form-item>
</el-col>
</el-row>
</el-form>
</div>
<slot name="after-content" />
</el-dialog>
</div>
</template>
<script>
import FileUpload from "@/components/fileUpload/index.vue";
import Tinymce from "@/components/Tinymce";
import RemoteSearchSelector from "@/components/RemoteSearchSelector";
import elDragDialog from "@/directive/el-drag-dialog"; // base on element-ui
import DatePickerWrap from "@/components/DatePickerWrap";
import SelectorWrap from "@/components/SelectorWrap";
import { placeholderFormate, eventHandler } from "@/components/FormWrap/config.js";
export default {
name: "DiallogWrap",
directives: { elDragDialog },
components: {
FileUpload,
Tinymce,
RemoteSearchSelector,
DatePickerWrap,
SelectorWrap,
},
model: {
prop: "data",
event: "change",
},
props: {
//是否使用指令式调用弹窗
isFunctional: {
type: Boolean,
default: false,
},
title: {
// title内容
type: String,
default: "对话提示",
},
visible: {
// 是否显示对话框
type: Boolean,
default: false,
},
labelWidth: {
type: String,
default: "100px",
},
width: {
type: String,
default: "500px",
},
items: {
type: Array,
default: () => {
return [];
// item 格式:
// {
// prop: '',
// itemType: '',
// label: 'label名',
// tips: '提示输入内容',
// optionList: []
// }
},
},
data: {
type: Object,
default: () => {},
},
formRef: {
type: String,
default: "dialogform",
},
// 规则
rules: {
type: Object,
default: () => {},
},
isAutoComplete: {
type: Boolean,
default: false,
},
},
data() {
return {
buttonsAlign: {
left: "flex-start",
right: "flex-end",
center: "center",
},
};
},
methods: {
// 文本提示语格式化
placeholderFormate,
eventHandler,
isArray(obj) {
if (!(obj instanceof Array)) {
return [obj];
}
return obj;
},
isRequire(item) {
if (!item.rules) return false;
if (Object.prototype.toString.call(item.rules) === "[object Array]") {
return item.rules.some((item) => item.required);
} else if (Object.prototype.toString.call(item.rules) === "[object Object]") {
return item.rules.required;
}
},
submitValidate(validate, reset, fn) {
// 表单提交按钮事件
if (validate) {
// validate为 true 表示需要验证的表单
if (this.isAutoComplete) {
this.$refs[this.formRef].$el.submit();
}
this.$refs[this.formRef].validate((valid) => {
if (valid) {
fn();
reset && this.resetForm(); // reset 为 true 表示需要重置的表单
} else {
console.log("error submit!!");
return false;
}
});
} else {
fn();
}
},
resetForm() {
this.$refs[this.formRef].resetFields();
this.$emit("update:data", {});
},
show() {
this.visible = true;
return new Promise((resolve, reject) => {
this.resolve = resolve;
this.reject = reject;
});
},
close() {
this.$emit("update:visible", false);
this.$emit("close");
this.isFunctional && this.hide();
},
//指令式调用时移除dom
hide() {
this.visible = false;
this.reject && this.reject("cancel");
document.body.removeChild(this.$el);
this.$destroy();
},
// 远程搜索内容值修改
remoteSearchValueChage(value, data, item) {
data[item.prop] = value;
this.$emit("valueChange", value);
},
},
};
</script>
<style lang="scss" scoped>
.dialog-wrapper {
&::v-deep .el-dialog__header {
border-bottom: 1px solid #f0f0f0;
}
&::v-deep .el-dialog__body {
max-height: 90vh;
overflow: auto;
}
&::v-deep .el-dialog__title {
font-weight: 600;
}
&::v-deep .el-form-item__label {
text-align: right;
background-color: #f3f3f3;
padding: 0 10px 0 0;
border-radius: 5px;
margin-right: 5px;
&::before {
content: "" !important;
}
}
&::v-deep .el-form-item {
margin-bottom: 20px;
&:last-child {
margin-bottom: 5px;
}
}
.item-inputs {
width: calc(100% - 10px) !important;
}
.dialog-buttons {
display: flex !important;
justify-content: flex-start;
margin: 0;
}
&::v-deep .el-upload__tip {
margin: 0 0 0 10px;
}
&::v-deep .file-upload-container {
width: 100%;
}
.hidden-form-item-label {
&::v-deep .el-form-item__content {
margin-left: 0 !important;
}
}
}
.form-item-required {
&::v-deep .el-form-item__label {
margin-right: 5px;
&::after {
content: "*";
color: #f56c6c;
padding-left: 4px;
}
}
}
.hidden-tips {
&::v-deep .el-form-item__error {
display: none !important;
}
}
</style>
该弹窗组件为 Form 表单通用型弹窗组件,适用于常见的后台管理系统,该组件有以下特性:
- 通过
items属性配置弹窗内表单项,通过data属性传入弹窗表单数据;
2.编写命令时弹窗插件
使用 vue2 插件机制,将弹窗实例挂载到 vue 实例中,每次调用时候,执行以下操作
- 创建弹窗组件实例
- 继承选项插槽内容
- 编译,挂载弹窗到 body
- 合并组件选项
- 显示弹窗
//引入使用 template 编写的弹窗组件
import component from './index.vue'
function install(Vue) {
    Vue.prototype.$dialogwrap = (options => {
        // 继承弹窗组件
        let Constructor = Vue.extend(component)
        // 实例化新的组件
        let instance = new Constructor()
        // 将插槽内容传递给组件
        if (options.slots) {
            instance.$slots = options.slots
        }
        // 挂载时,编译组件
        instance.$mount()
        // 将编译后组件挂载到 body 下
        document.body.appendChild(instance.$el)
        // 指令式调用时,添加 isFunctional 为 true 标识
        Object.assign(instance, options, { isFunctional: true })
        // 立即展示弹窗
        return instance.show()
    })
}

export default install
3. 全局使用命令式弹窗插件
import useDialogWrap from "@/components/DialogWrap/index.js"
export default useDialogWrap
4.使用
this.$dialogwrap({
    // 传入组件透传属性
    attrs: that.$attrs,
    // 弹窗事件
    on: {
        click: () => that.clickTest(),
    },
    //插槽内容
    slots: {
        content: ' content 插槽组件',
    },
	// 弹窗标题
    title: "测试弹窗",
    // 弹窗表单数据
    data: {
        test: "测试数据",
    },
    // 弹窗表单配置项
    items:[]
}).then((comfirm) => {
    console.log("===dialogwrap=comfirm=", comfirm);
}).catch((cancel) => {
    console.log("===dialogwrap=cancel=", cancel);
});
Vue3 封装命令式组件
基础 API
实现思路
参考资料
展示组件和容器组件
概念
在React中,展示组件(Presentational Components)和容器组件(Container Components)是一种常见的组件架构模式,用于分离组件的关注点和职责。
- 展示组件(Presentational Components): 展示组件主要关注UI的呈现和交互,通常没有自己的状态(或仅有少量的局部状态),并通过props接收数据和回调函数来进行渲染。展示组件通常是无状态函数组件或纯组件,只关注如何正确地呈现界面。
- 容器组件(Container Components): 容器组件主要关注数据的获取、状态的管理和业务逻辑的处理,它们通常包含一些展示组件,并通过props向它们传递数据和回调函数。容器组件可以拥有自己的状态,可以订阅数据源(如Redux的store)并将数据传递给展示组件。
展示组件和容器组件的分离可以帮助我们更好地组织和管理组件,提高代码的可读性、可维护性和可测试性。这种组件架构模式在React开发中被广泛采用,并与其他设计模式(如HOC、Render Props等)结合使用,以实现更灵活和可扩展的应用程序。
特点
展示组件特点:
- 专注于UI的呈现和交互。
- 通过props接收数据和回调函数。
- 通常没有自己的状态。
- 可以被多个容器组件或其他展示组件复用。
容器组件特点:
- 负责数据的获取、状态的管理和业务逻辑的处理。
- 包含一个或多个展示组件。
- 通过props向展示组件传递数据和回调函数。
- 可以有自己的状态。
为什么要分离展示组件和容器组件?
- 关注点分离: 展示组件和容器组件的分离可以帮助我们更清晰地划分关注点。展示组件专注于UI的呈现和交互,而容器组件专注于数据和逻辑处理。这样的分离可以提高代码的可读性和可维护性。
- 可复用性和可测试性: 通过将展示组件和容器组件分离,展示组件可以更容易地被复用和测试。展示组件只依赖于传入的props,使得它们可以在不同的容器组件中进行组合和复用。而容器组件可以在不同的上下文中使用,以处理不同的数据和业务逻辑。
- 单一职责原则: 分离展示组件和容器组件符合单一职责原则,每个组件只关注自己的职责。这样的组件架构更易于理解和维护,同时也有助于团队合作和代码的可扩展性。
举个栗子:
在后台管理系统的表单组件中,常常出现会遇到如下需求:
同一个列表中的新增和编辑表单,两个表单字段大体相同,既视图相同,但逻辑不同(比如:新增中存在部分禁填字段,编辑中所有字段可以编辑,存在字段逻辑关联等)
新增页面:存在部分禁止填写字段

编辑页面:所有字段都可以填写

以上两个表单页面中,存在相同的视图,不同的操作逻辑;如果将两个页面视图和逻辑写在一个组件中,就需要通过一个 if 判断条件显示当前视图,需要维护两个相同的视图模板,并且新增和编辑逻辑将混在一个组件中,通常这种写法会导致以下问题:
- 新增和编辑代码逻辑严重耦合,逻辑不清楚;
- 重复代码多,两个页面视图相同,逻辑不同,视图代码重复;
- 难于维护,在后续扩展中新增/减少字段,需要在两个视图都进行更变,并且逻辑混乱;
通过分析需求可知,两个表单组件视图相同,逻辑不同,因此我们可以通过将 逻辑和视图分离方式重新组织组件:
- 新增一个视图组件,将两个组件视图作为一个公共视图组件,如:
AddEditForm.vue; 视图组件专门渲染视图和处理公共逻辑; - 新增两个逻辑组件,新增逻辑放在
Add.vue的逻辑组件,编辑逻辑放在Edit.vue组件中;逻辑组件处理特定逻辑;
根据以上方式,创建以下文件结构:
components
├─ Add.vue  // 新增逻辑组件
├─ Edit.vue  // 编辑逻辑组件
└─ AddEditForm.vue // 新增和编辑视图组件