Vue 组件基础
Vue 组件基础
组件基础
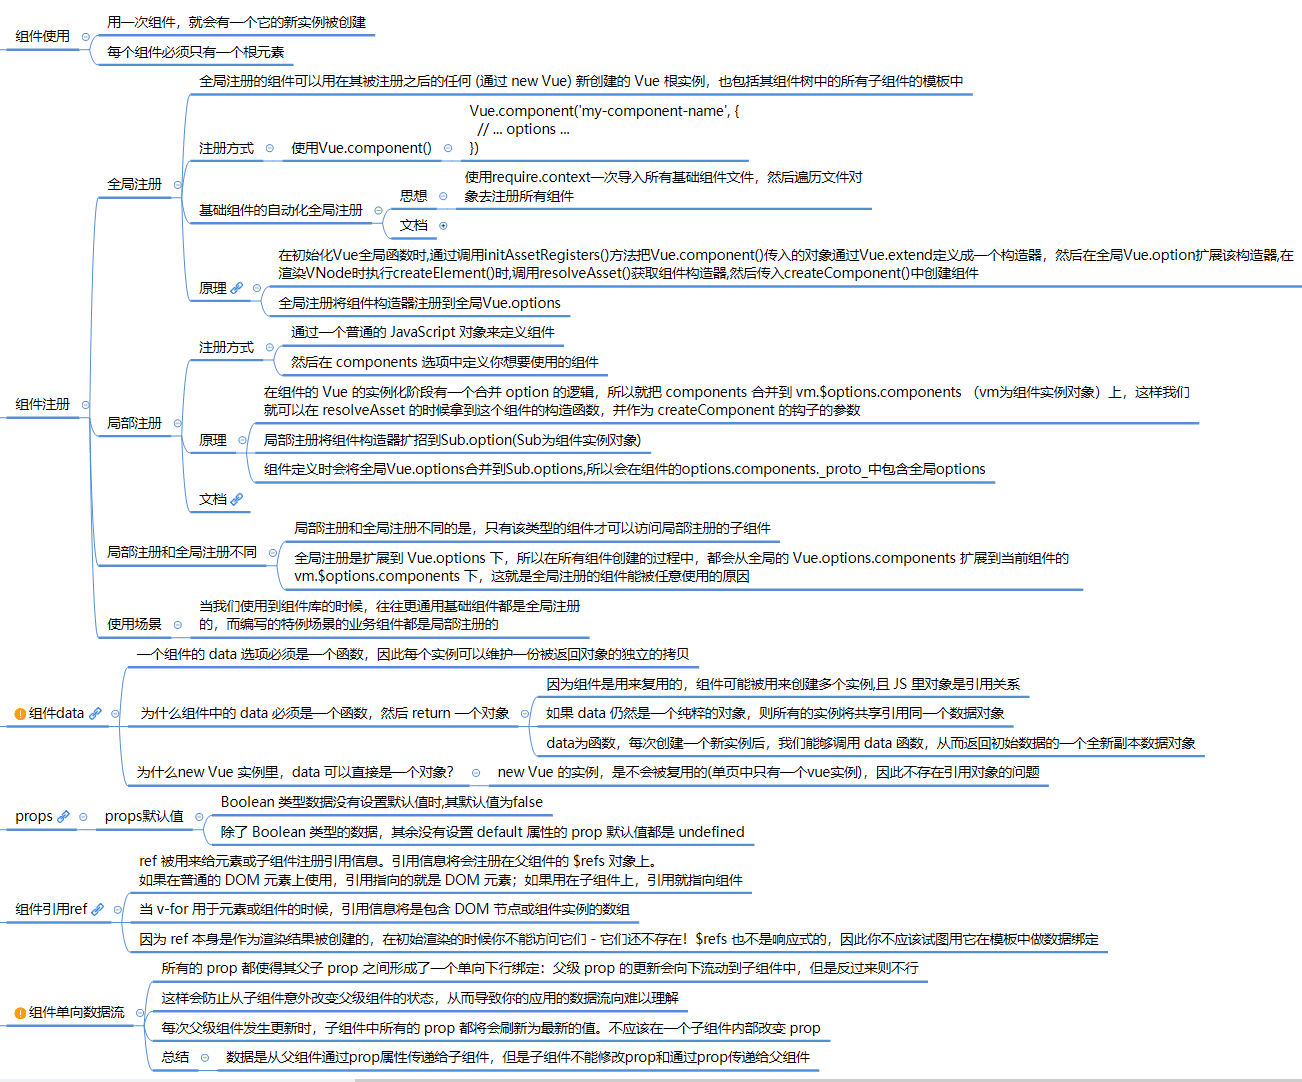
组件注册
- 组件注册有两种方式
- 全局注册:使用 Vue.component( id, [definition] )
- 局部注册
全局注册
原理:将全局注册的组件扩展到
Vue.options中,在所有组件创建的过程中,都会从全局的Vue.options.components扩展到当前组件的vm.$options.components下。要注册一个全局组件,可以使用
Vue.component(tagName, options)。例如:Vue.component('my-component', { // 选项 })Vue.component函数: 定义过程发生在最开始初始化 Vue 的全局函数的时候:import Vue from vue引入 vue ->initGlobalAPI在 Vue 上扩展的一些全局方法的定义 ->initAssetRegisters注册全局 apiinitAssetRegisters代码在src/core/global-api/assets.js中:export function initAssetRegisters (Vue: GlobalAPI) { /** * Create asset registration methods. */ ASSET_TYPES.forEach(type => { //遍历 ASSET_TYPES,得到 type 后挂载到 Vue 上 Vue[type] = function ( id: string, definition: Function | Object ): Function | Object | void { if (!definition) { return this.options[type + 's'][id] } else { /* istanbul ignore if */ if (process.env.NODE_ENV !== 'production') { if (type === 'component' && config.isReservedTag(id)) { warn( 'Do not use built-in or reserved HTML elements as component ' + 'id: ' + id ) } } if (type === 'component' && isPlainObject(definition)) { definition.name = definition.name || id //把组件转换成一个继承于 Vue 的构造函数 definition = this.options._base.extend(definition) } if (type === 'directive' && typeof definition === 'function') { definition = { bind: definition, update: definition } } //挂载到 Vue.options this.options[type + 's'][id] = definition return definition } } }) }
全局组件执行过程:在创建
vnode的过程中init()->render()->update()->_createElement()创建Vnode ->resolveAsset()解析全局组件 ->createComponent()创建组件_createElement方法中 调用resolveAsset()解析全局组件:export function _createElement ( context: Component, tag?: string | Class<Component> | Function | Object, data?: VNodeData, children?: any, normalizationType?: number ): VNode | Array<VNode> { // ... let vnode, ns if (typeof tag === 'string') { let Ctor ns = (context.$vnode && context.$vnode.ns) || config.getTagNamespace(tag) if (config.isReservedTag(tag)) { // platform built-in elements vnode = new VNode( config.parsePlatformTagName(tag), data, children, undefined, undefined, context )//调用 `resolveAsset()` 解析全局组件 } else if (isDef(Ctor = resolveAsset(context.$options, 'components', tag))) { // component vnode = createComponent(Ctor, data, context, children, tag) } else { // unknown or unlisted namespaced elements // check at runtime because it may get assigned a namespace when its // parent normalizes children vnode = new VNode( tag, data, children, undefined, undefined, context ) } } else { // direct component options / constructor vnode = createComponent(tag, data, context, children) } // ... }resolveAsset解析全局组件,定义在src/core/utils/options.js中:/** * Resolve an asset. * This function is used because child instances need access * to assets defined in its ancestor chain. * 先通过 const assets = options[type] 拿到 assets,然后再尝试拿 assets[id], * 这里有个顺序,先直接使用 id 拿,如果不存在,则把 id 变成驼峰的形式再拿, * 如果仍然不存在则在驼峰的基础上把首字母再变成大写的形式再拿,如果仍然拿不到则报错。 * 这样说明了我们在使用 Vue.component(id, definition) 全局注册组件的时候, * id 可以是连字符、驼峰或首字母大写的形式 */ export function resolveAsset ( options: Object, type: string, id: string, warnMissing?: boolean ): any { /* istanbul ignore if */ if (typeof id !== 'string') { return } /*分别用id本身、驼峰以及大写开头驼峰寻找是否存在,存在则返回,不存在则打印*/ const assets = options[type] // check local registration variations first if (hasOwn(assets, id)) return assets[id] /*转化为驼峰命名*/ const camelizedId = camelize(id) if (hasOwn(assets, camelizedId)) return assets[camelizedId] /*驼峰首字母大写*/ const PascalCaseId = capitalize(camelizedId) if (hasOwn(assets, PascalCaseId)) return assets[PascalCaseId] // fallback to prototype chain //在原型链中查找 const res = assets[id] || assets[camelizedId] || assets[PascalCaseId] if (process.env.NODE_ENV !== 'production' && warnMissing && !res) { warn( 'Failed to resolve ' + type.slice(0, -1) + ': ' + id, options ) } return res }- 通过
resolveAsset解析结果作为createComponent参数创建组件。
- 通过
局部注册
原理: 局部注册组件扩展到当前组件的
vm.$options.components下,只有当前组件可以访问。注册方法:在一个组件内部使用
components选项做组件的局部注册,例如:import HelloWorld from './components/HelloWorld' export default { components: { HelloWorld } }过程:在组件的 Vue 的实例化阶段有一个合并
option的逻辑,就把components合并到当前组件的vm.$options.components上,这样我们就可以在resolveAsset的时候拿到这个组件的构造函数,并作为createComponent的钩子的参数。
组件生命周期
流程分析
- 整体执行顺序:
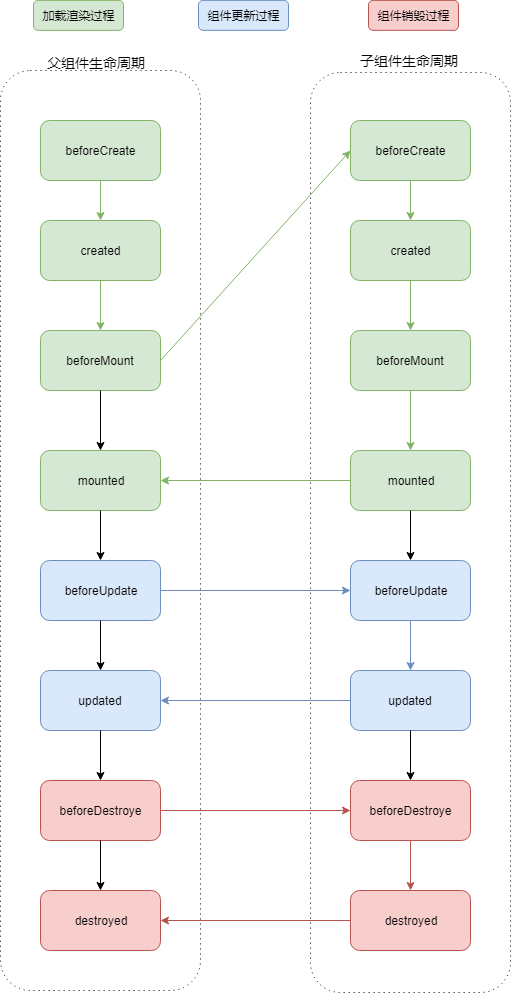
- 加载渲染过程: 父 beforeCreate -> 父 created -> 父 beforeMount -> 子 beforeCreate -> 子 created -> 子 beforeMount -> 子 mounted -> 父 mounted
- 组件更新过程: 父 beforeUpdate -> 子 beforeUpdate -> 子 updated -> 父 updated
- 销毁过程: 父 beforeDestroy -> 子 beforeDestroy -> 子 destroyed -> 父 destroyed
父组件监听到子组件的生命周期方法
方法1: 在父组件引用子组件时通过 @hook 来监听
// 父组件 Parent.vue
<Child @hook:mounted="doSomething" ></Child>
doSomething() {
   console.log('父组件监听到 mounted 钩子函数 ...');
},

//子组件  Child.vue
mounted(){
   console.log('子组件触发 mounted 钩子函数 ...');
},

//输出顺序
// 子组件触发 mounted 钩子函数 ...
// 父组件监听到 mounted 钩子函数 ...
方法2: 父组件监听到子组件生命周期事件,子组件生命周期内emit事件
// 父组件Parent.vue
<Child @mounted="doSomething"/>

// 子组件Child.vue
mounted() {
  this.$emit("mounted");
}
常见问题:
在哪个生命周期内调用异步请求?
在created、beforeMount、mounted中data 已经创建,可以将服务端端返回的数据进行赋值
在什么阶段才能访问操作DOM?
在钩子函数 mounted 被调用前,Vue 已经将编译好的模板挂载到页面上,所以在 mounted 中可以访问操作 DOM为什么beforeMount先父组件后子组件执行而mount先子组件父后组件执行?
在组件挂载过程中调用mountComponent(),mountComponent中立即调用breforeMount钩子,后调用mount钩子;
在组件的 VNode patch 到 DOM 后,会执行 invokeInsertHook 函数,把 insertedVnodeQueue(在执行createElm函数中如果发现子组件包含insert方法,则将子组件添加到insertedVnodeQueue中;在createComponent中所有子组件path完毕以后执行initComponent,在initComponent中把子组件添加到insertedVnodeQueue) 里保存的钩子函数依次执行一遍,该函数会执行 insert 这个钩子函数,每个子组件都是在这个钩子函数中执行 mounted 钩子函数,insertedVnodeQueue 的添加顺序是先子后父,所以对于同步渲染的子组件而言,mounted 钩子函数的执行顺序也是先子后父
组件通信
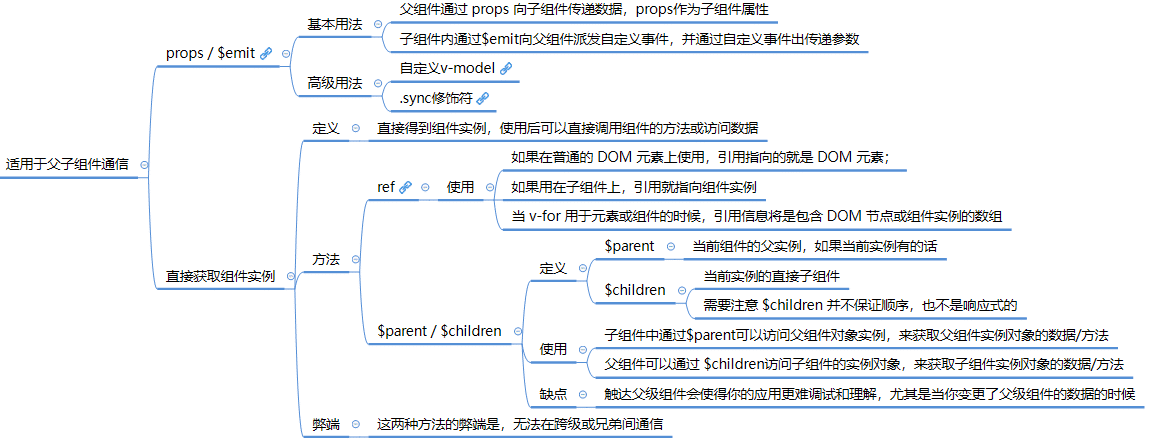
组件通信方式分类
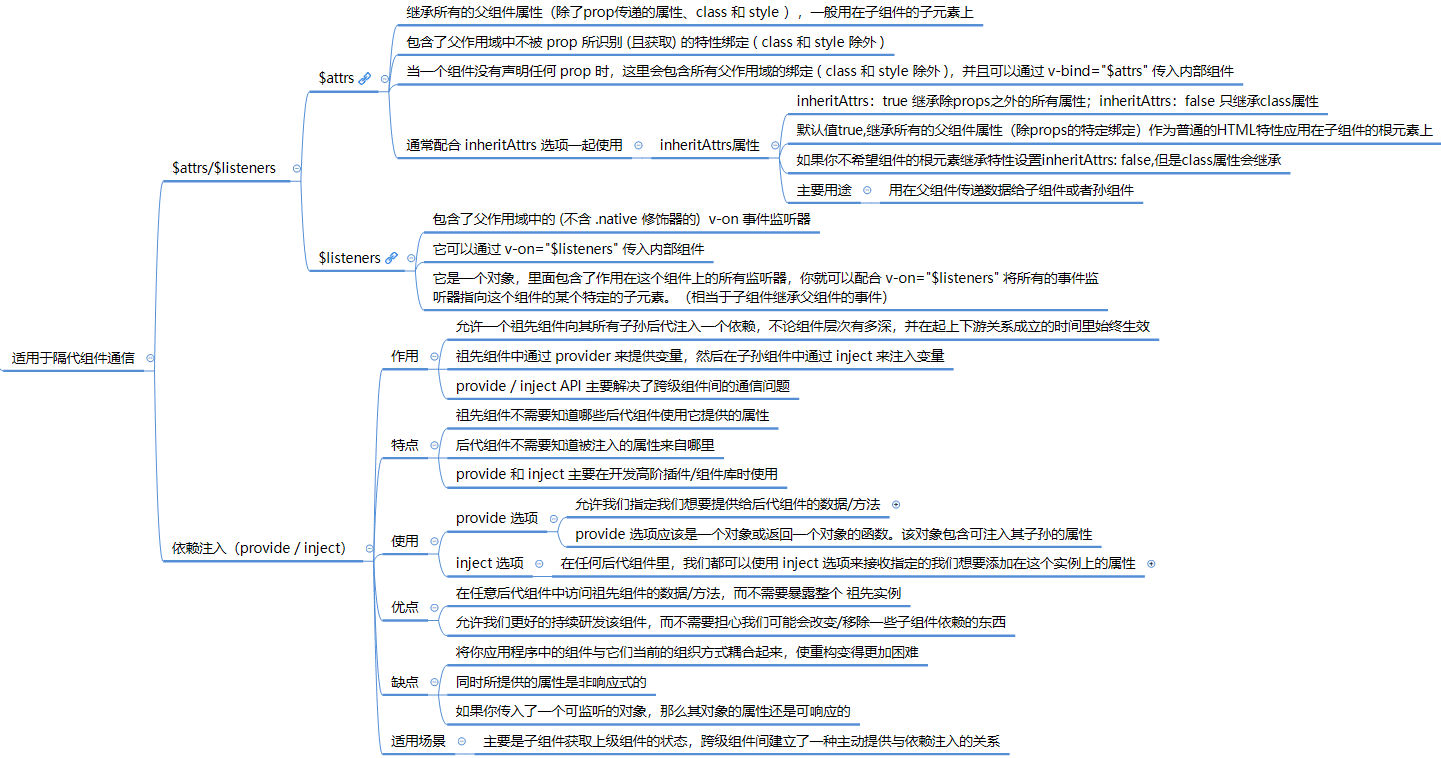

$attrs 和 $listeners 通信
vm.$attrs: 继承所有的父组件属性(除了prop传递的属性、class 和 style ), 一般用在子组件的子元素上,如第一个例子的
<input v-bind="$attrs"/>vm.$listeners: 属性,它是一个对象,里面包含了作用在这个组件上的所有监听器,你就可以配合
v-on="$listeners"将所有的事件监听器指向这个组件的某个特定的子元素。(相当于子组件继承父组件的事件)
props/$emit通信
- 父组件通过props传递数据给子组件事件并通过监听子组件事件获取子组件数据
- 子组件通过props接受父组件数据并通过$emit()触发事件并传入数据给父组件
- 查看示例
$emit/$on通信
- 这种方法通过一个空的Vue实例作为中央事件总线(事件中心),用它来触发事件和监听事件,巧妙而轻量地实现了任何组件间的通信
- 包括父子、兄弟、跨级
- 具体实现方式:
- 1.创建一个空的vue实例:var Event=new Vue()
- 2.在发送数据实例中使用:Event.$emit(事件名,数据) 发送数据
- 3.接受数据实例中使用:Event.$on(事件名,data => {}) 接数据
- 查看示例
provide / inject通信
EventBus
EventBus又称为事件总线。创建一个事件中心,相当于中转站,可以用它来传递事件和接收事 件。- 本质是通过创建一个空的 Vue 实例来作为消息传递的 对象,通信的组件引入这个实例,通信的组件通过在这个实例上监听和触发事件,来实现消息的传递。
- 如果业务逻辑复杂,很多组件之间需要同时处理一些公共的数据,这个时候采用上面这一些方法 可能不利于项目的维护,因此才需要更完善的 Vuex 作为状态管理中心,将通知的概念上升到共享状态层次。
- 参考资料:
按照父子组件通信、兄弟组件通信和隔代组件通信的分类:
父子组件通信
| 通信方式 | 说明 |
|---|---|
| Props | 父组件通过props向子组件传递数据。子组件在模板中通过声明props选项来接收父组件传递的数据。 |
| 自定义事件 | 子组件通过this.$emit('eventName', payload)触发自定义事件,父组件在模板中监听这些事件,并执行相应的处理函数。 |
| 插槽(Slots) | 父组件可以在模板中定义插槽,并在插槽中插入HTML内容,子组件则可以在其模板中引用这些插槽,实现内容的分发。 |
| attrs 和 listeners | attrs用于传递父组件中未被识别为props的attributes,listeners用于传递父组件中的事件监听器,可以通过v-bind="$attrs"和v-on="$listeners"传递给子组件。 |
兄弟组件通信
| 通信方式 | 说明 |
|---|---|
| 事件总线(Event Bus) | 创建一个新的Vue实例作为事件中心,兄弟组件通过$emit触发事件,并通过$on监听事件,实现组件间的通信。 |
| Vuex | Vuex适用于大型应用,它采用集中式存储管理应用的状态,并通过actions、mutations和getters等机制实现兄弟组件间的状态共享和通信。 |
| 状态提升 | 通过将兄弟组件之间状态提升到公共父组件中,通过公共父组件之间通信 |
隔代组件通信
| 通信方式 | 说明 |
|---|---|
| Provide / Inject | 允许祖先组件向其所有子孙组件提供一个依赖,不论组件层次有多深,该依赖都可以注入进来。这在隔代组件通信时非常有用。 |
| Vuex | Vuex同样适用于隔代组件通信,因为它管理的是全局状态,任何组件都可以访问和修改状态,实现跨组件的数据共享和通信。 |
需要注意的是,虽然Vuex通常用于大型应用中的状态管理,但它也可以用于兄弟组件和隔代组件间的通信。然而,对于简单的应用或简单的通信需求,可能不需要引入Vuex,而可以使用其他更轻量级的通信方式。
在选择通信方式时,应根据具体的应用场景和需求进行权衡和选择。
组件插槽
插槽详细介绍参考官方文档:插槽 Slots | Vue.js (vuejs.org)
此处主要介绍组件设计时使用插槽要点
设计组件时何时使用插槽?
当组件内某一部分标签不确定,或者不应该按固定标签来写死模板代码时,我们可以对不确定的位置定义一个插槽。等待调用者调用该组件的时候再把内容传入。这样,组件就更加灵活,能够适应多种不同的使用场景。
使用插槽时需要注意什么?
- 插槽内容完全取决于父组件如何使用子组件。父组件在子组件标签内添加的内容,会作为插槽的插入内容。
- Vue提供了默认插槽和具名插槽两种类型。默认插槽只有一个插入位置,而具名插槽可以有多个插入位置。使用时需根据需求选择合适的插槽类型。
- 在使用具名插槽时,父组件和子组件的插槽名必须相同,否则内容无法正确插入。
- 注意插槽的传递的数据和内容的合理性和准确性,避免因为数据错误导致插槽内容显示异常。
模板引用
模板引用详细参考文档:模板引用 | Vue.js (vuejs.org)
内置组件
<keep-alive>
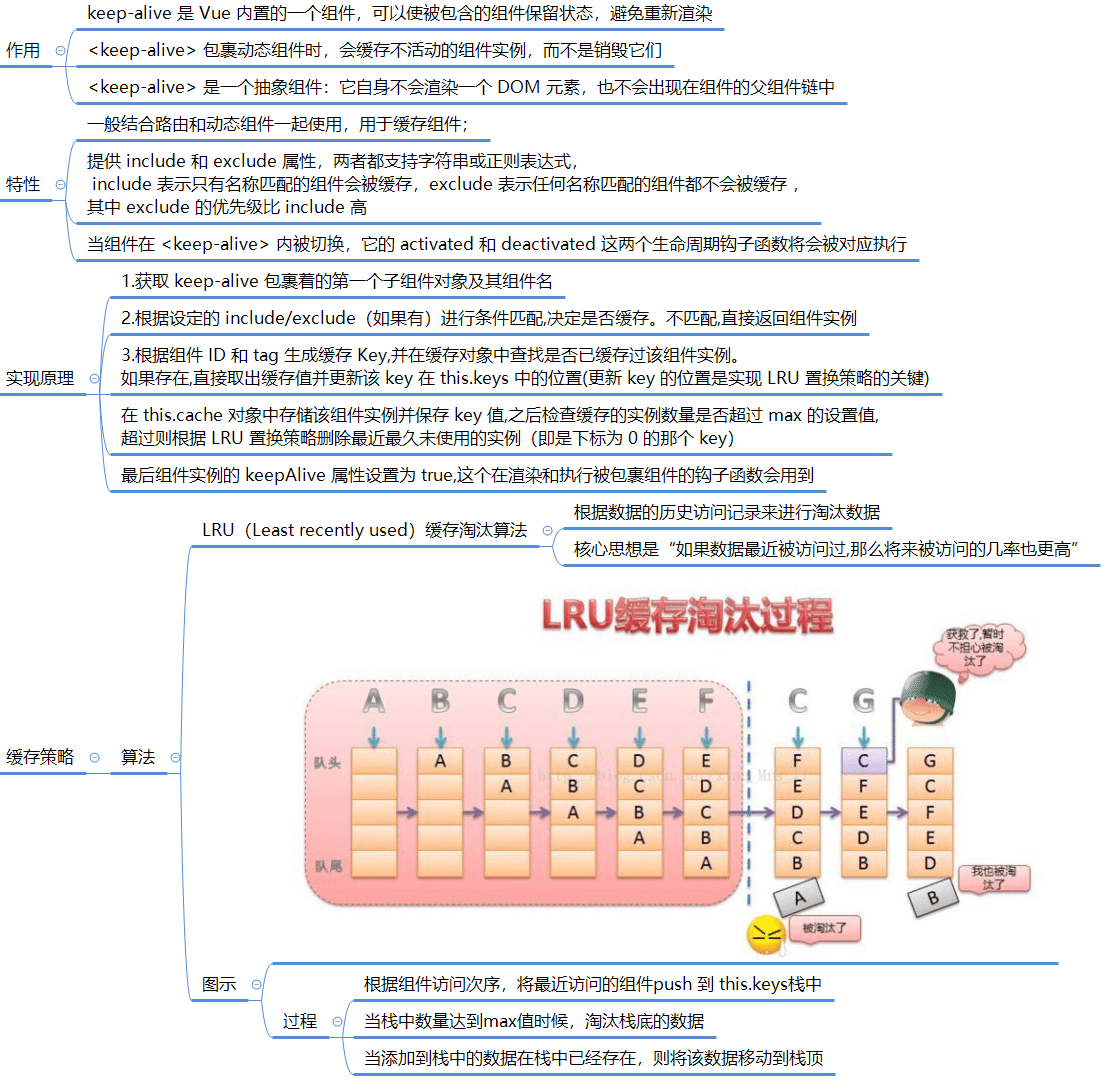
keep-alive 组件: 是一个抽象组件,它自身不会渲染一个 DOM 元素,也不会出现在组件的父组件链中
作用:
- 主要用于保留组件状态或避免重新渲染,组件实例能够被在它们第一次被创建的时候缓存下来
- 当组件在
<keep-alive>内被切换,它的activated和deactivated这两个生命周期钩子函数将会被对应执行
缓存对象:
- 缓存子组件的
vnode对象
- 缓存子组件的
Props:
include- 字符串或正则表达式。只有名称匹配的组件会被缓存。exclude- 字符串或正则表达式。任何名称匹配的组件都不会被缓存。max- 数字。定义缓存组件上限,超出上限使用LRU的策略置换缓存数据
应用场景:
- 用户在某个列表页面选择筛选条件过滤出一份数据列表,由列表页面进入数据详情页面,再返回该列表页面,我们希望:列表页面可以保留用户的筛选(或选中)状态
- 避免组件反复创建和渲染,有效提升系统性能
注意:
<keep-alive>只处理第一个子元素,所以一般和它搭配使用的有 component 动态组件或者是 router-view- 被
<keep-alive>包裹的组件在有缓存的时候就不会在执行组件的created、mounted等钩子函数 - activated 和 deactivated 钩子将会在
<keep-alive>树内的所有嵌套组件中触发
用法:
<keep-alive :include="whiteList" :exclude="blackList" :max="amount">
  <component :is="currentComponent"></component>
</keep-alive>
在vue-router中的应用
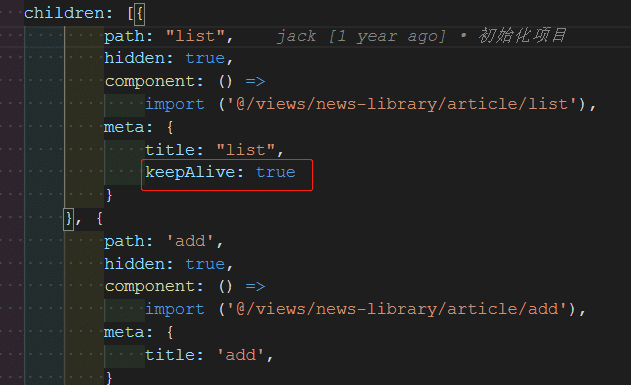
- 在需要缓存的组件中的路由配置中 meta 自定义字段 keepAlive 配置为 true
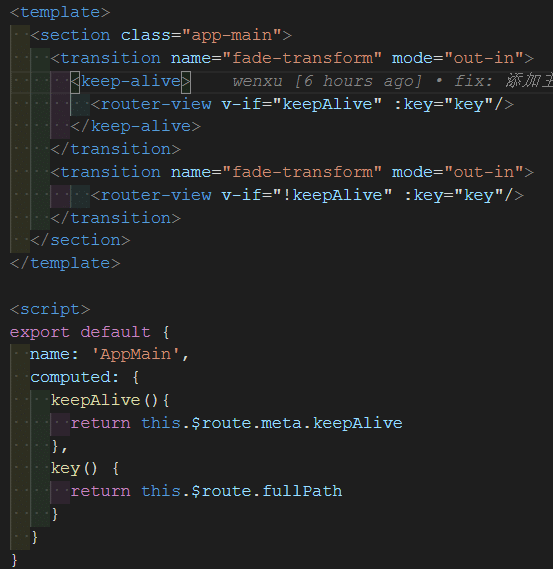
- 在路由组件中添加 keep-alive 组件,通过 this.$route.meta.keepAlive 获取当前路由中 meta 的 keepAlive 字段,通过该字段判断页面是否需要缓存
源码分析
export default {
  name: 'keep-alive,
  abstract: true,

  props: {
    include: patternTypes,
    exclude: patternTypes,
    max: [String, Number]
  },

  created () {
    this.cache = Object.create(null)
    this.keys = []
  },

  destroyed () {
    for (const key in this.cache) {
      pruneCacheEntry(this.cache, key, this.keys) //删除缓存
    }
  },

  mounted () {
 //观测 include 和 exclude 变化,当有新的组件名称加入这两个数组,则通过 pruneCache() 遍历所有缓存组件,查找缓存组件中是否包含新增加到这两个数组的组件,如果存在则在缓存剔除该组件
    this.$watch('include', val => {
     //新增组件不在 include 中,从缓存中剔除新增组件
      pruneCache(this, name => matches(val, name))
    })
    this.$watch('exclude', val => {
    // 新增组件在 exclude 中,从缓存中剔除新增组件
      pruneCache(this, name => !matches(val, name))
    })
  },

  render () {
  //注意:<keep-alive> 是用在其一个直属的子组件被开关的情形,所以<keep-alive> 只处理第一个子元素
 //一般和它搭配使用的有 component 动态组件或者是 router-view
 //由于我们也是在 <keep-alive> 标签内部写 DOM,所以可以先获取到它的默认插槽,然后再获取到它的第一个子节点
    const slot = this.$slots.default // 获取组件内默认插槽
    const vnode: VNode = getFirstComponentChild(slot) //获取插槽第一个子节点
    const componentOptions: ?VNodeComponentOptions = vnode && vnode.componentOptions
    if (componentOptions) {
      // check pattern
      const name: ?string = getComponentName(componentOptions)
      const { include, exclude } = this
      //组件名如果配置了include 且不存在于 include 或者是配置了 exclude 且匹配,那么就直接返回这个组件的 vnode
      if (
        // not included
        (include && (!name || !matches(include, name))) ||
        // excluded
        (exclude && name && matches(exclude, name))
      ) {
        return vnode
      }

      const { cache, keys } = this
      const key: ?string = vnode.key == null
        // same constructor may get registered as different local components
        // so cid alone is not enough (#3269)
        ? componentOptions.Ctor.cid + (componentOptions.tag ? `::${componentOptions.tag}` : '')
        : vnode.key
      // 以下缓存使用 LRU 最近最久未使用算法
      if (cache[key]) { //命中缓存
        vnode.componentInstance = cache[key].componentInstance
        // make current key freshest
        //重新调整了 key 的顺序放在了最后一个
        remove(keys, key)
        keys.push(key)
      } else { // 未命中缓存直接加入缓存
        cache[key] = vnode
        keys.push(key)
        // prune oldest entry
        //如果配置了 max 并且缓存的长度超过了 this.max,还要从缓存中删除第一个
        if (this.max && keys.length > parseInt(this.max)) {
          pruneCacheEntry(cache, keys[0], keys, this._vnode) //删除缓存
        }
      }

      vnode.data.keepAlive = true
    }
		return vnode || (slot && slot[0])
  }
}
缓存流程分析

相关问题
- 缓存中缓存组件的什么数据?
- 缓存中主要通过数组缓存子组件Vnode
- 缓存中缓存组件的什么数据?
<transition>
<transition>元素作为单个元素/组件的过渡效果。<transition>是抽象组件:只会把过渡效果应用到其包裹的内容上,而不会额外渲染 DOM 元素,也不会出现在可被检查的组件层级中。- 不能在抽象组件中使用
v-if和v-for指令:因为抽象组件不会渲染成 DOM 元素。 - 内置抽象组件包括:
<keep-alive>、<transition>
- 不能在抽象组件中使用
<transition>组件是只能包裹一个子节点。Vue 的过渡实现分为以下几个步骤:
- 自动嗅探目标元素是否应用了 CSS 过渡或动画,如果是,在恰当的时机添加/删除 CSS 类名。
- 如果过渡组件提供了 JavaScript 钩子函数,这些钩子函数将在恰当的时机被调用。
- 如果没有找到 JavaScript 钩子并且也没有检测到 CSS 过渡/动画,DOM 操作 (插入/删除) 在下一帧中立即执行。
所以真正执行动画的是我们写的 CSS 或者是 JavaScript 钩子函数,而 Vue 的
<transition>只是帮我们很好地管理了这些 CSS 的添加/删除,以及钩子函数的执行时机。<transition>的定义在src/platforms/web/runtime/component/transtion.js中,之所以在这里定义,是因为<transition>组件是 web 平台独有的:export default { name: 'transition', props: transitionProps, abstract: true, render (h: Function) { //从默认插槽中获取 <transition> 包裹的子节点 let children: any = this.$slots.default if (!children) {//子节点的长度,如果长度为 0,则直接返回 return } // filter out text nodes (possible whitespaces) children = children.filter((c: VNode) => c.tag || isAsyncPlaceholder(c)) /* istanbul ignore if */ if (!children.length) {//子节点的长度,如果长度为 0,则直接返回 return } // warn multiple elements //如果大于 1,也会在开发环境报警告,因为 <transition> 组件是只能包裹一个子节点的。 if (process.env.NODE_ENV !== 'production' && children.length > 1) { warn( '<transition> can only be used on a single element. Use ' + '<transition-group> for lists.', this.$parent ) } const mode: string = this.mode // warn invalid mode //过渡组件的对 mode 的支持只有 2 种,in-out 或者是 out-in if (process.env.NODE_ENV !== 'production' && mode && mode !== 'in-out' && mode !== 'out-in' ) { warn( 'invalid <transition> mode: ' + mode, this.$parent ) } //rawChild 就是第一个子节点 vnode const rawChild: VNode = children[0] // if this is a component root node and the component's // parent container node also has transition, skip. //当前 <transition> 如果是组件根节点并且外面包裹该组件的容器也是 <transition> 的时候要跳过 if (hasParentTransition(this.$vnode)) { return rawChild } // apply transition data to child // use getRealChild() to ignore abstract components e.g. keep-alive //getRealChild 的目的是获取组件的非抽象子节点,因为 <transition> 很可能会包裹一个 keep-alive //getRealChild 会递归找到第一个非抽象组件的 vnode 并返回 const child: ?VNode = getRealChild(rawChild) /* istanbul ignore if */ if (!child) { return rawChild } if (this._leaving) { return placeholder(h, rawChild) } // ensure a key that is unique to the vnode type and to this transition // component instance. This key will be used to remove pending leaving nodes // during entering. const id: string = `__transition-${this._uid}-` child.key = child.key == null ? child.isComment ? id + 'comment' : id + child.tag : isPrimitive(child.key) ? (String(child.key).indexOf(id) === 0 ? child.key : id + child.key) : child.key //从当前通过 extractTransitionData 组件实例上提取出过渡所需要的数据 const data: Object = (child.data || (child.data = {})).transition = extractTransitionData(this) const oldRawChild: VNode = this._vnode const oldChild: VNode = getRealChild(oldRawChild) // mark v-show // so that the transition module can hand over the control to the directive if (child.data.directives && child.data.directives.some(d => d.name === 'show')) { child.data.show = true } if ( oldChild && oldChild.data && !isSameChild(child, oldChild) && !isAsyncPlaceholder(oldChild) && // #6687 component root is a comment node !(oldChild.componentInstance && oldChild.componentInstance._vnode.isComment) ) { // replace old child transition data with fresh one // important for dynamic transitions! const oldData: Object = oldChild.data.transition = extend({}, data) // handle transition mode if (mode === 'out-in') { // return placeholder node and queue update when leave finishes this._leaving = true mergeVNodeHook(oldData, 'afterLeave', () => { this._leaving = false this.$forceUpdate() }) return placeholder(h, rawChild) } else if (mode === 'in-out') { if (isAsyncPlaceholder(child)) { return oldRawChild } let delayedLeave const performLeave = () => { delayedLeave() } mergeVNodeHook(data, 'afterEnter', performLeave) mergeVNodeHook(data, 'enterCancelled', performLeave) mergeVNodeHook(oldData, 'delayLeave', leave => { delayedLeave = leave }) } } return rawChild } }
扩展组件方式
扩展 Vue 组件方式: